There's no permeable paving for residential use. Those permeable concrete and asphalt are ugly and hard to install. Usual permeable paving for the home are stone (or similar material) slabs, relying on the gaps between stones to drain water.
Why you want permeable paving? The big issue is to prevent urban runoff, with the rain and storm carrying dirt into the ocean. Soil around your home absorbs the excess water, and then release it up on sunny days.
But for the home owner, leveling a pavement is the big issue. That's impossible if you pave an old path or area with things there at different levels over the years. I tried to lay the stone directly on grass and let the grass die and let the stones sink a bit into the soil at different degrees. If your pavement or patio is not perfectly level (with a few degrees off to drain water), water puddles can form every time after rain or washing.
For home paving, you make a level bed of rocks and sand, then add the top layer of stones, brick or other slabs. Finally you fill the gaps with something.
I'm using like thin tiles of stone modules hold in place in a plastic grid. The untended side effect is that it can go up and down to fit my irregular base. With some modifications it would be a pleasure to install. Though you still need a good base. Sadly, the current design is unpopular because of a few flaws. I managed to get it cents for dollars.
Permeable gap fillers are aggregates of stone fragments or sand. If you don't fill it it will be filled with soil or dirt. The problem is that you can't brush it, you can't hose it. And if you don't fill it, insects such as ants like it very much.
Other ways to fill the gaps are more like mortars. The popular way is to use polymeric sand, easy to apply and some retains it's soft sealing property. But they are not permeable. I found about two permeable types on the web, but only available in Europe or commercially.
Modern mortars are impermeable, they will make sure of it to prevent water seeping into the whatever base.
My perfect permeable mortar is lime and sand mix, which is actually used for old buildings. Here it is:
1 cup water
2 cup Type S hydrated lime (~$14 / 50 lb)
2 cup washed plaster sand (~$3 / 50 lb)
Type S hydrated lime is the most common lime you can get from building material suppliers, except for the home improvement hardware stores because they don't think people will mix their own mortar. Any hydrated lime will do but you ,may have to vary the ratios. Standard lime allows the builders to mix consistence mortars.
Any sand will do but beware that if they are not properly graded (filtered), any large particle will block your grout bad tip, and you have no easy to unblock it but to empty your whole bag. Sea salt will affect the long term chemical reaction of lime reverting to lime stone, but you probably don't really need that. Play sand is probably OK - washed and safe to play on. Paving sand will not be OK because my grout bag was blocked.
The exact ratio is not critical. The above amount will give you mortar for some 10 sq ft of 5 mm shallow gaps. Add 1 cup of water to 2 cup of lime will give you a soft paste that will not drip. Without sand the lime will be very soft. More sand the finish will be rougher, may be stronger and may be more permeable.
Features
The mix is brilliant white. The color of sand is immaterial unless you have a very high proportion of it.
The lime sand mix is soft. You can crack it with your finger nails. But you can brush it or hose it without anything noticeable falling off. That's a big advantage over any aggregates. Even if you brush a little lime (and a little sand) off the surface, it just lime stone and sand, perfectly environment friendly.
The lime sand mortar is strong enough to glue lose stone or fragments into position.
I cannot guarantee that the mortar is permeable. But for me it's highly permeable. The mortar do not have strong adhesive properties attached to the stone, and pure lime shrinks a lot when dry leaving a lot of tiny cracks. As a result I tend to create a lot of tiny cracks during the filling process. They look beautiful with my natural stones anyway. If you use pure lime with little sand, the minute cracks due to shrinking when dry will certain be highly permeable. The other extreme is to use very little lime so basically it's all sand so it must be permeable.
Procedure
You have to use a grout bag, like apply cream to a cake. Lime will stain everything brilliant translucent white. Lime is soft and the stain will eventually fall off but fine dust takes time.
For 5mm gaps or larger, the tip of the bag should go inside the gap and you should fill the gap without the mortar overflowing out of the gap.
Then use a pointing knife to "point" the mortar. It's basically a sharp object to smooth out the mortar. If no mortar overflow outside the gap, you are done. Or you have to remove the excess mortar with a putty knife, which is like a pizza server, or anything with a thin strong edge. Excess mortar will stain the edge with a white haze. It doesn't look bad and it will wear off with time.
You should let the pavement from sun and rain for a couple of hours or days. The proper way is to keep it moist under a wet blanket. I don't do any of these, which defeats the purpose of easiness. The mixture dries out in a few hours at most, and good enough to brush and rinse the next day for certain. The carbonate process is a long term process.
Unused mortar dries very slowly with a lid on. You can do a little bit everyday or every weekend. The tools are easily washed clean with water. There's no environment impact because it's lime stone and sand. I pour the used water into other parts of the permeable pavement.
Hydrated lime is very alkaline before turning back into lime stone with carbon dioxide in the air. The lime is fine as dust. Maybe for this reason the package says there are cancer causing agents. I doubt if they have to add any chemical to lime.
Friday, June 25, 2010
Wednesday, June 23, 2010
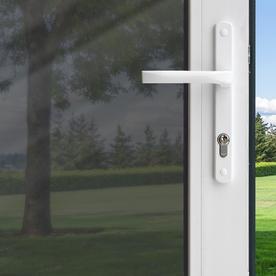
GILA Mirrored Privacy Window Film
 I recommend it because it's cheap for 3' x 15', and looks good too. However, there's a lot of if's and but's. The Lowes review system is pretty useless. So here it is.
Privacy
First of all, the privacy is not absolute, and varies depending on time of the day. To understand how it works, a piece of glass reflect a small fraction of the incoming light and let others through. With the film on, the incoming light is reduced to some 15% (check), and the reflection is increased to 85% (assuming no absorption).
So on the outside of the house you see two light sources. A 85% reflection of yourself, and 15% of whatever source from inside the house. The brighter the outside, the stronger the reflection of yourself and the less you can see inside. In day time even without bright sunlight, you can hardly see inside even when you are a few feet from the window.
After dark outdoors, you don't see any reflection of yourself at all. All you see is the indoor lighting, reduced to 15%. Although dim, you can see clearly how many people are there and what they are doing. In addition, people indoors don't see anything outside at all. All they see is a beautiful reflection of the living room or wherever they are in. They can't see even if someone is right outside the window.
It's not for you if you want absolute privacy at night. But it's wrong to say there's no privacy. The indoor lights is reduced to 15% and that's an improvement, thought not very useful. For me there will not be visitors and door to door salesmen at night and any pediatricians then will be far away from the windows.
Appearance
It really looks like that from the outside as in the picture even if your installation is not perfect. Of course it depends on how good looking is your environment. It's hard to see the flaws when you are at the outside. Unless you have huge windows like that, other people from afar will not easily notice that it's a mirror, because the reflections will be other parts of the external architecture, the sky, and trees. Even normal glass will reflect a lot in bright sunlight.
Looking indoors you see a beautiful reflection of your room at night. Your room will be brighter and hence another energy saving advantage. In daytime you can see the flaws of your installation if you are a few feet away or closer. Form afar the windows looked like it has dark stinted glass instead of plain glass with film on.
From indoors you can see the about 2mm gap that the film does not cover. It's a bit like a dark stain glass with unstained, polished edge as in some mirrors. Clear films do not have this feature. It can look good inside architecturally in bright sunlight. It's likely that your first installation do not have perfect straight edges and perfect corners. But you won't notice it if you are a few feet away. And if that imperfection bugs you, don't put it on a window you sit next to all the time.
Energy saving applications
I would put the film on all windows wherever I can. It's a pretty good cooler in summer and has official ratings to prove it. Clear energy saving films are more expensive. Check that some films are not desirable for double glazing.
Blinds and curtains do not have the energy saving efficiency of the film against the sun.
Blinds/curtains/shutter replacement
With this film blinds will not be necessary in many windows. I believe UV light is filtered by the film so furniture are safe. This film is like a sun glass so no more glares when you are working next to the windows.
It's suitable for a TV room, unless you often close all the blinds and curtains in daytime. At night it's a mirror indoors so you won't be disrupted by a passing car (likely).
It's great for architectural windows like arch windows, where blinds are impossible, curtains are awkward. The only decent way to "close" arch windows is to use custom arched shutters. Imagine the expenses compared to a piece of film. With the film on, you can sleep in day time or wake up late with must less disruption by sunlight. It's like sleeping on a dull rainy day, which makes you sleepy anyway.
Window that I will not use on
I will not use the film on windows that have a great view. The view is improved by the film with bright sunlight, due to the anti-glare effect. On rainy cloudy dull days, the effect is marginal. The view certainly get worse as the light reduces from evening to night.
If you have a sunny climate, the glass patio door is probably OK if you don't have a far view from there, and you don't have fancy flood lights in the yard at night.
Installation
Installation isn't at all difficult if you do not need perfection. If it's an arch window near the ceiling no one will ever notice.
The films are on for a few months now. I did a rather poor job but the films stay on mostly like part of the glass, not like a film on glass. Even when the film is scratched by a sharp object, it looks like the glass get scratched. The edges and corners do not peel off by itself. Actually the edges and corners got better when all the moisture are driven out, sticking to the glass perfectly.
If you follow the instructions, tiny bubbles are not noticeable, and big ones are rare. Small bubbles are more noticeable at night, but the effect is like ancient bronze mirrors with imperfect flat surface.
Tips and procedures
The window glass must be free of deposits especially at the edges and corners. For problem areas in old windows I use CLR cleaner, the biodegradable version, which is as acidic as it can be safe. I use a putty knife to scrap off the stains and deposits. They I rinse or wipe off the window with clean water. It's also important to clean the outside of the window to the same degree if possible. If both sides of the window is clean, you can see the imperfection when you are installing the film and then correct it before it's too late.
Pick small windows nearest to the ceiling to practice first. Anything larger than 2'x3' become non trivial to handle. When you work on the lower windows later on, the fluids will not drip on the installed windows.
Do not leave 1" margins for the films as the instruction says. For small glass panels like part of a mosaic, cutting to exact size (with gaps) is possible and easier way to install.
The rule of thumb is to cover the glass panel plus a few mm of edge for the cutting tools to work. The nominal margin to leave depends on how accurate you can cut. You leave large margins if you are not sure how square you can cut. There's no penalty to leave large margins, but it would be very inconvenient to work on a small, deeply recessed window.
Large windows do not make a lot of difference but you need two people to handle the film before it's in place. For one person, I hang the film on the two supporting arms of a shelf with miniature clips. Then I peel the film and spray the GILA soapy solution on it as I go along. With enough soapy solution the film will stay straight. If it's not too large I can carry the film myself and paste it on the window.
I will use a clean edge straight from the factory, cutting three edges instead of four, unless you will notice the slight variation of the gap.
Don't worry too much about tiny bubbles. You won't notice them that much.
The only way to cut is a single strong cut splitting the film in one go, without ever lifting the knife from the film. It's not possible at the corners. You have to learn to use the slots in the tool to cut the corners, then turn the tool around so you can continue the cut right down to the next corner without lifting the knife. Basically start the cut at a corner and continue in a clockwise or anticlockwise sequence. Don't cut the adjacent edges first and then the corner, or vice versa.
Actually the tool is rather reasonable if you at least try as I suggest. The alternative of cutting to exact size is out of the question for most. You need to have a big cutting board that also holds the curling film steady during cutting.
Tuesday, June 15, 2010
Paving joint / gap filler / mortar
I chose a paving system that allow non-level uneven surface. It was uneven beautiful. I assumed to fill the gaps with sand, but soon find out that you will have sand all over the place all the time. Wind and rain and runoff can move the sand. You can't clean the pavement with high pressure jets or strong brushes, or you will have to collect a lot of sand as waste and replace the sand in the gaps.
If you do not fill the gaps, it will be filed with garden waste and soil. It's the same story when you try to hose it or brush it. And if you don't fill it, it's a heaven for insects especially ants.
My problem is, the pavement must drain a lot of water. It's on the bottom of a large slope. Even without the slope, my pavement will collect water here and there because it was not level nor even.
All fillers and mortar are sealants, non permeable. One exception is Ecofil from UK, and Rompox from Germany, but not available anywhere else. There are permeable concrete and asphalt, but even if they are available in gap filler form, they are ugly.
I stumbled upon lime, hydrated lime. You can find a 50lb bag in building materials / landscaping supplies stores for less than $15. It's not in the big chain hardware stores because it's for custom mix of mortar.
Hydrated lime is like white flour. It will turn back to limestone gradually, reacting with carbon dioxide in the air. The proper way is to add enough water to completely hydrate the lime into a putty form. When the water dries the lime will "set" like a mortar, though complete setting will takes years when the lime all turn into limestone. Lime is vapor and moisture permeate. It can drain water fast if sufficient channels are formed.
Round 1: dry brush fill
I applied the lime like sand or polymeric sand. I brushed it in when dry. Then I added water. It doesn't work. Unless added slowly, water rinse away the lime. And when the lime absorbed enough water, it shrinks a lot, leaving large gaps in the joints.
No harm done. Lime is just limestone, caulk, calcium hydroxide. It's totally organic or natural but the bag carries cancer warning. I suppose you shouldn't breath in the dust, and an active, highly alkaline chemical will do some harm. And lime is easy to clean. It's soft and do not adhere to stone strongly. You can just scrub off the surplus lime even when set.
Round 2: pure lime mortar
It's obvious you have to apply lime already wet. So I mix lime powder with water. You have to add a lot of lime to water to get it into a thick paste. Mine wasn't thick enough but a paste nevertheless. I applied with a putty knife.
The good thing is, it sets into a brilliant white joint. Somehow broken stones are glued together.
The bad thing is that it shrinks a lot when dry, creating a lot of cracks. If you push the joint with your finger, part of it will break from the rest and settle more into the gap.
All is not that bad. The cracks look beautiful. They drain water fast.
Round 3: lime and sand mortar
Actually this is standard for repairing historical buildings, which used permeable lime rather than impermeable cement. The mix ratio for me is academic. I can use a lot of sand, as long as the sand are glued together and not blown away by wind or brushed away easily. The lime paste has to be thick enough to stay on the putty knife.
I am supposed to use washed sand so as not to affect the chemical reaction. But imperfection with cracks is always desired. I wanted very coarse sand up to half of 5mm (the gap size) for good drainage. I ended up using the base sand for paving, as I got it in the yard.
The paste seemed to be a lot thicker with sand thrown in. It feels like a mortar and looks like a mortar with a little grey color.
There are still cracks, but a lot smaller, which is a good thing. I think the cracks can be controlled by the thickness of the lime putty. The more lime content the less it will shrink and the smaller the cracks. The full result isn't available yet.
The bad thing is that it's difficult to clean up the paving stone. Walking on it will certainly clean up the excess dry mortar, but it takes a long time. I thought of applying the mix like a caulk gun. Then I just point the mix and there will be no mess. Interestingly there is such a thing as a fillable caulk tube. It's only about $3 each but it's only available over the internet.
Then I think of using my wife's cake making bag. Surprisingly, there is such a thing as a grout bag. It's available on some hardware stores too.
Monday, June 7, 2010
Cleaning plumbing snake
I used everything to open the blocked drain in my kitchen. The clog is far from the U shaped trap under the sink. You have to understand that why restaurants need to use a grease trap. The blockage happens repeatedly at about 20 ft from the sink.
Everything works, but have their limits. Sulfuric acid openers are most powerful. But some say that they push the block further and further away from the sink. This seems to be true for my case. But the main problem is that if you pour a bottle of acid down 20 ft of 2in pipes, there's nothing much of it left to do the job. I already pour the acid down bypassing the U-trap. The trap itself holds about half the bottle. Also I left the acid overnight instead of 15 minutes. They are supposed to be safe if used as directed. I'm not sure for overnight.
The safe and effective alternative is gel. It's not supposed to be diluted by water. So the same amount that your pour down will get there, eventually. It works and I am happy to leave it overnight. But I have to pour 128 oz of strong gel down there.
Exploding bladder using water pressure is a good one. But it's messy and the blockage will come back soon if you do not do something else. But it's chemical free and it's free.
I used the plumbing snake once. It worked but I don't understand what's the problem. Because the tip of the snake captured some grease solid. I hate to clean it up and left it in a corner of the yard to rot. It did rot.
Now I understand that the whole 2" tube is deposited by grease solid, leaving a tiny passage for water. Therefore it clogs frequently and slow drain most of the other times. There's no way you can clear that up using chemicals down 20 ft of pipe.
Snake seems to be the only option now. And if recurring slow drain is your problem, you should not waste time on other methods.
A hand held snake using electric drill cost less than 3 bottle of sulfuric acid or gel. That's a bargain in my case.
Now I understand that the snake is corrosion resistant, but you need to oil it to prevent corrosion.
The problem is to clean it before oiling it.
Mine is a common cheap one. The important point is that it can be easily pry open so you can take out the snake to clean and put it back easily. There's almost no metal part except for the drill connector. It's isolated from the inside of the casing so you can keep it absolutely dry if you want. So you can wash the plastic casing in degreaser.
The snake itself is a terrible thing to clean. It's not just the foul smell. It's the grease accumulated on the pipe that got trapped into the snake instead. Of course you do not need to clean it. But then where do you store it? I have a garage but you don't it to smell of foul grease for days. You can store it outdoors but it would easily rot if you do not treat it well.
Degreaser doesn't do a thing on the snake. Not unless you polish the snake with a cloth repeatedly.
I had the idea to use brake cleaner. It's like a dust blower for computers but with solvent. It's a aerosol spray with tube, dries very quickly leaving no residue. It works pretty good depending how much you spray on the snake. A whole bottle only cost a few dollars. The best part is that I do not need to touch anything, except wiping the dirt off with a disposal rag towel.
The bad part - it's a cancer causing aerosol. Nowadays they contain no CFC and none of the more harmful chemicals. But it's still cancer causing (what isn't?). But if you do not inhale the vapour, there's shouldn't be any harm done to you. I do it in the yard stretching the snake on a foot path. When I have to breath I run away to the other side of the house.
There are other aerosols that may be safer. But the brake cleaner dries very fast without residues.
When it's dry I'll add WD40 to oil it. WD40 isn't a proper lubricant. It got some cleaning properties as well. But it's pretty safe - at least non cancer causing. It sort of "dries" fast but the smell lingers. I hang the snake over the swings until the smell is gone. Then I put it back into the casing ready for next time.
Friday, June 4, 2010
Using economic trash bags on trash carts
The trash carts for machine collection is usually a lot bigger than you normally need. Trash bags of that size are usually for thick enough for heavy duty jobs. Therefore those bags are way more expensive than what you get for your kitchen at Target.
I made an wooden frame adapter so my trash cart can use a smaller bag. The problem is that it's too good in securing the bags. You have to rip off the corner of the bag to remove the frame before you push the cart out for collection.
That was before I discovered those miniature metals clips, 50 for a few dollars. The plastic bags I use are deep enough for the cart, but the opening is not wide enough. So I just need to use 4 clips to hold the four corners of the bag to cover part of the cart opening. It's simpler than it sounds. It's pretty fast to do so. For the same bag, the trash capacity is larger than when I'm using the wooden frame adapter.
Addition:
Now I put in another trash bag to fill the void, in case someone throw things into the bin bypassing the main trash bag.
Tuesday, May 25, 2010
The revolutionary pet water system
 This is for the pet rabbit. About $3. It's a 1-1/4" PVC slip joint p-trap - the J shaped tube. The other part is a hose clamp. I just clamp the J to a PVC pipe glued to the "cage". And of course the "free" standard wine bottle.
It works as any office gravity feed drinking water system or any pet gravity feed system. Rabbits like to topple things. Mounting the J instead of a heavy bowl saves space, and the rabbit cannot step into the bowl. I used bottles with a stem and ball valve. It drips eventually. The mounting on the outside of the wire door is stupid for an outdoor cage, which can be rather cold without covering it up in winter. Mounting inside is still very inconvenient. I tried to make something to mount it but the awkward stem made anything fail eventually.
It happened that a standard wine bottle neck can get into the 1-1/4" slip joint, but cannot pass through the joint. So the water level is perfectly aligned as shown. The bottle can wobble a bit but it's not going to fall off. The only minor detail is that the bottle opening fits the joint too well, sometimes making a perfect seal. To avoid that, I put a plastic soft mesh, such as those used in gardening to protect from birds, on top of the J, before slipping the bottle in. The soft mesh guarantee to disrupt any perfect seals.
Kids know how to add water. But in order not to spill a drop, you need a hand pump for babies, pump out the remaining from the drinking hole, before taking out the bottle.
Sure mr rabbit knows where the water is. He drinks it too. But I'm not sure. For the water bottle with a drinking stem, he learned to drink it in no time. Since the water is flowing slowing, you can watch drinking from it. Maybe he drinks a lot faster from the J, so I don't notice that he drinks from it. I marked the water level in the bottle just to make sure. And he still pees a lot. I'm not sure because rabbits' mouth are a bit clumsy, opening like under the chin. So he has to dip his whole chin into the water to drink from it, unlike dogs and cats.
For dogs it's easier. I brought a float valve from Ace's hardware for cattle. It's like a brick but made of foam for the float. I just mount it on a bucket, large enough that he cannot topple the weight full of water. Water in the bucket is constant when connected to a garden hose. I can go for a few days of holiday and not worry about the water. Food is different.
The only problem is that you need a backyard. It's totally not for indoors. And you need some shelter to reduce the dust, soil, leaves and branches from falling into the bucket.
The requirements. You need a bowl big enough so that your pet cannot topple it deliberately or accidentally. The alternative is to mount it somewhere fixed.
You want to reduce the drinking hole to reduce dirt, not for your pet to step in it or dip their heads into it. But you want it to be big enough so they can find it and drink from it without training.
Water level should be high to reduce dirt, like rabbit litter. But you don't want to keep a large volume of water. It's easier to go stale. It's not as convenient to cleanup the whole setup. You want the water level to be low at a comfortable level for your pets.
You don't want to refill water every day, but you want to save space for your pets.
Kids should be able to refill without mess.
The 1 1/2 P-trap should be large enough for big dogs, if only for vacation. Either you get those huge wine bottles, or you can adapt the 1-1/2 slip holding a standard bottle, to the 1-1/2 standard non slip joint tubes. I can see that you can put a bottle and a J at different places for redundancy when you are at vacation.
ps The wine bottle necks seem to be fairly standard. I use a much smaller bottle now with the same size neck so the kids can do it easily. Water need to be changed every 2 days instead of about a week. The lighter load means that there's less tilting of the bottle - basically it's mounted on a PVC pipe glued onto a acrylic platform. The weight of a full wine bottle will bend the whole thing slightly to one side.
Monday, May 24, 2010
In praise of Wayne Dalton garage door and opener
It was at least a couple of years ago, I picked a Wayne Dalton sectional garage door at the local hardware store. The installers told me I had to get a new opener and sold me a Wayne Dalton jack shaft type, or torsion type, wireless. I didn't know why I had to get a new opener, and I wasn't happy with the price of the opener, which wasn't much cheaper than the door itself. But I let them because they were that at my garage already. I didn't do any research and let my wife coerced me into the hardware store to get a new door. I knew WD is trouble when I tried to replace the remote control that I lost. That was a few years ago. But I'm glad that I ran into two geeks who picked the WD opener. Perhaps you couldn't get anything more expensive and less time to install than this. But I'm happy for the 1st time after so many years.
My old garage door was the one piece, very thick and very heavy wood door type. Indeed it was welcomed to donate those doors to Mexico to build houses. The spring counter balance was trouble when I moved in, and had been trouble since. Despite the thickness, it was not flat. I learned to lubricate and adjust the counter balance, and to replace them altogether. But it was worse as time went on, relying on the brute force of the opener to pull the door open, and gravity to shut it.
I didn't remember but the reason I agreed to get a new door was because my wife crashed her car on the door twice, from inside! Every time there was significant damage to her car, but not the door though. The door was too imperfect and too heavy for me to fix.
For the new door, I always felt that the two geeks didn't do a good job. The tracks didn't look precisely installed, and the wooden planks that they added didn't look professional. I felt that they were in a rush. I felt that they sold me the most expensive drive on their truck and the easiest one to install.
To add insult to injury, I crashed into the garage door a couple of years ago. I think it's aluminum or steel. But unlike my wife, the door got damaged instead of my car. Actually that's a good outcome. Fixing the door should be cheaper than fixing the car. But I have to replace two sections, which is about half of the door. Since the door still works and you can't see much different from the outside, I never replaced anything. So everyday I looked at the bent sections from inside the garage.
I sensed that WD is trouble when I tried to replace the remote control that I lost. Although I do not have much problems, the customer service seemed scared about the model I had. I took the chance to ask some questions about home link compatibility, but they can't answer anything. I just brought a WD direct replacement from elsewhere.
I think what happened is that WD is very innovative. The ideas are pretty good, going towards an intelligent home, with the garage door integrated with other controls. The problem is, how can they compete with other companies for good electronic engineers? They may out source the design but who's going to support them?
The worse problem is that who is going to install the openers? Openers used to be very simple, just a motor, with belt, screw or chain drive. Installers would hate to install something very different. They would not know anything at all if the electronics have problems. And actually the drives can be installed by the owners. There's not much to do as a professional installer. Actually the whole garage is quite easy to install, relatively speaking.
Why I praise WD after so many years? Because my garage is completely screwed up one day. The installer didn't left any documents, only warning labels and a terse, tiny, programming sheet on the wall. I had absolutely no idea how the door works. And WD seemed to have exited the drive business, and perhaps the Torque Master type of doors.
I was looking for the emergency release like my old door. It disconnected the door from the opener alright, but how am I going to lift the door? The old door will just swing open. I tried to lift the door with great difficulty, and soon it was completely jammed close.
I opened the drive cover with difficulty. I had no manual. To my surprise I saw two batteries. I remembered they call it backup in case of power outage, but actually the motor need to be battery operated. I checked the internet that the batteries had a couple of years of life. They cost too much. I was trying to jump start it with my car battery, when I realized that the batteries were still good.
I thought the electronics were screwed up, so I connect the motor directly to the battery. The motor just gave out sparkles but didn't move. I thought I had to replace the drive, the damaged sections, and maybe the whole door.
Then I found the installation manual of my door, but not at the WD website! There was over 20 steps with diagrams. It looked good but there are 1 in 10 words that I don't understand. It should be easy if you have some idea of how the door is designed and operates.
There's no trouble shooting procedures. The thought of going through 20 odd steps through the installation daunted me. I parked the cars outside and left them there for a week, doing nothing. Before that, the cars were trapped inside the garage. I had to unscrew all sectional bolts so the sections could be lifted up one at a time. With the help of my wife we managed to lifted the sections up to the ceiling rail, let the cars out. My wife decided to drop the sections down that night. But the bottom section wouldn't go completely down, leaving a pet height opening on the ground. Worse still, the bottom was one side higher than the other. I also decided that we should not put the top section down because it might be difficult to get them all up again. So we have only three sections as the garage door, with a bottom slanted opening and the same at the top, for all the neighborhood to see.
Finally I went through the installation process. Very soon I discovered that there's nothing wrong with the hardware installation. The tracks were solid, though they are not perfectly horizontal and vertical, and there are gaps at the joints. The rollers guiding the sections easily comes off, but that's a feature, and the design is quite tolerant to imperfect installation.
Then I discovered what is jamming the door mechanism. It was the counter balance. On one piece swing doors, there is a large spring on each side. Although the door is damn heavy, you can swing it open fairly easily in the spring counter balance is installed correctly. For the torque master doors, the counter balance is in the form or wounded spring inside a small disc box at each end of the shaft.
The door is suspended by two cables. When the shaft turns, the cables are wounded onto the drum at each end. The counter balance is part of the drum. So if the cables are jammed, with all the tension on them, you cannot move the cables to the right place.
There is a bolt on each side to unwind the torsion springs. If you have no idea you just think that the bolt is just a bolt like any others at the door. They are mostly of the same size. The bolt is designed to be turned by an electric drill. I used hex screw driver bits to drive square sockets before. I thought it should be illegal. Now I know, for the first time, that there are square bits for sockets, silly me.
So I unwind the torsion springs until the dial is at zero, straighten out the cable, put the bottom section back on the ground, slide the other sections on top one by one, and screw them back together one by one. So if you install the tracks correctly, there's nothing to it for the sections. It doesn't need to be precise.
So I understand why the door can't be opened in an emergency. If the counter balance malfunctioned or the cables are jammed, the door is just too heavy to open. And even if you opened it, the loose cable will be jumbled up.
Then I tried to calibrate the two sides so that the tension is the same. I don't think it can be done easily, not on my old door anyway. You have to roll the cables a little and tighten the cables a little by the drill. You can't do the same on both sides equally. When I tighten the cables to the same number of turns on the dial, I felt that the tension in the cable are very different.
I tried it all over again by unwinding completely. It's the same. I think the torsion springs aged differently, or they suffer differently. What the hack. I just tighten until I feel that the cable is about the same tightness, and that the door can almost be opened by hand. There's nothing much to it.
Now the door is perfect. I don't know if I damaged the opener's electronic by connecting the battery directly to the motor. Indeed the opener seemed dead. Just when I think that I have to replace the opener, and have to install the conventional overhead opener, I remembered that there's one and only one thing to do.
On the wireless wall unit, there's a little toothpick for you to insert into a hole to start the installation. It doesn't start anything but I know what button to push when I opened the unit. When I pushed the button, the door went up and down twice and wallah, my garage door is all normal again.
All you need to install the opener is to put it right in the middle of the shaft and screw it onto the wall. The opener sense the torque, or more likely the speed, of the cables and vary the speed of the motor when the door is at different positions. There's nothing to measure. The door will close perfectly and open perfectly. The opener knows when to stop exactly.
The whole setup is a big advancement over the dumb openers. Sadly WD is exiting the opener business, even though the openers are still on sale. Or they are just scaling back the number of drives on the market in order to have sufficient support for them.
It's easy to install, tolerant to imperfections. Less moving parts. Quieter and smoother. And since there's intelligence, it's easy to provide more function such as opening a little bit for pets, delay close, and disabling the remote controls.
The mechanics and the motor can be very reliable. The electronics should be more reliable. But if there's trouble, who's going to shoot it? The jump from dumb openers is just too big. But you can't make the jump easier because you want all the features. For example, some jack shaft openers still require to run cables from the drive to the wall unit, which is on opposite ends of the garage!
If the electronics goes wrong, there's nothing much to do except to swap it out. If you are not supported by WD technicians they do not have the boards to replace yours. Sending it back to WD to "repair" seems too much trouble. If WD doesn't cover it, it may be too expensive to replace the electronics. Why can't they do it as if it's a TV? It's quite reliable and you don't expect it to fail, not initially anyway. It's guaranteed for a number of years and there's extended guarantee. And nobody is afraid to "repair" TV's although it really can't be repaired, just swapping out the bad boards and bad parts, or take it back to "factory" to repair, in reality you get back the old shell with everything new in it.
WD is the way to go, but they seemed to fail. I'll still recommend the wireless jack shaft drives, whether you install it yourself or not. But make sure that you are covered if the thing doesn't work initially. As with other electronics, if it works during the burn in period for a couple of months, it will not likely to fail for years. Have a look at the installation manual, and if you are clueless technically, you may want to cover yourself for at least 10 years. The WD service department seems to be afraid of any technical questions regarding electronics.
Subscribe to:
Posts (Atom)