It's a pleasure to plan for your house for the next 20 years. I put it off again and again using the cheapest replacement stuff and hope that they will rot soon so I can do a proper job when come round to it.
I hate CFL, and much more when I notice that they contains mercury. For the 4 ft fluorescent tubes in the kitchen, they are hard to reach inside the ceiling. But CFL bulbs will be everywhere, many near the switch in lamps.
I brought a lot of good stuff online and particularly cheap from eBay. Then I worry about their safety. Here's my research after the fact. So I may be biased to make myself feel better.
LED can generate high energy beam a bit like laser (!). So if you are replacing over 100 watt bulbs, don't look at the tiny bright squares, or make sure they are well diffused by shade. The new squares are higher power and smaller. It's not more dangerous than looking at bright spots, and the sun is the extreme case. And for high power new round bulbs, they don't use tiny squares anymore but have a continuous coating on the bulb, which distributes light more even.
LED use semiconductor to generate blue light, then the yellow phosphorous coating turns the blue light into white light. There's no UV generated at any stage, or there's no significant source. CFL is basically a mercury lamp that generates UV. The white coating of a CFL turns the UV into white light. The problem is that the coating are seldom perfect, leaking UV.
The tiny square chips are probably made in Taiwan or S Korea. You can measure the size and know the chip model. They are made in huge lots and if there are problems you will hear about it in many different products.
The chips aren't that hot but they are tiny so they need huge heat sinks to draw the heat away to prevent the chip from frying. So I would think there's virtually no fire risk, just the risk of malfunction even if you seal off the bulb.
LEDs work on DC so there's a voltage adaptor inside each bulb or tube, like those of portable computers or many other electronics. Because the circuit is simple, cowboy factories in China could produce a finished product totally via trial and error without proper design. (I have used a battery charger with just a resistor inside.) However, I would think it's really hard to create a potential fault to generate a fire. And anybody with any common sense will put together something with popular chips and standard circuits.So I would test the bulbs extensively for the 1st few days and would not worry about it anymore, unless you have something high power that you have to leave unsupervised sometimes.
Also, bulbs and tubes are naturally well insulated, and they are out of touch. And most lamps have grounds.
Well, as for the quality, you can always return it if you "know" that it's not satisfactory. So avoid buying something from the far east when you have to pay for the return shipping, unless if you have to, and that you can tell if the device is good or bad right away. These merchants aren't trying to rip everybody off. I brought a few silent clock mechanism. One doesn't work after a couple of months and the seller just refunded me without needing to return the faulty one. One seller asked me for a picture of the faulty inkjet cartridge and then replace it without return. I also got free batteries because I complained that the battery is faulty but later I found out in fact it's my flashlight. The seller replaced it without me returning it.
First of all, many LEDs are not instant on, but they call it instant on even with a power on delay for a fraction of a sec to a sec. "Instant on" is a comparison to good old fluorescent tubes that flickers a bit before steady. I have a quick electronic starter so my old fluorescent tubes are almost instant on, faster than it's LED replacement.
Power on delay is probably due to the voltage adaptors. LEDs are instant. I also think that energy efficient bulbs are more likely to have a delay. I have very cheap energy star rated CFLs from IKEA that are almost instant start, but you can barely see anything until a minute later.
Power on delay is something you can get use to it, especially if the bulb is half the price and it saves more energy. But imagine that you rush to the bathroom in the middle of the night, flip the switch and shoot, only to find out that you did it too soon before you see the target.
The previous owner of the house (or the builder) put an energy saving compact fluorescent tube in the bathroom inside the master bedroom. It was at least a decade old CFL. It flickers a lot before it lights up. I swear I will open up that odd thing in the bathroom ceiling when it stops working. I don't even know that it's a CFL. It never stopped working.
I gave up on flipping the switch. When I can see something after the flickering, I would have finished or I couldn't afford to wait. So I often shoot in the dark. That's only half the bathroom with only the toilet in it.
As for the brightness, you can tell if you put the old bulb side by side. The color temperature is a big deal but only in reviews to persuade you to buy more expensive bulbs. If you want to match your other incandescent bulbs you need the same color temperature range and CRI of near 100%. If you replace everything with LEDs, they will probably match if you buy the same brand, use the same technology (eg, yellow square) and at the same color temp range.
Honestly I don't give a fuss about the color temperature. For the kitchen or workspace you may want anything daylight (with sun) or cool white (cool than sunny daylight with overcast). It's also best for makeup since one need to look good at least when going out under the sun. In other case warm white is more relaxed but how warm doesn't make a lot of difference to the eye comfort. I know your million dollar home is designed to look best for incandescent lighting. But then it have to look at daytime right? So the CRI is really a fuss for nothing.
The power used and the efficient really doesn't matter that much. If the running cost is $1 a year, what's the difference can it made? Especially when the bulb is half the price? I know it's not as green as it can be but you have done your part by looking at the specs. There's nothing you can do if the seller misreport by 10%. Also, if the bulb is affordable, doesn't need 20 years to break even, you are already doing something good by buying it now.
I hate CFL's. I only brought them when my old bulbs went out. I discovered that I can hear them, everyone of them.
But I hate my 4 ft fluorescent tubes more, there are four of them in the kitchen. Seldom all 4 of them works. I have a quick starter so they are almost instant on and seldom flickers. But only if they works. I suspect that the quick starter reduced the life of tubes a lot. I can see black burnt marks every where near the connectors. And that the paint on the metal housing directly above the tubes have some sort of heat pattern.
When the tubes are near fail, it takes minutes for any tube to become bright, if only at all. At those times I never know if I should replace the decade old starter or just new cheap tubes, or new expensive tubes. Until I saw affordable LED replacements. Now I don't hear the tubes at all and I hope I don't need to open the ceiling anymore for the next 20 years.
Now, if only they can make the fridge shut up.
Saturday, July 12, 2014

Thursday, June 26, 2014
Telemarketing combined with door to door?
I discovered a worrying and very annoying trend, that telemarketing is being combined with door to door sales. I searched on the net and can't find anything about it.
I discovered this only after I changed over to VOIP and the telemarketing guys can't really get to me. All they can get is to my voicemail if I allow them. But then they find something else to get to me!
First somebody called from a local number. I answered the phone but they hang up. Soon, but not immediate, somebody knock on my door. Obviously, it dawned on me that they called to make sure somebody is home to answer the door! However, I would think this is some desperate local business promotion. They have my phone number and my address because I once patronized them. So it's legal to call me. Of course it's legal to hang up, especially I don't know who hang up on me. Still, these business hire some marketing company to do the dirty work and risk annoying their local customers.
Now the others are big guys like solar, energy, windows. They sent a whole team to "invade" whole neighbourhoods. They drop off truck loads of mostly out of work but presentable people on a neighbourhood in day time, and then pick them up at sunset. How do they use the telephone?
No, they don't worry nobody answers the door. They have time, the whole day. They want to make sure that you are not at home! They already know that the "decision maker" blocked them one way or the other, either telemarketing or door to door. They watch you until you went to work. Then they call to see if the wife or somebody other than the decision maker is at home to gain entry. This is evil.
I have received calls at home when I worked at home in those days, but at a time just when I was out!
It's absolutely not tinfoil that they watch me. They just do. Once there was a farm promotion. I told the door to door guy that I don't deal with grocery and my wife is not around. When my wife return home and parked the car on the driveway, the guy soon knock on the door. But I don't think they sit in a car watching like a PI. They drive around or walk around in the neighbourhood and made sure that they visit my wife when she returns before sunset.
The best defence against door to door is a security cam. They don't seem to like it. If you have those cheap ones with blinking led's and able to turn around and pick up sound. They will probably leave you alone in the 1st place because you wouldn't need to go to the door and have plenty of time to decide not to open the door for bullshit. Our house is full of windows and it's impolite not to open the door to told them to go away when they see you near the windows.
But then even neighbour kids are nervous to come to your door when they know that you have a security cam.
I discovered this only after I changed over to VOIP and the telemarketing guys can't really get to me. All they can get is to my voicemail if I allow them. But then they find something else to get to me!
First somebody called from a local number. I answered the phone but they hang up. Soon, but not immediate, somebody knock on my door. Obviously, it dawned on me that they called to make sure somebody is home to answer the door! However, I would think this is some desperate local business promotion. They have my phone number and my address because I once patronized them. So it's legal to call me. Of course it's legal to hang up, especially I don't know who hang up on me. Still, these business hire some marketing company to do the dirty work and risk annoying their local customers.
Now the others are big guys like solar, energy, windows. They sent a whole team to "invade" whole neighbourhoods. They drop off truck loads of mostly out of work but presentable people on a neighbourhood in day time, and then pick them up at sunset. How do they use the telephone?
No, they don't worry nobody answers the door. They have time, the whole day. They want to make sure that you are not at home! They already know that the "decision maker" blocked them one way or the other, either telemarketing or door to door. They watch you until you went to work. Then they call to see if the wife or somebody other than the decision maker is at home to gain entry. This is evil.
I have received calls at home when I worked at home in those days, but at a time just when I was out!
It's absolutely not tinfoil that they watch me. They just do. Once there was a farm promotion. I told the door to door guy that I don't deal with grocery and my wife is not around. When my wife return home and parked the car on the driveway, the guy soon knock on the door. But I don't think they sit in a car watching like a PI. They drive around or walk around in the neighbourhood and made sure that they visit my wife when she returns before sunset.
The best defence against door to door is a security cam. They don't seem to like it. If you have those cheap ones with blinking led's and able to turn around and pick up sound. They will probably leave you alone in the 1st place because you wouldn't need to go to the door and have plenty of time to decide not to open the door for bullshit. Our house is full of windows and it's impolite not to open the door to told them to go away when they see you near the windows.
But then even neighbour kids are nervous to come to your door when they know that you have a security cam.
Saturday, June 7, 2014
How to wall mount cheap power strips and add electrical outlets where you want as much as you want

Adding inside wall mount outlets is the ultimate solution but they are actually not cheap, and a lot of hassle to open up the dry wall. With a cheap oscillator tool and a bundled wall cutter, it's trivial to open up the drywall, but you still have dust and you have to paint over patches that isn't covered by the new wall socket plates.
USB in wall sockets are way over priced, considering that adaptors comes "free" with your device. I don't think they can fast charge the iPad's while some high current charger for the iPad's may damage your Android phone (I've heard).
Power strips are attractive. In the same spot you may need an outlet for the computer, an USB for the phone and one for a tablet. With the extension cord, basically you can add them where you want them. But the problem is, the mounting holes are trash. I've been using them for years. It's only OK if you leave it on the ground or hang over some screws. If you need to plug and unplug occasionally, they just come off from the mounting screws.
In the past, you can open up the power strip, screw the bottom onto the wall securely, and then put the cover back on with screws. For reasons of safety or cost, they don't do it anymore, at least not on a few dollar power strips.
All of a sudden, it dawned on me that I can sacrifice two earth pins as the mounting holes. If you mount the strip on a vertical stud, it will never come off. As they are mostly for electronics, the earth pins are never used.
If you have doubts, unscrew the strip and take a look inside if it is possible and safe to wall mount like that. But for the cheap strips from hardware store, you can do it easily and safely.
The earth pin socket are usually connected by two horizontal rails on the sides of the socket, with nothing blocking the bottom housing. A screw will pass through the plastic bottom and straight into the wall.
By construction, the earth pin will be well isolated from the other pins so after mounting, the screws will still only be connected to earth. You don't worry about exposed earth because some appliances with metal cases are just earthed outside. Earth is a safety pin and normally nothing happens over it. You can also cover the screw with a piece of insulating electrical tape of the same color.
No, cheap outlets don't have USB's but USB adaptors/chargers are cheap and plentiful. Pick some with national lab certified. If you want, you can glue it on the power strip too.
Sunday, May 4, 2014
Replace aluminum security patio sliding door rollers
I found many sliding door repair or replacement videos on Youtube but I almost gave up when nothing applies to my patio door. I cannot lift the door out of the track from inside. It could be lifted out of the track from outside, but I have to take down the still panel first. The still half of the door seems to be securely installed with no screws in sight.
Thanks to allaboutdoors.com, you can just take the sliding door frame apart without lifting it out of the track.
You may try this if you cannot lift the door out to replace the rollers. Or if the fixed panel seems to be impossible to disassemble. But first of all, I think you need a security door with strong glass. Otherwise you need to be careful with the glass panel.
1. Locate the side screws holding the frame together.
 It's near the top and the bottom. Only do one side at a time. You should be able to see the screws. The other hole is for inserting a screw driver to adjust the rollers.
2. Unscrew the two visible screws holding the frame together and notice where the "sockets" are inside the top and bottom panel (for later alignment).
3. With a small hammer and a smaller block of wood, knock off the vertical side frame gently from bottom to top a little bit at a time. Repeat the bottom to top process until the frame comes off.

4. For my particular model, keep knocking sideways until the vertical side frame pull the roller assembly out completely via a T-shaped metal strip on the assembly.

5. Rotate the T strip 90 degrees and take out from the slot of the side frame.
6. Now go to buy the same roller assembly.
7. Put the rubber gasket in position on the glass edge. Put the side frame in position ready to be knocked back in.
8. Put the T strip back in the slot of the side frame, rotate back to the normal position to be inserted into the bottom frame. You may need a little lifting of the door. I just hold and lift on the glass panel. If it's too heavy you may need a helper.
9. The key is to align the top and bottom holding screws before you insert the side frame back. Partially screw in both screws.
10. Tighten both screws and the side frame will go back to position. You will help by knocking a block of wood on the side of the frame. Repeat tighten the screws and knock of the sides gently.
11. Do the other side, same thing. One man job mostly.
Thanks to allaboutdoors.com, you can just take the sliding door frame apart without lifting it out of the track.
You may try this if you cannot lift the door out to replace the rollers. Or if the fixed panel seems to be impossible to disassemble. But first of all, I think you need a security door with strong glass. Otherwise you need to be careful with the glass panel.
1. Locate the side screws holding the frame together.
2. Unscrew the two visible screws holding the frame together and notice where the "sockets" are inside the top and bottom panel (for later alignment).
3. With a small hammer and a smaller block of wood, knock off the vertical side frame gently from bottom to top a little bit at a time. Repeat the bottom to top process until the frame comes off.
4. For my particular model, keep knocking sideways until the vertical side frame pull the roller assembly out completely via a T-shaped metal strip on the assembly.
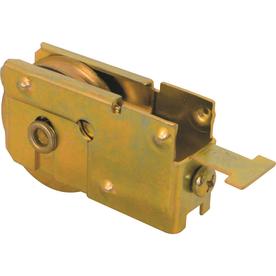
5. Rotate the T strip 90 degrees and take out from the slot of the side frame.
6. Now go to buy the same roller assembly.
7. Put the rubber gasket in position on the glass edge. Put the side frame in position ready to be knocked back in.
8. Put the T strip back in the slot of the side frame, rotate back to the normal position to be inserted into the bottom frame. You may need a little lifting of the door. I just hold and lift on the glass panel. If it's too heavy you may need a helper.
9. The key is to align the top and bottom holding screws before you insert the side frame back. Partially screw in both screws.
10. Tighten both screws and the side frame will go back to position. You will help by knocking a block of wood on the side of the frame. Repeat tighten the screws and knock of the sides gently.
11. Do the other side, same thing. One man job mostly.
Thursday, January 16, 2014
How to get rid of water in underground sprinkler pipes and fix tee thread joint leaks with minimal digging
Some of the pop-up sprinkler in the lawn leaks. It's not the sprinkler. Must be the threaded joint in the tee down below or worse. It turns out that my ex-gardener used a metal nipple to joint the tee below to the sprinkler. That means he repaired the bad thread by making it worse. I don't know how many he did. If the sprinklers are not near the concrete driveway, it's hardly noticeable.
It's never easy to replace a section of PVC pipe, not to mention an underground tee piece. You need at least two bulky unions or worse, two extendable repair pipe sections. The total cost is silly when a tee is some 20 cents. For me the labour cost is infinite as I have to dig out enough soil for all those things to get in and under.
I searched the net for ideas and found only one video inspiring. Of course it is in you-tube. All credit to him. What he did was drill the thread joint to enlarge it to become a slip joint. And sand down a short pvc section to glue to it. Then you can attach anything to the other end, use a shorter sprinkler or install a flexible swing joint.
After drilling the thread joint on the tee, I think it's easier to drill enough so you can screw in a pvc male section, or just a threaded nipple that you would normally use. So it depends. If the thread are very loose, it may be easier to turn it into a full slip joint. My threads are all "screwed up" so I can't even screw in a nipple. After drilling with a 3/4" wood hole drill, I can screw in a nipple and have a rather rigid joint. The nipple doesn't wobble. There seems to be some good thread left or the bad thread still holds the nipple in position. If I use PVC glue to seal the thread it would be better than a slip joint. The PVC glue weld both pieces together to form one single piece with the same thermal properties.
Now the only thing to do is to dry the tee and apply the glue. It turns out to be impossible. Closing the water supply, turning on the valves doesn't drain the pipes. Taking off the entire sprinkler down the slope doesn't drain the pipes. Blowing air into the pipe with my air bed pump will get rid of water for a moment until more water come back. I searched the web for ideas and time and time again they use air compressor to force water out of the pipes and out of the other sprinklers.
I don't have an air compressor and it's silly to rent one for a simple job. I have a hand pump that is ideal but it is for oil change. I can still use it but then I will be polluting if I just pour the water down the drain. Pond pumps will be ideal for 1/4" tubes but they don't have inlets.
You-tube have plenty of water pumps that use electric air pump as the driving force. The problem is that you can't get an air tube down the tee bottom with enough space for an inlet/outlet tube. Without that you can't lift water with air - the principle of air lift pumps. I spent a few days in experiments on and off to realize that.
The other possibility is venturi water pump. But water pumps using that principle are probably not using that principle.
Just when I'm ready to order a real water pump I remembered that I have this:

It's never easy to replace a section of PVC pipe, not to mention an underground tee piece. You need at least two bulky unions or worse, two extendable repair pipe sections. The total cost is silly when a tee is some 20 cents. For me the labour cost is infinite as I have to dig out enough soil for all those things to get in and under.
I searched the net for ideas and found only one video inspiring. Of course it is in you-tube. All credit to him. What he did was drill the thread joint to enlarge it to become a slip joint. And sand down a short pvc section to glue to it. Then you can attach anything to the other end, use a shorter sprinkler or install a flexible swing joint.
After drilling the thread joint on the tee, I think it's easier to drill enough so you can screw in a pvc male section, or just a threaded nipple that you would normally use. So it depends. If the thread are very loose, it may be easier to turn it into a full slip joint. My threads are all "screwed up" so I can't even screw in a nipple. After drilling with a 3/4" wood hole drill, I can screw in a nipple and have a rather rigid joint. The nipple doesn't wobble. There seems to be some good thread left or the bad thread still holds the nipple in position. If I use PVC glue to seal the thread it would be better than a slip joint. The PVC glue weld both pieces together to form one single piece with the same thermal properties.
Now the only thing to do is to dry the tee and apply the glue. It turns out to be impossible. Closing the water supply, turning on the valves doesn't drain the pipes. Taking off the entire sprinkler down the slope doesn't drain the pipes. Blowing air into the pipe with my air bed pump will get rid of water for a moment until more water come back. I searched the web for ideas and time and time again they use air compressor to force water out of the pipes and out of the other sprinklers.
I don't have an air compressor and it's silly to rent one for a simple job. I have a hand pump that is ideal but it is for oil change. I can still use it but then I will be polluting if I just pour the water down the drain. Pond pumps will be ideal for 1/4" tubes but they don't have inlets.
You-tube have plenty of water pumps that use electric air pump as the driving force. The problem is that you can't get an air tube down the tee bottom with enough space for an inlet/outlet tube. Without that you can't lift water with air - the principle of air lift pumps. I spent a few days in experiments on and off to realize that.
The other possibility is venturi water pump. But water pumps using that principle are probably not using that principle.
Just when I'm ready to order a real water pump I remembered that I have this:
It's as good a pump as anything. I repaired the broken tube with packing tape, and taped a 1/2" pvc pipe to the hose end. I have the 1/2" to 1/4" tubing adaptor. It takes less than a minute to suck out all the water, not even one bucket full. I also have a wet vac which is easier to attach a pipe to it. Silly me. But then I have no idea why everybody use compress air to blow out.
All the time and effort works out. I saved some money and delivery time. I learned some science. I don't need to spend money on tools I already have with superior performance. The pay off will be coming when I have to check and repair god knows how many sprinklers.
Tuesday, December 24, 2013
The catch with T-Mobile's $30 monthly plan
It's unlimited text and data, first 5Gb at 4G! It includes only 100 min. But you will later find out that each extra min is 10 cents, which is the lowest you can get for prepaid. So far so good.
You may get the plan from Walmart, but as long as you buy a sim activation kit online at t-mobile, you have the choice when you activate. I don't how what happened but I got the sim for free, but today it's $10. I was just going to get a free sim for every kid because I spotted that their $10 pay as you go last for 90 days. Not so fast now in case they drop that again.
The 1st hurdle is actually with AT&T to unlock my phone. I setup profile for my wife but the bill is under my name. It may be the probable cause that I couldn't unlock. I waited until the contract ended and then some, because I can't risk any mishaps in the busiest time of the year. Finally I chat with them online and it was quite helpful. May be it's my phone, they have a procedure that I have to do it. I don't have another carrier's sim at the time so I didn't try. I copied the steps from chat but the 1st line is missing before I realized it.
A couple of days later, I received an email with the instructions. This time they have an unlock code that I don't think I have it before. When the T-Mob sim came, I inserted it, power on, entered the unlock code and it seemed to work. I was on the t-mob network but can't make any calls because my sim wasn't activated. But I am sure they can't fuck me up on the carrier unlock.
I considered carefully when to activate. I tried the activate website and it seemed to work and help to transfer my number too. But when I actually do it I want not to be at a very busy time when there are no real agents to trouble shoot. And I have 2 days off so there is one spare day for fuck ups when they claim to do it in 24 hours. And I don't want to wait too long when it's close to the deadline of the activation of my free sim. And I don't want to start losing things from the package.
So I took the plunge on Xmas eve day before I realized it. It went totally smoothly online until the last payment page. I use Linux and they screw up. Who wouldn't do a website nowadays without sticking to some common standards? I was afraid that I got the number transferred but I can't call because my service wasn't paid.
They don't have online chat. It's terrible when there are so many numbers involved. I tried to pay elsewhere online but they don't have my number registered yet.
I called as the last resort and very soon an agent answered. He was helpful. He got those data that I entered online. Instead of payment, he first deals with the transfer first. AT&T wants to screw me. They want my AT&T account number instead of my phone number. But I have a browser tab on that ready. Now that was OK and before he continued, the phone got cut off. I was using my mobile phone. So I switched to my landline.
Another agent answers the phone very soon. I think the 1st guy is American dealing with carrier transfer and tech stuff. This woman is in India dealing with other non-tech stuff. Now, I got too many apologizes in one day. It sounds as if he is sorry that t-mob website don't support Linux well enough, but that would be a first. She is sorry for the cut off. After a minute or two she confirmed that the transfer is successful and transfers me to payment. This 3rd call center could have been in Mexico. Again I don't have to wait and some agent pickup the phone soon. May be I picked the right day in the year? She is not sure what my problem is and I understand that the usual automatic prepaid payment via the phone is available. So I said goodbye and dial 223 or something. It was wrong. You dial 611 but * or # then 223. Seriously!
I dial 611 again and realized the correct number should be prefixed with a * or # (that I don't remember). It doesn't matter because I couldn't pay anyway. Because the transfer is actually not completed. I called 611 again to find out that I have to wait 2 hours until I got the completion text.
Before that I registered on t-mobile website but then the registration wasn't real because I don't have an active number to go with it.
A couple of hours later I can receive call too. And I got the completion text. Now I can pay online, after registration again. And I sign up for automatic payment. But as soon as I paid, learned to check the balance, my 100 min was up as indicated on the website!! What's going on? I called 611 again with no waiting. The guy assured me that my account status was OK and I can use the phone. 1st they have a funny way to tell the balance. I paid $30 and they say my balance is $0 and I will be paying $30 next month. But really the minutes count is wrong and after some wait the used minutes drops from 100 to 10. But I don't think I made 10 connected calls.
Before the transfer completion I can dial out but incoming calls go straight to my old AT&T voicemail. I looked it up and enter the t-mob voicemail number into my phone and it didn't seem to work.
Somehow it all worked. Then I wanted to setup visual voicemail (for my wife). There is a subscribe button on the website but it does nothing except redirect to your homepage. Then I did what I prefer to do, switch over to her google number voicemail. Android reported that it can't do it and I have to talk to t-mob.
After a while of online search, I confirmed that t-mob don't allow visual voicemail nor forward voicemail for prepaid accounts. This is pretty strange as I would think $50 and up prepaid plans are more popular and the money isn't too bad. I thought I got an old internet post of how to switch to google voice email. In GV I setup a contact with my mobile phone number, then I setup a group for it. If group members call, GV will not try to ring any numbers so the call will go straight to google voicemail. Now I just need to setup call forward in my phone, to forward when no answer to my google number. But the problem is, forwarding isn't allowed by the t-mob network, and that's why you just can't simply change over to GV voicemail. A waste of time.
Those are the catches. I spend half a day doing it, on xmas eve. May be I'm lucky. I could have waited for 24 hour and nothing would happen because AT&T wants my account number.
You may get the plan from Walmart, but as long as you buy a sim activation kit online at t-mobile, you have the choice when you activate. I don't how what happened but I got the sim for free, but today it's $10. I was just going to get a free sim for every kid because I spotted that their $10 pay as you go last for 90 days. Not so fast now in case they drop that again.
The 1st hurdle is actually with AT&T to unlock my phone. I setup profile for my wife but the bill is under my name. It may be the probable cause that I couldn't unlock. I waited until the contract ended and then some, because I can't risk any mishaps in the busiest time of the year. Finally I chat with them online and it was quite helpful. May be it's my phone, they have a procedure that I have to do it. I don't have another carrier's sim at the time so I didn't try. I copied the steps from chat but the 1st line is missing before I realized it.
A couple of days later, I received an email with the instructions. This time they have an unlock code that I don't think I have it before. When the T-Mob sim came, I inserted it, power on, entered the unlock code and it seemed to work. I was on the t-mob network but can't make any calls because my sim wasn't activated. But I am sure they can't fuck me up on the carrier unlock.
I considered carefully when to activate. I tried the activate website and it seemed to work and help to transfer my number too. But when I actually do it I want not to be at a very busy time when there are no real agents to trouble shoot. And I have 2 days off so there is one spare day for fuck ups when they claim to do it in 24 hours. And I don't want to wait too long when it's close to the deadline of the activation of my free sim. And I don't want to start losing things from the package.
So I took the plunge on Xmas eve day before I realized it. It went totally smoothly online until the last payment page. I use Linux and they screw up. Who wouldn't do a website nowadays without sticking to some common standards? I was afraid that I got the number transferred but I can't call because my service wasn't paid.
They don't have online chat. It's terrible when there are so many numbers involved. I tried to pay elsewhere online but they don't have my number registered yet.
I called as the last resort and very soon an agent answered. He was helpful. He got those data that I entered online. Instead of payment, he first deals with the transfer first. AT&T wants to screw me. They want my AT&T account number instead of my phone number. But I have a browser tab on that ready. Now that was OK and before he continued, the phone got cut off. I was using my mobile phone. So I switched to my landline.
Another agent answers the phone very soon. I think the 1st guy is American dealing with carrier transfer and tech stuff. This woman is in India dealing with other non-tech stuff. Now, I got too many apologizes in one day. It sounds as if he is sorry that t-mob website don't support Linux well enough, but that would be a first. She is sorry for the cut off. After a minute or two she confirmed that the transfer is successful and transfers me to payment. This 3rd call center could have been in Mexico. Again I don't have to wait and some agent pickup the phone soon. May be I picked the right day in the year? She is not sure what my problem is and I understand that the usual automatic prepaid payment via the phone is available. So I said goodbye and dial 223 or something. It was wrong. You dial 611 but * or # then 223. Seriously!
I dial 611 again and realized the correct number should be prefixed with a * or # (that I don't remember). It doesn't matter because I couldn't pay anyway. Because the transfer is actually not completed. I called 611 again to find out that I have to wait 2 hours until I got the completion text.
Before that I registered on t-mobile website but then the registration wasn't real because I don't have an active number to go with it.
A couple of hours later I can receive call too. And I got the completion text. Now I can pay online, after registration again. And I sign up for automatic payment. But as soon as I paid, learned to check the balance, my 100 min was up as indicated on the website!! What's going on? I called 611 again with no waiting. The guy assured me that my account status was OK and I can use the phone. 1st they have a funny way to tell the balance. I paid $30 and they say my balance is $0 and I will be paying $30 next month. But really the minutes count is wrong and after some wait the used minutes drops from 100 to 10. But I don't think I made 10 connected calls.
Before the transfer completion I can dial out but incoming calls go straight to my old AT&T voicemail. I looked it up and enter the t-mob voicemail number into my phone and it didn't seem to work.
Somehow it all worked. Then I wanted to setup visual voicemail (for my wife). There is a subscribe button on the website but it does nothing except redirect to your homepage. Then I did what I prefer to do, switch over to her google number voicemail. Android reported that it can't do it and I have to talk to t-mob.
After a while of online search, I confirmed that t-mob don't allow visual voicemail nor forward voicemail for prepaid accounts. This is pretty strange as I would think $50 and up prepaid plans are more popular and the money isn't too bad. I thought I got an old internet post of how to switch to google voice email. In GV I setup a contact with my mobile phone number, then I setup a group for it. If group members call, GV will not try to ring any numbers so the call will go straight to google voicemail. Now I just need to setup call forward in my phone, to forward when no answer to my google number. But the problem is, forwarding isn't allowed by the t-mob network, and that's why you just can't simply change over to GV voicemail. A waste of time.
Those are the catches. I spend half a day doing it, on xmas eve. May be I'm lucky. I could have waited for 24 hour and nothing would happen because AT&T wants my account number.
Friday, December 13, 2013
Mulching fallen leaves on lawn
This is another "why I didn't thought of that" moment. I was brain washed into racking up the leaves, and put them in the green collection bin. That is a lot of work and last many weeks for all leaves to fall.
I didn't know what triggered me to search how to deal with fallen leaves. Indeed I didn't remember what I was searching. I agree that mulching fallen leaves save a lot of resources.
Just happened that my 1st season small battery mower had a mulching attachment. I only know that it is for grass, and I use it a lot out of laziness. I also use the grass chip collection bag because it is convenient too. At the front yard, mulching the grass cuttings may spread the chippings into the sidewalk. There's more work to clean up.
My mulching attachment is to keep the grass chips in a loop around the blades, instead of allowing them to go out into the bag. The grass are cut finer and drop back onto the ground.
Leaves look very different from grass so I doubted. When I mow the fallen leaves, I was impressed. The leaves are palm sized, dried and brittle. One pass over the yellow leaves, the pile is gone leaving a green path. I can still small dots under the short grass. But instead of a very yellow pile, the ground turns green with barely visible yellow dots at an angle.
It's easier than mowing. You can easily see where the leaves are done. My mower isn't that big so the lesser the overlapping passes, the more effort are saved. But my small mower is very good at manoeuvring to get to the leaves. Even for a big pile (by nature) you can still see the lawn after all leaves are mulched.
Now I can just mulch the leaves when I mow the lawn as soon as the leaves fall. I don't need to wait for sufficient leaves to pile up before raking.
I didn't know what triggered me to search how to deal with fallen leaves. Indeed I didn't remember what I was searching. I agree that mulching fallen leaves save a lot of resources.
Just happened that my 1st season small battery mower had a mulching attachment. I only know that it is for grass, and I use it a lot out of laziness. I also use the grass chip collection bag because it is convenient too. At the front yard, mulching the grass cuttings may spread the chippings into the sidewalk. There's more work to clean up.
My mulching attachment is to keep the grass chips in a loop around the blades, instead of allowing them to go out into the bag. The grass are cut finer and drop back onto the ground.
Leaves look very different from grass so I doubted. When I mow the fallen leaves, I was impressed. The leaves are palm sized, dried and brittle. One pass over the yellow leaves, the pile is gone leaving a green path. I can still small dots under the short grass. But instead of a very yellow pile, the ground turns green with barely visible yellow dots at an angle.
It's easier than mowing. You can easily see where the leaves are done. My mower isn't that big so the lesser the overlapping passes, the more effort are saved. But my small mower is very good at manoeuvring to get to the leaves. Even for a big pile (by nature) you can still see the lawn after all leaves are mulched.
Now I can just mulch the leaves when I mow the lawn as soon as the leaves fall. I don't need to wait for sufficient leaves to pile up before raking.
Subscribe to:
Posts (Atom)