Saturday, November 20, 2010

Self haircut with salon style and precision

The basic cut - equal length

Hair stylists do all the time is to hold your hair between the index and middle fingers, and then shorten the hair in a straight flat cut.

We can do that in a precise manner with a "clip" cut out from plastic gift boxes. The height of the clips determine the lengths of hair. Stand the a clip about vertically on your head. Put a thin strand of hair between the clips and pull straight. Hold the clip with thumb and middle fingers. Use your index finger as the location finder and try to cut it. Pull out your index finger at the last minute when you cut. It is easier not to look at the mirror when you cut.

The principle is, if you repeat cutting all over your head, no matter how the clips are oriented, all your hair will be of the same length, perfectly, more precise than in the salons. Actually you don't need to cut precisely. Hair are forgiving.

This is the same principle as the Flowbee and the Robocut. But you got it for free. Hand cut is a bit slower than machines but I do it in a warm bath. Make sure you have a filter to collect the hair. For any reason, if you do not finish in one bath, finish it another day.

For long hairs like 6 inches to 1 foot, I cut a PVC pipe to the desirable length with a pipe cutter. Then I cut the pipe in half along the length. I use the half pipe to measure the hair length during cutting.

You can just tape two plastic rulers together like using the clips above.

Moist cut, wet cut or dry cut does not make much difference. But wet hair tends to stay together so you won't miss a hair or two. Also scissors cut straight into wet hair with no slipping.

Dry cut is safer in the sense that what you see is what you get for newbies. You may also want the final final cut when dry, after washing your hair clean and dry completely.

Layers

I think multi-layers mean that you partition your hair into different groups, and cut each group with the same style and length.

The length of cut determines the hair length, as measured from the hairlines. Just as important, it determines the thickness or volume of hair.

Women are perfectly fine with a one-layer cut, with all hair the same length - 6", 1' or longer. In this case you split the front into the sides. The back will gradually be longer than the sides. There's the natural uneven look with a tapered end at the back.

Men are fine with a one-layer cut, 1" to 4", but the hairlines need to be trimmed, unless they want to look like girls.

If you need different layers, one method is to partition your hair carefully with clips. But the equal length cutting method do not require carefully partitioning. The different layers will blend into each other naturally.

Women

Bling at the front can use the same basic cut to get the natural look. To control the bling thickness, choose a length longer than the desired bling length. After the basic cut, trim back the bling to the desired level with a flat straight cut.

The sides may need to be shorter if you want to have very long hair at the back. You may want to cut the lower back hair shorter than the rest. And you may want to give the end of your hair a straight flat cut instead of a tapered look.


Men

The top of your head need to be longer, so the "swirl center" at top of your head can be covered. 2" to 3" will be typical. About the same length on top of your head to give some margin to play around with blow drying or other styling if desirable.

The front hairline needs to be about 1.5" or shorter if you want it to stay up sideways without falling down like blings.

Too short your hair will becomes spiky, dependent on hair type.

A good choice for the back of your head and the sides is 1". Short is easy to manage. But any shorter will be difficult using our primitive tool. And because of the tolerance of your cut, very short hair may start to look uneven.

Now the apparently difficult part - the neckline. Actually, even if you have absolutely straight hair, you can do a business clean cut all by yourself. Now after the basic cut, all your hair at the neck hairline will be about, say, 1" dangling down.

I create a straight line guide by using a rubber band on my neck. I use a trimmer to cut away the hair below the rubber band. You need to look at your neck with two mirrors while cutting.

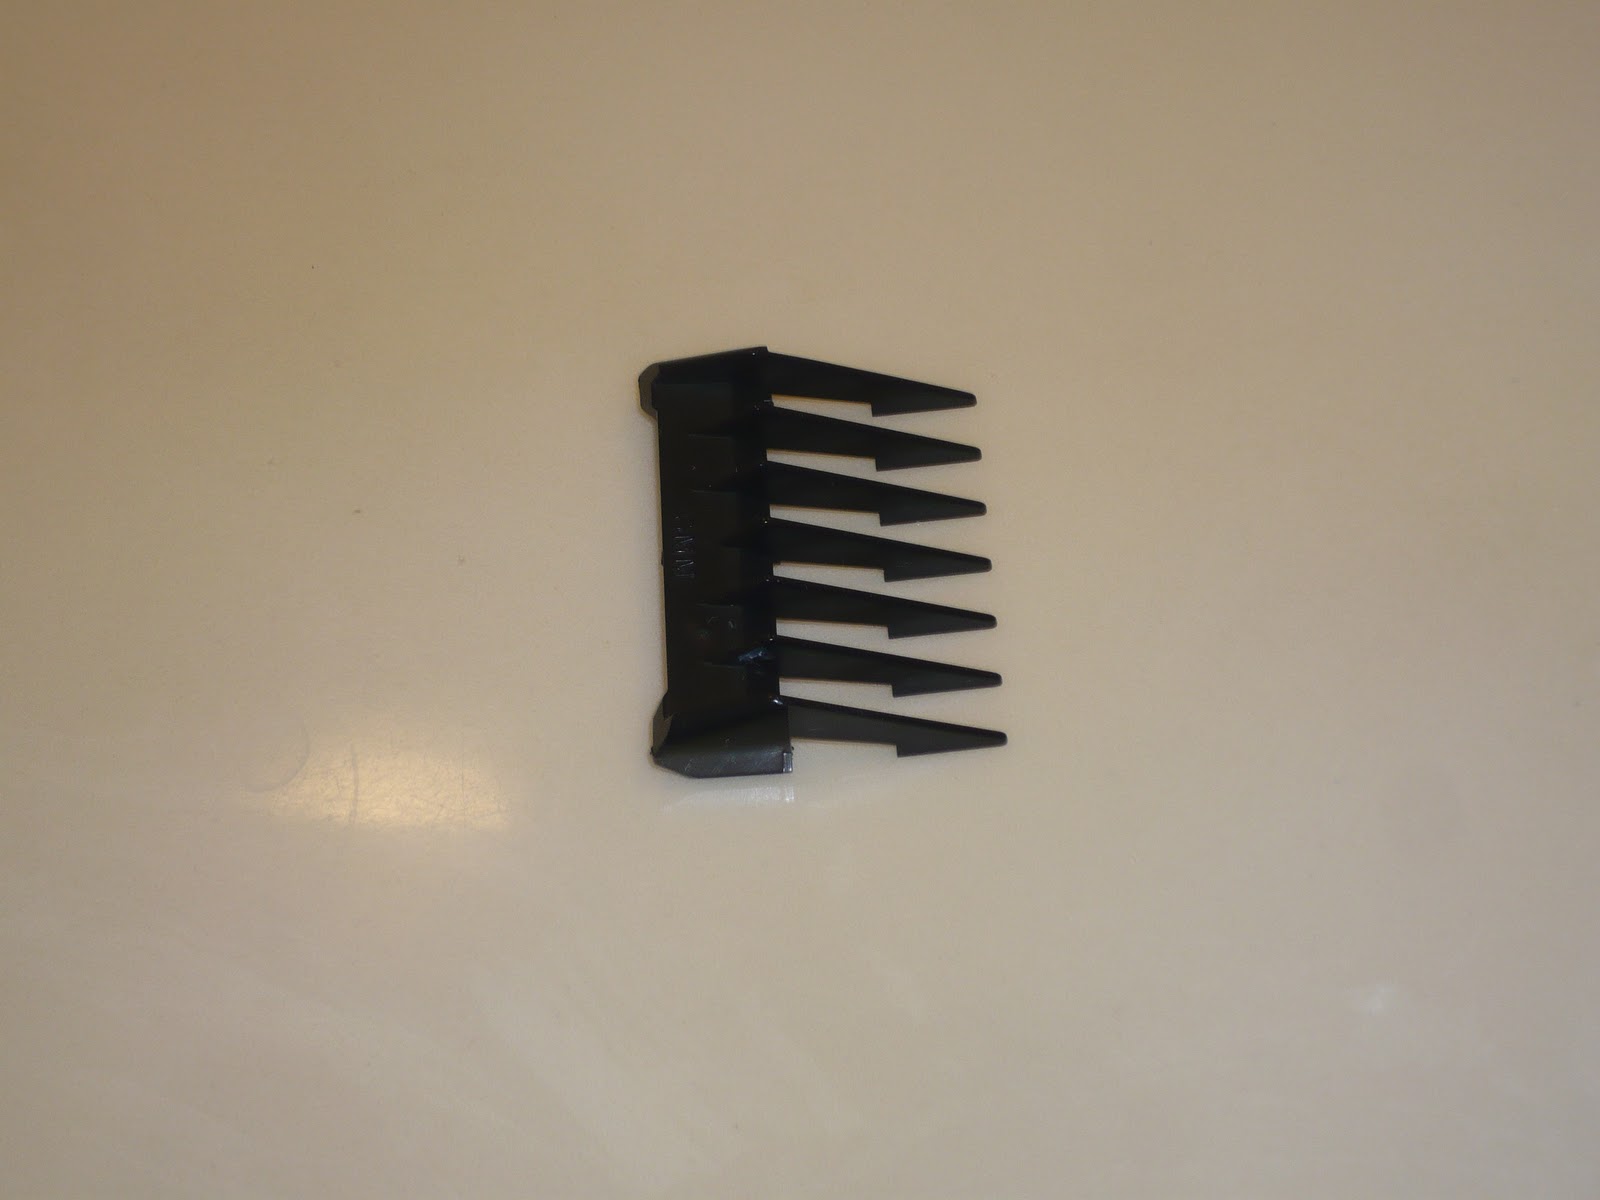
I picked this narrow head trimmer because it's cheap. Not really. You can trim off individual odd hair easily. If you make a mistake, it will be a minute mistake and nobody will notice.

You can use scissors and clippers. But for this trimmer you can touch your skin first, make sure the orientation is right and then move gradually to the cut point. Then move a few mm to cut the neighboring hair. In the mirror you always make mistakes unless you are experienced. One wrong scissor cut or clipper cut will ruin your hair style for weeks, until new hair grow back.

Now the most difficult part is apparently the ears. If you have curly hair you probably want to fully or partially cover your ears. If you have straight hair and want to cover your ears, you need to cut your hair with sufficient thickness on the sides.

Now if you want to show off your sexy ears, do a clean business cut, and you have absolutely straight hair, you have to read carefully. Not really.

You need help to hold down your ears so you can see where you are cutting in the mirror. A rubber band will do nicely.

Now comb your hair around your ears in all possible directions towards the ears, and trim off excess using the ear lines as a guide.

Then comb normally and trim the hair around the ears that is out of place. Since hair do not grow on the bones just around the ears, you can use that as a guide instead of the ear lines.

Finally, the hairline at the two sides near your ears need to be further trimmed. You trim it until it's neat and no odd hair stand out. This is the only places that you need to worry if the left and right are symmetrical. But seldom anyone look at you straight from the back within two feet.

For the sideburns, I use a clipper and pick a guide that gives me a few mm of hair, and blend in with the hair above. Then use the clipper directly to cut a straight edge. You can also use your fingers as short clips and cut. You can use razor for a straight edge.

Clippers are supposed to give you fixed length hair, the same as the basic cut using clips. However, in the basic cut you pull you hair straight and therefore more precise. Clippers also cannot do long hairs such as 1".

That's all there is to it. Start long. If you don't like it you can try again tomorrow. If you cut too short you have to wait a few weeks.

Hair car for men and kids

In case you do not know, you always need conditioner. Two in one is not good, not good enough to detangle kid's hair. After shampoo and rinse, apply conditioner quickly like shampoo. You hair should be slippery all over. Then rinse thoroughly. It takes about an additional minute. But even the cheapest conditioner will make a lot of difference to your hair.

You may need some non-fragrant hair gel to style or to cover your mistakes.  It can help your front hair to stay up and your spiky hair to stay down.  It can add style to cover up that your hair is not that evenly cut. 

Friday, October 8, 2010

Winterize your outdoor pet hourse


I found the perfect material for adding insulation to my outdoor pet house. Fiber glass is unsuitable because they are for filling cavity that you never touch or breath into. Rigid materials are difficult to cut to size, and do not fit my plastic house with odd corners and odd wall angles. Soft materials are too time consuming to fix onto my plastic walls.

This one looks like some packaging material like packing peanuts. It's like Styrofoam but semi rigid. It's like bubble wrap but it is very dense and the bubbles are not visible. It's cheaper than packaging material - 3.5" x 50' for less than $5.

It's not very thick so it's easy to go around non-flat places. After application it's not bulky so my pet house remains portable, and easy to dissemble for cleaning. It's light weight so I can stick it at the roof with tapes and not worrying something heavy falling down crushing my pet.

It goes very well with sticky tapes. I got clear packing tape 2" x 50m for less than $2. You can tape the insulation to plastic or to other pieces of insulation. Nothing absorb moisture so it will last a long time and the thermal property will not degrade. You can even use it to rain proof something.

The insulation will withstand water and likely steam. The tape may withstand water spraying on it but I'm not sure about soaking and steaming. Washing a big pet house is too much of a hassle. I'll scoop away the dirt and wipe wet spots with newspaper. Occasionally I steam clean the really part. So I don't worry about washing and steaming very much.

The insulation is very difficult to break by pulling, but can be easily cut with a scissor. You can also easily pierce holes in it. I don't feel that big and small pets will want to mess with it. Or, you can always use it only on the roof and on the outside.

The insulation will take adhesive well, such as the caulk adhesive that I use. But I want to rip off some of the insulation in summer, and reuse it the next winter. So I used adhesive tape. If I have a wooden house, I will use staple guns or thumb nails. If you take out the staples carefully, I guess the tiny holes will seal itself.

Because of it's semi rigid property, I can use it for sealing the metal grid door. Leave some extra insulation and it will cover the gaps when the door closes.

For the heater, there's simpler things than my broken low power solder iron. 10W is about right for a small heater. For 110V supply, you need 1.1K ohm resister with > 10W rating. The resister is pretty cheap and so is the electricity consumption.

If you have some cavity to fill, the best and free is supermarket plastic bags compacted. They trap air and do not absorb moisture. I have a two inch high void between the platform and the floor. The bags will get dirty given time. I can just wash them and dry them in the sun. Then use them again or recycle.

Sunday, October 3, 2010

Multi-flush toilet problems

Previously I discovered that my old 13G toilet can use as little water as new dual flush toilets, and maybe even less, because I have 2nd chances.

The adjustable flappers can reduce the water usage but maintain powerful flush. The problem is the refilling of the toilet bowl. Because less water is used, the tank refills faster, but the toilet bowl do not have enough time to refill, about an inch or less water level. This lead to very poor flush. Because of the poor flush, the toilet bowl will still be full after flush. So the next flush will be perfect. I call this odd-even flush phenomena.

You still save water if you need to flush twice for the even flush. Sadly no conventional valve can be adjusted to refill faster.

My experiment is to siphon water from the tank down the toilet bowl continuously with a driper. My estimate is that about 10 liter of water is wasted per day this way. So it is equivalent to a few flushes. So if the toilet is used a few times a day it will break even. The problem is having enough time in between flushes for the bowl to refill.

Ant blocking materials for house repair

Surprisingly, I have been battling ants most of summer, everyday. It wasn't that bad at all. In the past, I filled a few big holes so the ants cannot come in the house. Now since I have the ammunition, I can't tolerate ants crawling into the space between the house and me, even though they may not bother me at all.

Mostly I use my lime sand mix for filling big holes and for the underside of things, typically around the damp proof course. Lime shrinks a lot so sometimes one application will still leave holes when dry. Also there may be tiny holes and spaces in between applications.

The other main thing is wood stabilizing glue, because it is cheap. Typically around gaps on vertical wood frames and fences, and any holes on the ground. It is quick and easy, but cannot apply on the underside of things and don't stay long that way. So when all the masonry holes are filled, the ants start to come at the door frames and wooden fences. They don't walk into the doors though. They may not last long and they attract dirt, but they can be painted on or removed. It doesn't matter if I can't see the spots.

The other thing I use is clear caulk adhesive. It's just as easy and a little more expensive. It's for the places that I don't want it to look bad. It last but easily removed.

Monday, September 20, 2010

Non-toxic bug killer sprays

So I settled for the bug killer sprays:

Dish washing liquid diluted several times - for spraying around the kitchen and eating surfaces.

Multi-surface cleaner diluted several times - for floors that should not be slippery, and for other surfaces that do not need to rinse or wipe. The one I use is Green Works with grease formula for kitchen, that only need to wipe clean.

Multi-surface cleaner neat - for large bugs such as flies. I use diluted spray to shoot flies down, immobilize them and move in the big guns for the kill.

The soapy solutions really do not kill by toxin. Once the solution dries, the ants come back in no time if they can get in. When I kill the flies with undiluted solutions, their corpse attract plenty of ants.

Friday, September 17, 2010

Perfectly safe effective fly spray

Oh yes, it's soapy water again. From the web, it can even kill roaches instantly.

Flies cannot fly long distance. That's why they are annoying. My problem is not their invasion as all my windows have insect screens. But once a group got inside, it's hard to let them fly outside again, even though they want to.

To get rid of flies instantly you need fly swatter. Any other weapons at hand will repel them before reaching them.

A soapy spray is easier. You may stop them in mid flight by spraying them. You are only spraying hand soap diluted. However, they resting place is very easy to follow and not far away. You just need to spray them when they are resting. One spray and they cannot fly, hardly crawl. You can allow them to die slowly and fall off the wall. Or you can add a spray or two to kill them in seconds.

And there is a soapy solution for everything. For glass. For bathroom. Multi-surface. While hand soap is completely safe, it got residues and slippery. The Nature's Choice that I got is not there anymore. I got the Nature Works for grease. It's a multi-surface that you do not need to rinse. And I only need some mild cleaner for the kitchen. Any other place I have the CRL biodegradable.

Wednesday, September 15, 2010

Soapy water kill ants instantly

I used up my enviro friendly biodegradable acidic mixture pretty fast. So I just add my cheapest liquid soap and dilute it. It kills instantly just the same. I wash my hands many times everyday with it undiluted, so it can't be toxic.

Just don't spray on smooth footpath - it's slippery. When the sprinkler turned on, it re-energized the dried soapy solution. Ants can't walk on it without dying. In contrast, they just cross solid piles of ant barriers as if nothing.

It's so wonderful that if ants get into anything in the house, there's a soapy solution for that. For example, carpet shampoo! Hardwood floor cleaner! Liquid detergent even for vegetables! In the past I use wide cellulose tape.

If you do need to plant anything that ants will attack: Keep all your areas at least lightly irrigated and ants will not live. Ants will only come from outside.

Ants always walk on dry hard flat surface if they can, rather than soil and turf. I'm not sure if they will cross a trench of water. But if you add a little liquid soap, they will die crossing. And soap will stay when water evaporates.

Forget about ant repelling plants. My lavender doesn't work. The ants are happy to climb the thick branches. Those dense ground hugging covers may work, as ants are forced to crawl over it.

I would cut cheap black waste pipes in half, which is pretty easy with a jigsaw with any metal blade. They will surround a fruit garden or a fruit tree. You just to top up with water from time to time. Soap will stay a log longer. Soap may or may not repell mosquito eggs. You can add an 1" block of chlorine bleach for swimming pools.

Sunday, September 12, 2010

Instant kill homemade biodegradable ant killer

For most current updates, see label "pest".

Summary: dilute soapy solution kill ants instantly.  There are even organic liquid soaps on the market if you want.  Soapy solution will kill or immobilize crawling insects.  Alcohol will kill flying insects like flies almost instantly.  First-aid alcohol is good but Vodka spray is safe around food, pets and people (for non-alcoholics).  Ants don't live in wet places like regular watered lawns.  Must fill cracks so ants don't live.  Protect fruit trees with soapy water trench on the ground or up the trunk.

I'm consolidating the number of chemicals used in our house. Basically several types of cleaners contain similar chemicals. Even if they are optimized for different uses, you save a lot of hassle keeping so many, with so many labels to read. Basically a strong organic acid (biodegradable) is all you need for degreasing, lime scales, bathroom, toilet, sinks, stinks, to tires and wheels. (Some surface are not acid safe, but that's stupid.)

It dawned on me to try spraying ants with strong acid cleaners. My CLR biodegradable is an instant kill, better than the insect and ant killer that I'm using that is safe for lawns. As CLR is about the most expensive bottle of household cleaner, I tried

Nature's Choice,
general purpose cleaning agent
ingredients - mostly biodegradable natural plant extracts, probably organic acid

It's instant kill. I diluted to half and then quarter strength, it is still instant kill. I just search the net and am surprised to see that people mentioned soapy solution, but not in a big way so as to put ant killers out of business.

You may find you best and cheapest soapy solution and see how diluted it can be. But mine is good enough. It biodegradable, multi-surface cleaner. It already comes with a spray bottle in case you are in a hurry. That's the reason I tried it in the first place. There are no resides and you don't need to rinse it after surface cleaning. Basically I'm cleaning while killing ants at the same time!

Also I doubt if a diluted plant extract cleaner will do any harm to plants. I do spot spraying only so I rarely need to spray on plants and lawns. You do not need to spray on lawns because ants do not live in wet soil.

I used to use an instant kill ant killer. They took it off the market, perhaps because of safety concerns. I remembered somebody said that some chemicals use kills like nerve gas, and it works on ants as well as humans, which is much bigger.

To consolidate chemicals, I only use an outdoor spray, safe for lawns. Otherwise I need three.

Basically if you live near to some open space, and you have ant problems, you need to live with it. Ants just need some shady dry place to make a home, and accessible to water and food, which is plenty.

Ants don' t eat that much plants so there's not much reason to get rid of all ants outdoors. Ants like fruit. You better harvest before they come, or share with them. Experienced gardeners will cut off the palm tree fruits before they ripe.

Keep everything outdoors watered and ants will not live near you.

To keep ants out of your landscaping, the same method applies regarding the house.

Most importantly, you have to stop ants invading your house. Ants invade your house for many reasons - to find food and water, and to find dry shelter. Whatever they lack outside they will try to find inside.

I have seen enough insect terminators fail for ants. The latest terminator offered to spray once every month instead of three, compensated with safe chemicals they claim. This is the wrong approach as there is an unlimited supply of ants.

The only way is to block all access into your house for ants. If you live in a single family / detached house, that's easy. When a lot of ants invade your home, from the outside find ant trails. Follow the ants and you know how they get into the house, even the hole is tiny.

Fill the hole with you favorite. Transparent caulk adhesive. Specking material. Or just repair the outside surface properly. My favorite is of lime, sand and water mix - the cheapest and safe (don't breath the dust). The main advantage is that it does not dry easily. The paste will stop ants instantly, and it will dry completely in a couple of hours. Paintable too. But the unused paste will takes weeks to dry up if you put a sealing cover on. It's completely safe so you can rinse your tool in the sink. It's not waterproof though. You can mix in a little cement for that, but it drys fast.

When one hole is blocked, they may find the next best one. That's why I don't kill them. They help me to find all the holes fast. When they have no where to go they just disappear, looking for other houses perhaps.

Ants come from the ground so its rare that they invade inside via air ducts and window seam drain holes, which are high up. They don't get through window insect screens either.

If ants invade your apartment, it's a bit tricky. It's hard to trace where they enter your apartment. But as long as you can move around your furniture, you have a good idea.

Here's how soapy solutions work, I think.

Soapy solutions have something called surfactants, I think, which prevent oils from sticking to surfaces. Ants can survive in water for a long time. These surfactants changed the game. They mess up the water surface tension, so this become a powerful force to destroy the ants. Firstly the ants cannot move in an instant, as in prison. I think they look like drowned, if not the chemicals in the cleaners kill them in seconds. I think their "nose" and "mouth" are messed up the same as their limbs. They can't move and can't stop water and chemicals coming in. And perhaps water blocks their air passage. So the look dead instantly and stay that way. For my cleaner, when it drys the dead ant will fall from the wall, needing no more action from me. (It's a no reside no rinse formula.)

Ant killing chemicals claim that they have residue to control ants for months. Obviously it wont' work for outdoors, and even if true you don't want it indoors.

Imagine that, I lived so may years and nobody told me that. And it's not just me. It's so vague on the web. And our neighbors all hired insect controls for ants. I bet they still do.

Monday, September 6, 2010

TravelJohn versus CleanWaste (WAG)

The major comparison is the disposable solid waste collection bag. TravelJohn wins. The bag and the external enclosing pouch is attached to the bag. Once you close the bag, you can roll it into the pouch blind folded. The John bag feels thicker to the hand, and is also biodegradable. I think the John bag has double Ziploc while the WAG is single.

The John powder is enclosed in a paper pouch inside the plastic bag. The WAG powder is just inside the plastic bag. It is more convenient to install the John bag onto the toilet, blind folded. There's no risk of getting powder into your hand.

The WAG capacity is 32 oz. The John capacity wasn't specified, but probably at least 28 oz as in it's urinal product. I tried in two mornings. The urinal risked overflowing, but didn't. So if each one person of three deliver 12 oz, both bags are not sufficient anyway. I had more experience with the WAG. My rule of thumb is three times of liquid disposal, hopefully not all adults. If you use it too much, apart from the solidification, the pouch isn't large enough for that much liquid.

The John powder may not be completely biodegradable. It's non-toxic though.

So the poo powder for extra solidification is pretty useless. The limiting factor is the size of the pouch.

Portable urinal - all not suitable for camping. The classic John comes without any Ziploc. You can just throw away the jelly when you are done. The newer reusable ones comes with a seal like a Ziploc. They are quite usable though for traveling and the long drive to camp. The plastic "mouth" is good for both boys and girls. If you are careful and with tissue in your hand, you can keep your hands all dry.

The big bags has similar liquid capacity. Any toilet system will be more convenient than holding a small plastic ring. Though these urinals, single use or double use, are really personal and private, and you don't need any toilets and bathrooms. But solid waste is the main issue.

Toilets - I will use the WAG system for solid and the John system for boys' urinal. The WAG toilet is much better than a bucket, but still boxy and bulky. The whole toilet is sturdy when you sit on it. It has a good solid toilet seat and easy to clean if necessary. The cover lid can seal the toilet pretty good. It's totally good when everybody seats down. For boys generating liquid, they can lift up the toilet seat as at home. But when the seat is lifted, there is nothing to secure the bag.

The net in the WAG toilet for holding the bag in place is pretty useless. The size of bags are designed to go all the way to the ground. If you restrict the bag it cannot be spread evenly around the seat. I remove it.

The John toilet is like a portable chair. From the picture I wouldn't seat on it, sharing it with others. But I would carry one, good for a boy loo that nobody need to sit on. A simple frame like the ring holding a basket ball net will be good.

I won't buy any simpler toilet to sit on with good possibility of toppling - kids can't sit still.

For the bathroom tent, both looked big enough. I have a cheap shower tent that is designed for one people standing. You can put two toilets but they are not far apart. If you have just one toilet, you still have some space for changing, but too close to the toilet. I would get a tent big enough for two loos with some space in between, plus extra spacing for changing. You will need changing space with open bottom if you only have a tent for sleeping.

Tips: I will dispose of the bag once someone use it for solid. I think any bag will smell, but cleaning up after yourself is the more important feel good factor for others. For liquids, share at most three times, or more with kids.

A family can use around 2 bags per person per day, which is comparable to a daily camping fee for a big family. But if the campsite bathrooms are reasonably clean, adults and boys should use it in the day time. After dark, in a big campsite, in a non-environmental sensitive campsite, dumping biodegradable liquid waste anywhere shouldn't be an issue. It's priceless when you wake up in the middle of the winter night and need to go, without having to walk a long way to the camp bathroom. Also, some overcrowded campsites' toilets are only clean in the early morning, after cleaning crews do their job. Often someone block one of the toilet, or make a big mess in one of them, forming a line in the rest.

Wednesday, September 1, 2010

Awesome green paving and patching material

My lime sand mixture is going places, more awesome than I thought. So awesome that I think that's why you cannot buy hydrated lime in hardware stores, anything but.

In building supplies you can get 50 lb for less than $15. If you keep it dry and from air in a plastic trash bag, it will last forever. Sand is free. Now I have the habit of bring back from vacation a cup or two of sand, and immortalize them in my pavement or part of the house. Any cheap sand in hardware stores will do. Lime will dominate the color - brilliant white.

The new dry paving technique for gap filling. You just mix dry sand and hydrated lime (white power) together, and pour the mixture onto the gaps. Then you use a push boom, or small brush, to put the mixture neatly into the gaps only, and take away excess mixture. Then you spray water on the mixture with a spray bottle for example, enough to keep the mixture from blowing away by the wind, and not to much to avoid rinsing away the mixture. The next day you can pour water on it gently to finish the re-hydration process and start the recarbonate process.

The bad. There will be a brilliant white haze on the paving slabs. It will blind your eyes like snow if you live in sunny areas. I don't know how long will the haze be worn down by walking and the elements - basically it's lime stone if left for long. May be months or years. Certainly acid can cleanup the haze with little damage to the gaps. There is the biodegradable CLR. I have no idea how effective it will be. The white haze is a small price to pay.

The gaps will be brilliant white. Is it a good or bad thing compare to gray?

The mixture will take a long time to dry and harden. It doesn't matter for paving. You can walk right after as long as your slabs or stones are securely fixed. Light rain doesn't matter. It will probably heavy rain proof after a few hours. My gaps hasn't been hardened yet. Using the wet technique with water added into a paste, the mixture will harden like any other mortar, after days or weeks.

The good. This method is lighting fast. The mortar is permeable - the green way to go. For me that's a way to drain water away without having a level and flat pavement.

You can fill pretty large gaps economically and easily, as long as the lime mortar don't carry stress. It can be hard as limestone, but it takes a long time.

It's natural. Lime is from limestone, and will return to the limestone state gradually if left on it's own. It's non-toxic (but strong alkaline). It's safe for the environment, because it was the environment. I wash the tools confidently in the bathroom sink. There's the cancerous label but I think that's for breathing the dust in long term. Wear a mask and only mix it outdoors.

What is the lime and sand proportion? I have used pure lime. It shrinks and crack a lot when dry. It doesn't matter because no strength is required. The wet mixture in previous post is a guide. Basically, imagine the lime powder glue the sand particles together. So you just put enough lime in the mixture, but not too much.

You can use it on tiles, but they have to be horizontal.

Now for patching work. It has to be the wet mixture unless your holes and gaps are horizontal. Basically you mix lime with water into a thick paste without falling off walls. Then you add sand without too heavy on the mixture. The surface will be sand rough and permeable.

I have used the mortar for outdoor patching, to fill the cracks from ants entering. If not for the ants I'll leave it as it is anyway. So permeability is not a problem. If you have a base that is non-permeable, it doesn't matter. And you can always paint it with a non-permeable paint. You can always add some Portland cement to make it like concrete, but that's a complication. And you are better off buying ready mixed patches.

Friday, August 27, 2010

Multi-user personal multi/dual flush toilet conversion

If you want to save water, you really need multi-volume flush. Kids are different from adults. Boys are different from girls. Morning is different from night. And each meal is different.

Also I have a huge tank that money can't buy. It looks brand new and will last forever. The bowl do have hairline cracks inside but with my constant automatic bleaching system, you can't notice the cracks. You can see the cracks only if there are dirt or water deposits - not possible with constant bleach and crystal clear water.

They are many incentives and tricks to get you to get a new toilet. All the toilet seats now do not fit the mounting holes of older toilets. But I got a slightly flexible one that will fit!

The adjustable flapper is fairly consistent. It flushes about the same volume of water every time (except for the different level of water in the bowl due to different refill times). So this is the flush number one.

Holding the flush handle for a couple of sec more is pretty easy, and many people already have been doing it. The less water flush #1 uses, the less is the time to hold the handle for flush #2 and #3 etc.

The only thing needed is to visualize the level of water in the tank and let go of the handle at the right moment. This can be done by a vertical, calibrated, tube outside of the tank. But this is inconvenient to look at.

Electronic water level detection is easy and cost almost nothing. So there will be a bank of LED's for indicating the level in the tank, digitally. You can also use different tones or sophisticated displays. But the aim is to compete with those $20 conversion kits. LED cost at most a few dollars per pack.

You need one simplest transistor and a few resistors per level. That's cost about nothing. The circuit is trivial and I will give you one when I come round to it. Water is about a 20k resistor, the presence and absence of which is a reliable switch. Using one AAA battery, the transistor drives one LED when water is absent.

A low current design is required for the battery to last long, say, a couple of months. But it's simpler to enable the circuit only when the flush handle is turned. An AAA battery will probably last for a year or two. And a normally cutoff circuit minimize corrosion due to electrolysis.

Wednesday, August 25, 2010

Your dual-flush toilet conversion kit may not work

And here's my very cheap multi-flush system.

I think I still have the 13 L (3.4 G) flush toilet, or even larger. It's pretty easy to use inexpensive hardware to save water to 6 L or less (<1 .6="" a="" almost="" and="" br="" can="" don="" dual-flush="" easy="" flush.="" for="" g="" have="" i="" it="" lot="" man="" more="" nothing.="" per="" poor="" pretty="" s="" save="" t="" than="" think="" this="" to="" water="" you="">
If you have the post-1994 6 L low flow toilets, the first generations don't even flush well for the full volume. What can you achieve by halving the volume?

There's another complication during tank refill. The bowl is also refilled via the overflow tube (the tube in the middle of the tank). The water at the level of the bowl will depend on the volume of the last flush, which dictates the refill time and hence the refilled volume. This may not occur if your fill valve is way over refilling the bowl, or you use those kits that come with it's fill valve too.

You can do tests before deciding to convert. The motivation is that you need to empty your tank for installing anything. It can be messy depending on what is deposited and accumulated in your tank.

Before you test, you have to understand that there are at least 3 levels of flush. The least volume required is flush for pure liquid. The next I will call it paper flush, for paper plus liquid. The most volume required is solid flush. You can also add floater flush, 3-day-after flush, you know what I mean.

It happened that all my toilets have an adjustable flapper already in it, the sort with a scaled dial to vary the volume. It cost a tiny bit more than the cheapest flapper. First you adjust the fill valve to increase the volume in the tank to the maximum level, leaving a safe margin (~1 inch?) below the overflow tube. Then you test by adjusting the flapper to get the desired flush. If you do not have an adjustable flapper, you can just keep the flapper open by hand and measure the water levels at the tank.

I found out that for my old toilet, 4 to 6 L is required for all the 3 different flushes. That means you do not gain anything if you have already a low flow toilet. If you have a high efficient low flow, you may still flush a lot of things by reducing the volume.

Let me say it this way, if you add food dye at the bowl, the amount of water you need to flush depends on how much dye you use. So you can't get away with much less than 5L of water all the time. Actually for pure liquid, you don't really need to flush. You can just add water at the bowl via the overflow tube, until the food dye disappears.

If the volume is enough to flush paper, you don't need much more water to flush solids.

So, if dual-flush is pretty useless, do I need a new $500 dual-flush toilet to really save water?

No. It dawned on me people do dual-flush all the time. By holding onto the flush handle, people empty the whole tank of water into the bowl to achieve a mega flush, when the normal flush fails.

So this is my ideal of a multi-flush system for almost nothing:

Firstly, there is the tube at the top of the tank, coming up from the back of the tank. This is just to push the fill valve open with a ring of tube, through the hole at the back of the tank, and refill the bowl via the overflow tube. You stop pushing when all the color of the food dye disappears. This is a bad 3-minute implementation but someone can improve on it.

The indicator is the main component of the multi-flush system, located at the corner of the tank, just below the flush handle. This is just a 1/4 standard fridge water tube, with the other end at the bottom of the tank.

You can see two mark at the tube indicator. The top mark is the level of the full tank. The bottom mark is the level when the flapper closes by itself. Currently this is about 5L, enough to flush paper and solids most of the time.

This is the normal or number 1 flush. Before the flapper closes (before the water level drops below the bottom mark), you hold on to the handle and let the water level drop some more, until you think it's enough. So you have multiple flush levels.

Having an old powerful toilet has its advantages above those poor low flow ones. If the number 1 flush fails, I still have up to 10 L of water in the tank to complete the task immediately, instead of having to wait for the tank to refill.

If this is a guest room toilet I don't recommend it at all. Here I would recommend a single 5 to 7 L flush, and tell all the family only to use this bathroom for solids only, but don't tell the guests.

If you have small kids that don't understand much, you can have a bathroom with 3-4 L for boys only, and a bathroom for girls with 5L for liquid and paper flush. If you really need to save the planet, you have to teach them that pale yellow is OK, and residue white paper in the bowl is OK.

The indicator is just a tube that runs over the back of the tank, below the lid, to the bottom of the tank. At the moment I tape the tube to the tank with packing tape. The L-bend quick connector you see is just to avoid curving the tube too much. At the beginning, you have to siphon out the air in the tube, using your mouth or a baby ear and nose pump.

ps Don't leave the tube for long without securing the end. If the end of the tube drops down, the tank will drain and the refill valve will open forever. This lead to another better idea.

Saturday, August 21, 2010

Fluidmaster Flush 'n sparkle improved


The Fluidmaster Flush 'n sparkle fits in the toilet tank. It dispense cleaning chemicals whenever it flushes. You can keep the whole toilet bowl clean without brushing.

It's an improvement over those drop-in-the-tank solid blocks. A typical one is by Clorox, a 3 inch diameter block, which dissolves slowly in the tank, and is suppose to last for a couple of months. If you are single, or a working couple leading an active lifestyle, it would probably last that long.

The only chemical you want is chlorine bleach. The acidity neutralizes the calcium deposits in water that form water stains. The problem is that for the first flush in the morning, you will be overwhelmed with chlorine, like swimming in the pool just after chlorination, and much worse.

More importantly, chlorine attacks soft plastic used for flapper parts. You need to get chemical resistance flappers, now commonly sold.

The flush 'n sparkle is an improvement. The refill block is smaller, designed to last as long as those Clorox blocks, which isn't that long. You still smell chlorine especially in the morning. By dispensing straight into the bowl, chemical attacks are eliminated.

But still the FNS dispenses too much bleach, needs refill too fast and too expensive. Here is the improvement.

The white tubes and parts are the original FNS, going from the valve and into the overflow tube. The parts added are the splitting T, and a 1 GPH dripper. To join the parts, I use standard 1/4 inch (OD) tubes, which are used for the fridge, and drip irrigation.

The tubes used in toilet tanks are 1/4 ID (internal diameter) tubes. I can't find parts for it, but standard 1/4 OD tubes fits inside it nicely, as in the picture.

The splitter ensures that there are enough water going into the toilet bowl, independent on how much water coming out from the dripper. Here I use quick connect, or John Guest, which is under $3. The alternative is to use much cheaper T's used in drip irrigation. But those T's restricts the flow somewhat, reducing the level of water in the toilet.

The dripper ensures that bleach is dispensed in drops. Don't use those flag drippers that can be opened and cleaned. They may leak.

Using rubber bands, I tied the tube from the dripper to the original clip of the FNS. In theory, both refill tubes should be above the overflow tube, so water from the tank is impossible to contaminate via the inlet valve.

Drinking tubes for the fridge would probably work but you really need is a tough 1/4 OD tube to insert into the white tubes with 1/4 ID, and into the splitter. It also need to be elastic enough to hold the dripper well. The quality of drip irrigation tupes vary so you need to pick a good one.

The whole thing can be installed in a minute.

Also, the setup was designed to use much cheaper 1 inch diameter chlorine blocks for swimming pools. I will be saving money if each small block last for a few days. And I would like to add blocks say every week or longer.

Here is the improved Flush drip 'n sparkle in action:

Sunday, August 15, 2010

Better than Flowbee

To understand why Flowbee and the older Robocut works, we have to understand haircut theory 101. If every hair in your head is equal in length, you look OK. Of course you adapt the theory to shorter sides, etc. Most haircut, say, business cut, will involve a lot of this basic cut.

So basically both the Flowbee and Robocut hold your hair straight up via vacuum, and cut into equal lengths. That's why they work to some extend. I believe some reviews that the Flowbee cuts more like a scissor with no pulling effect.

I actually build a cheap Robocut in 15 minutes and tried it out using PVC pipes. The main thing is a 3/4" water pipe with a slit cut in it - for the scissor to come in and cut. The other is the attachment to a powerful vacuum.

It works decently to cut a kid's hair (poor kid). The problem is that cutting is slow because you have to put the scissor in restricted place. And that even after blocking some of the air passage with a plastic plate and tape, some hair in each batch are missed. Also because of the difficult in cutting, the cuts are not clean and the hairs are not exactly equal in length. But at the end it looked decent.

After I realized the first principle in hair cutting, I developed the touch cut technique with the touch cut hair clips. Each clip is made of two plastic cards, hinged together by tape. You pull a small strand of (wet) hair straight between the clips, and cut the excess length of hair outside the clip. This is exactly what hair stylists do, but without the precision measurement.

For a man's business cut, you use shorter clips at the sides and gradually shorter at the neck. The Flowbee is fast but the different length blends better by hand.

The "invention" is really suitable for cutting your own hair - hence named touch cut. You do not need to see what you are doing! Because you cannot go wrong. You cannot cut any hair shorter than your clip dictates. If you repeat on the same area long enough, all hair will be of equal length. In practice it's pretty fast, almost as fast as your hair stylists. My experience is that you can cut any hair around your head easily with an ordinary hair scissor, by twisting your head if necessary. If you cut your kid's hair, it's real easy.

A big challenge is a man's business cut for straight hair. The challenge is around the ears and at the neck line. You may need very short length hair. In that case you can use your fingers as clip, meaning hair length the thickness of one finger. You can have two finger width if you stack your left hand fingers and right hand fingers to clip the hair. The Flowbee cannot blend in different hair lengths so easily.

For a business cut you do need to need to trim off the hairs that are out of place to get the neat look. I am not aware of anybody who do this. I attach an old camcorder to a TV, so I can watch the back of my head comfortably, and I can zoom in to watch each hair. It can be done but not too simple because you have to move the cam around your neck to be sure that no hair is out of place.

For precision trimming it's really difficult using scissors looking at the TV like a mirror. I suggest an electric hair trimmer.

The good old clipper is a totally different kind of fish that stylists don't use. Firstly, it cannot cut equal lengths using the hair guards, because you are not pulling the hair straight, and only cutting those.

Friday, August 13, 2010

Guard against Hotspot Shield disconnection

sofYour connection via Hotspot Shield can be dropped any time without notification. This will occur if their servers are busy, and your connection is idle for some time. This false sense of security is even worse than public unencrypted Wi-Fi connections that HHS is designed to protect.

You may think that your browsing content and IP are secure over the wireless connection. But HHS can stop working anytime and your content and IP will be revealed without warning.

The only way I know to stop the browser when HHS stops working is via .pac files for automatic proxy setting.


function FindProxyForURL(url, host) {
if (!isInNet(myIpAddress(), "10.10.1.0", "255.0.0.0"))
return "PROXY 127.0.0.1:12768; "; /*deny if not VPN*/
return "DIRECT";
}


This will work for typical home and Wifi connections. When HHS is function, you have a typical LAN IP such as 10.xxx.xxx.xxx. When this is not the case, a non-functional proxy url is returned so the browser will stop working immediately.

If you are directly connected to a cable/DSL modem at home, you have a typical public, external IP address. If you have a wireless router, your IP is typically 192.xxx.xxx.xxx.

The above instructions will not work directly if you are on a company LAN for example. You have to detect your fixed LAN IP. If your LAN IP is dynamic, you have to find a way to differentiate it with the dynamic HHS IP, using a suitable subnet mask.

Monday, July 26, 2010

Best way to block Hotspot Shield advertisements

This is simplest and fastest, same for most browsers.

All you need to do is to put this in a text file, eg, c:\hotspot.pac

function FindProxyForURL(url, host) {
if (shExpMatch(url,"*anchorfree*"))
return "PROXY 127.0.0.1:12768";
/*any unused port will block ad*/
else
return "DIRECT";
}

Most browsers support automatic proxy configuration. In Firefox its at Tools>Options>Network>Settings>Automatic proxy configuration URL

You enter the filename:
flile://c:/hotspot.pac

You can also do fancy things such as ensure that Hotspot Shield is on before allowing internet access, to protect your IP against Hotspot, which may disconnects you at anytime without notice. That's for another day.

Wednesday, July 7, 2010

Homemade Automatic toilet bowl cleaner

 For the many updates, check label "toilet"

I'm talking about:

Kaboom Scrub Free!
Fluidmaster Flush 'N Sparkle

I stumbled upon the earliest form of toilet tank mounted cleaner on the net many years ago. The idea is so good that I brought it. It looked a little more complicated as there seemed to be a miniature valves into and out of the cleaning tablet housing. I was let to believe that the valves were the important part, controlling the correct dosage of the chemical.

Everything was good except that the chemical didn't last. I thought I had the idea of waiting for one of the giants to enter the market and they can produce some decent chemicals. I actually asked the website about plumbing code, whether it's safe without the possibility of back flow. I think the toilet valve itself guarantees that. The website soon disappeared and I thought it folded.

I think Kaboom is the next to pick up the idea. It was well made and the hardware was free too. I think I still have the early version called No Scrub somewhere under the sink. It used crystals and was still dissolving too fast. I don't think it last 3 months. The housing is a bit big and I thought of putting something else in it too but if I never thought I can come up with something better than them. The lid is screwed on and it's a bit hard to open it to refill.

Than came the Fluidmaster Flush 'N Sparkle. It's more professional. It's compact. The cartridge is easier to pull out and replace, because there's an O ring to seal the housing, requiring less effort than just a screw cap. The major advantage is that it's available in hardware stores together with other Fluidmaster hardware. Again it doesn't seem to last 3 months or 1000 flushes, but long enough.

Yes, all the stuff works well. You don't really need to scrub. Try the Clorox tablets, 3" white bleaching blocks in supermarkets and everywhere. You drop the thing into the tank and that's it. The problem is that you can't control the dose. In the morning the first flush is concentrated chlorinated water. It's worse if your toilet has no windows, relying on extraction fans for the ventilation. The other problem is that chlorine attacks the soft rubber flapper of the flush valve. I think you have to replace them, say, every year or two. Consequently there are chlorine/ chemical resistance versions in the hardware stores. It's trivial to replace the flappers, but it cost a few dollars, and otherwise those things never break.

The only thing you need is chlorine tablets like Clorox. It's simple chemistry. Hard water contains mineral which are calcium minerals, or from natural lime stones. To dissolve them you need acid, and chlorine react with water to form hydrochloric acid. I hate corporations trying to sell bacteria killing stuff to ignorance housewives. Bacteria cannot survive without water and air. And if chemicals can kill bacteria they can also kill you in sufficient amounts. This time chlorine tablets are over kill for killing bacteria. In this case, you really don't need to kill bacteria in the toilet. There's plenty of them and they don't come back. Bye. The bad thing is that they will kill the good bacteria in the septic system.

Other cleaners without bleach are just like detergents, surface agents preventing dirt from sticking on the surface of the toilet bowl. They don't work that well against lime and definitely not on lime filled toilets. With chlorine tablets old toilets will become sparkling white with time, if the surfaces aren't damaged by scrubbing. The other acid cleaner are CLR, now with an organic acid form. It's as good as any toilet bowl cleaners. But I can't find any slowing dissolving acid in tablet form.

As for environmental impact, chlorine isn't that harmful. A small amount isn't toxic as it's used in most swimming pools and in the water. Chlorine will eventually form natural occurring stable mineral salts, which is totally harmless. As long as you can use as little as possible, you don't waste resources to produce it and minimize changing the acidity of the discharge environment.

The Fluidmaster is good but I have 3 toilets. I have to replace them all in one to two months. Sometimes I was too lazy to do it and it cost about $8 each? Using a brush and a liquid bleach every few months isn't a big deal, until one toilet turned black at one of the surface cracks. Well, the option is to replace the toilet that isn't necessary and too big a deal if I were to do it myself. If you keep it sparkling white you can't see the cracks.

The story goes: one day I found an old Clorox tablet 3" in diameter. I found out that the Fluidmaster cartridge can be opened to refill. So I crushed the tablet into smaller pieces and put them back in the cartridge.

I searched the net and if you have a swimming pool, you know what I was thinking. I found those 1" diameter chlorine blocks for swimming pools. Buy many swimming pool owners have thought of it and tried it. One plumber guy used it and do not recommend it mainly because the tablets are of different dissolving rates and the swimming pool is a lot of water compared to the toilet tank. But he was dropping the blocks into the tank like the Clorox ones.

I think those swimming pool chlorine tablets will work well. Firstly they are slow dissolving. They are much cheaper than those for toilets. The 1" ones fit right into the Fluidmaster cartridge that I measured. If these tablets dissolve too fast and you loose money compared to using the original cartridges, you can leave some time gaps between replacing the tablets. Acid is rather good in dissolving old calcium deposits. You just need to replace the tablets before deposits become visible, or just become visible.

Further down the road I don't think you even need the dispenser. It's pretty cheap to make one perhaps. If not you can just make one to show off. Parts:

1.5" diameter PVC tube (enough to accept 1" tablets)
John guest adapters on both ends, or tube adapters
two sort tubes

The tube used in the toilet valve seems to be not the standard 1/4" tubes, but at least they are standard. You must be able to find it in the hardware stores or cut the original piece into two. The installation becomes inserting the outlet tube into the central tube of the tank, securing using fancy clamps or just rubber bands. You can mount the whole thing at the side of the tank of just drop the sealed tube into the water.

You can have a fancy union to make it easy to open the tube and refill tablets. Really there are plenty of space in the tank to do some awesome stuff.

Friday, June 25, 2010

Perfect imperfection: Lime Sand permeable paving mortar

There's no permeable paving for residential use. Those permeable concrete and asphalt are ugly and hard to install. Usual permeable paving for the home are stone (or similar material) slabs, relying on the gaps between stones to drain water.

Why you want permeable paving? The big issue is to prevent urban runoff, with the rain and storm carrying dirt into the ocean. Soil around your home absorbs the excess water, and then release it up on sunny days.

But for the home owner, leveling a pavement is the big issue. That's impossible if you pave an old path or area with things there at different levels over the years. I tried to lay the stone directly on grass and let the grass die and let the stones sink a bit into the soil at different degrees. If your pavement or patio is not perfectly level (with a few degrees off to drain water), water puddles can form every time after rain or washing.

For home paving, you make a level bed of rocks and sand, then add the top layer of stones, brick or other slabs. Finally you fill the gaps with something.

I'm using like thin tiles of stone modules hold in place in a plastic grid. The untended side effect is that it can go up and down to fit my irregular base. With some modifications it would be a pleasure to install. Though you still need a good base. Sadly, the current design is unpopular because of a few flaws. I managed to get it cents for dollars.

Permeable gap fillers are aggregates of stone fragments or sand. If you don't fill it it will be filled with soil or dirt. The problem is that you can't brush it, you can't hose it. And if you don't fill it, insects such as ants like it very much.

Other ways to fill the gaps are more like mortars. The popular way is to use polymeric sand, easy to apply and some retains it's soft sealing property. But they are not permeable. I found about two permeable types on the web, but only available in Europe or commercially.

Modern mortars are impermeable, they will make sure of it to prevent water seeping into the whatever base.

My perfect permeable mortar is lime and sand mix, which is actually used for old buildings. Here it is:

1 cup water
2 cup Type S hydrated lime (~$14 / 50 lb)
2 cup washed plaster sand (~$3 / 50 lb)

Type S hydrated lime is the most common lime you can get from building material suppliers, except for the home improvement hardware stores because they don't think people will mix their own mortar. Any hydrated lime will do but you ,may have to vary the ratios. Standard lime allows the builders to mix consistence mortars.

Any sand will do but beware that if they are not properly graded (filtered), any large particle will block your grout bad tip, and you have no easy to unblock it but to empty your whole bag. Sea salt will affect the long term chemical reaction of lime reverting to lime stone, but you probably don't really need that. Play sand is probably OK - washed and safe to play on. Paving sand will not be OK because my grout bag was blocked.

The exact ratio is not critical. The above amount will give you mortar for some 10 sq ft of 5 mm shallow gaps. Add 1 cup of water to 2 cup of lime will give you a soft paste that will not drip. Without sand the lime will be very soft. More sand the finish will be rougher, may be stronger and may be more permeable.

Features

The mix is brilliant white. The color of sand is immaterial unless you have a very high proportion of it.

The lime sand mix is soft. You can crack it with your finger nails. But you can brush it or hose it without anything noticeable falling off. That's a big advantage over any aggregates. Even if you brush a little lime (and a little sand) off the surface, it just lime stone and sand, perfectly environment friendly.

The lime sand mortar is strong enough to glue lose stone or fragments into position.

I cannot guarantee that the mortar is permeable. But for me it's highly permeable. The mortar do not have strong adhesive properties attached to the stone, and pure lime shrinks a lot when dry leaving a lot of tiny cracks. As a result I tend to create a lot of tiny cracks during the filling process. They look beautiful with my natural stones anyway. If you use pure lime with little sand, the minute cracks due to shrinking when dry will certain be highly permeable. The other extreme is to use very little lime so basically it's all sand so it must be permeable.

Procedure

You have to use a grout bag, like apply cream to a cake. Lime will stain everything brilliant translucent white. Lime is soft and the stain will eventually fall off but fine dust takes time.

For 5mm gaps or larger, the tip of the bag should go inside the gap and you should fill the gap without the mortar overflowing out of the gap.

Then use a pointing knife to "point" the mortar. It's basically a sharp object to smooth out the mortar. If no mortar overflow outside the gap, you are done. Or you have to remove the excess mortar with a putty knife, which is like a pizza server, or anything with a thin strong edge. Excess mortar will stain the edge with a white haze. It doesn't look bad and it will wear off with time.

You should let the pavement from sun and rain for a couple of hours or days. The proper way is to keep it moist under a wet blanket. I don't do any of these, which defeats the purpose of easiness. The mixture dries out in a few hours at most, and good enough to brush and rinse the next day for certain. The carbonate process is a long term process.

Unused mortar dries very slowly with a lid on. You can do a little bit everyday or every weekend. The tools are easily washed clean with water. There's no environment impact because it's lime stone and sand. I pour the used water into other parts of the permeable pavement.

Hydrated lime is very alkaline before turning back into lime stone with carbon dioxide in the air. The lime is fine as dust. Maybe for this reason the package says there are cancer causing agents. I doubt if they have to add any chemical to lime.

Wednesday, June 23, 2010

GILA Mirrored Privacy Window Film

I recommend it because it's cheap for 3' x 15', and looks good too. However, there's a lot of if's and but's. The Lowes review system is pretty useless. So here it is.

Privacy

First of all, the privacy is not absolute, and varies depending on time of the day. To understand how it works, a piece of glass reflect a small fraction of the incoming light and let others through. With the film on, the incoming light is reduced to some 15% (check), and the reflection is increased to 85% (assuming no absorption).

So on the outside of the house you see two light sources. A 85% reflection of yourself, and 15% of whatever source from inside the house. The brighter the outside, the stronger the reflection of yourself and the less you can see inside. In day time even without bright sunlight, you can hardly see inside even when you are a few feet from the window.

After dark outdoors, you don't see any reflection of yourself at all. All you see is the indoor lighting, reduced to 15%. Although dim, you can see clearly how many people are there and what they are doing. In addition, people indoors don't see anything outside at all. All they see is a beautiful reflection of the living room or wherever they are in. They can't see even if someone is right outside the window.

It's not for you if you want absolute privacy at night. But it's wrong to say there's no privacy. The indoor lights is reduced to 15% and that's an improvement, thought not very useful. For me there will not be visitors and door to door salesmen at night and any pediatricians then will be far away from the windows.

Appearance

It really looks like that from the outside as in the picture even if your installation is not perfect. Of course it depends on how good looking is your environment. It's hard to see the flaws when you are at the outside. Unless you have huge windows like that, other people from afar will not easily notice that it's a mirror, because the reflections will be other parts of the external architecture, the sky, and trees. Even normal glass will reflect a lot in bright sunlight.

Looking indoors you see a beautiful reflection of your room at night. Your room will be brighter and hence another energy saving advantage. In daytime you can see the flaws of your installation if you are a few feet away or closer. Form afar the windows looked like it has dark stinted glass instead of plain glass with film on.

From indoors you can see the about 2mm gap that the film does not cover. It's a bit like a dark stain glass with unstained, polished edge as in some mirrors. Clear films do not have this feature. It can look good inside architecturally in bright sunlight. It's likely that your first installation do not have perfect straight edges and perfect corners. But you won't notice it if you are a few feet away. And if that imperfection bugs you, don't put it on a window you sit next to all the time.

Energy saving applications

I would put the film on all windows wherever I can. It's a pretty good cooler in summer and has official ratings to prove it. Clear energy saving films are more expensive. Check that some films are not desirable for double glazing.

Blinds and curtains do not have the energy saving efficiency of the film against the sun.

Blinds/curtains/shutter replacement

With this film blinds will not be necessary in many windows. I believe UV light is filtered by the film so furniture are safe. This film is like a sun glass so no more glares when you are working next to the windows.

It's suitable for a TV room, unless you often close all the blinds and curtains in daytime. At night it's a mirror indoors so you won't be disrupted by a passing car (likely).

It's great for architectural windows like arch windows, where blinds are impossible, curtains are awkward. The only decent way to "close" arch windows is to use custom arched shutters. Imagine the expenses compared to a piece of film. With the film on, you can sleep in day time or wake up late with must less disruption by sunlight. It's like sleeping on a dull rainy day, which makes you sleepy anyway.

Window that I will not use on

I will not use the film on windows that have a great view. The view is improved by the film with bright sunlight, due to the anti-glare effect. On rainy cloudy dull days, the effect is marginal. The view certainly get worse as the light reduces from evening to night.

If you have a sunny climate, the glass patio door is probably OK if you don't have a far view from there, and you don't have fancy flood lights in the yard at night.

Installation

Installation isn't at all difficult if you do not need perfection. If it's an arch window near the ceiling no one will ever notice.

The films are on for a few months now. I did a rather poor job but the films stay on mostly like part of the glass, not like a film on glass. Even when the film is scratched by a sharp object, it looks like the glass get scratched. The edges and corners do not peel off by itself. Actually the edges and corners got better when all the moisture are driven out, sticking to the glass perfectly.

If you follow the instructions, tiny bubbles are not noticeable, and big ones are rare. Small bubbles are more noticeable at night, but the effect is like ancient bronze mirrors with imperfect flat surface.

Tips and procedures

The window glass must be free of deposits especially at the edges and corners. For problem areas in old windows I use CLR cleaner, the biodegradable version, which is as acidic as it can be safe. I use a putty knife to scrap off the stains and deposits. They I rinse or wipe off the window with clean water. It's also important to clean the outside of the window to the same degree if possible. If both sides of the window is clean, you can see the imperfection when you are installing the film and then correct it before it's too late.

Pick small windows nearest to the ceiling to practice first. Anything larger than 2'x3' become non trivial to handle. When you work on the lower windows later on, the fluids will not drip on the installed windows.

Do not leave 1" margins for the films as the instruction says. For small glass panels like part of a mosaic, cutting to exact size (with gaps) is possible and easier way to install.

The rule of thumb is to cover the glass panel plus a few mm of edge for the cutting tools to work. The nominal margin to leave depends on how accurate you can cut. You leave large margins if you are not sure how square you can cut. There's no penalty to leave large margins, but it would be very inconvenient to work on a small, deeply recessed window.

Large windows do not make a lot of difference but you need two people to handle the film before it's in place. For one person, I hang the film on the two supporting arms of a shelf with miniature clips. Then I peel the film and spray the GILA soapy solution on it as I go along. With enough soapy solution the film will stay straight. If it's not too large I can carry the film myself and paste it on the window.

I will use a clean edge straight from the factory, cutting three edges instead of four, unless you will notice the slight variation of the gap.

Don't worry too much about tiny bubbles. You won't notice them that much.

The only way to cut is a single strong cut splitting the film in one go, without ever lifting the knife from the film. It's not possible at the corners. You have to learn to use the slots in the tool to cut the corners, then turn the tool around so you can continue the cut right down to the next corner without lifting the knife. Basically start the cut at a corner and continue in a clockwise or anticlockwise sequence. Don't cut the adjacent edges first and then the corner, or vice versa.

Actually the tool is rather reasonable if you at least try as I suggest. The alternative of cutting to exact size is out of the question for most. You need to have a big cutting board that also holds the curling film steady during cutting.

Tuesday, June 15, 2010

Paving joint / gap filler / mortar

I chose a paving system that allow non-level uneven surface. It was uneven beautiful. I assumed to fill the gaps with sand, but soon find out that you will have sand all over the place all the time. Wind and rain and runoff can move the sand. You can't clean the pavement with high pressure jets or strong brushes, or you will have to collect a lot of sand as waste and replace the sand in the gaps.

If you do not fill the gaps, it will be filed with garden waste and soil. It's the same story when you try to hose it or brush it. And if you don't fill it, it's a heaven for insects especially ants.

My problem is, the pavement must drain a lot of water. It's on the bottom of a large slope. Even without the slope, my pavement will collect water here and there because it was not level nor even.

All fillers and mortar are sealants, non permeable. One exception is Ecofil from UK, and Rompox from Germany, but not available anywhere else. There are permeable concrete and asphalt, but even if they are available in gap filler form, they are ugly.

I stumbled upon lime, hydrated lime. You can find a 50lb bag in building materials / landscaping supplies stores for less than $15. It's not in the big chain hardware stores because it's for custom mix of mortar.

Hydrated lime is like white flour. It will turn back to limestone gradually, reacting with carbon dioxide in the air. The proper way is to add enough water to completely hydrate the lime into a putty form. When the water dries the lime will "set" like a mortar, though complete setting will takes years when the lime all turn into limestone. Lime is vapor and moisture permeate. It can drain water fast if sufficient channels are formed.

Round 1: dry brush fill

I applied the lime like sand or polymeric sand. I brushed it in when dry. Then I added water. It doesn't work. Unless added slowly, water rinse away the lime. And when the lime absorbed enough water, it shrinks a lot, leaving large gaps in the joints.

No harm done. Lime is just limestone, caulk, calcium hydroxide. It's totally organic or natural but the bag carries cancer warning. I suppose you shouldn't breath in the dust, and an active, highly alkaline chemical will do some harm. And lime is easy to clean. It's soft and do not adhere to stone strongly. You can just scrub off the surplus lime even when set.

Round 2: pure lime mortar

It's obvious you have to apply lime already wet. So I mix lime powder with water. You have to add a lot of lime to water to get it into a thick paste. Mine wasn't thick enough but a paste nevertheless. I applied with a putty knife.

The good thing is, it sets into a brilliant white joint. Somehow broken stones are glued together.

The bad thing is that it shrinks a lot when dry, creating a lot of cracks. If you push the joint with your finger, part of it will break from the rest and settle more into the gap.

All is not that bad. The cracks look beautiful. They drain water fast.

Round 3: lime and sand mortar

Actually this is standard for repairing historical buildings, which used permeable lime rather than impermeable cement. The mix ratio for me is academic. I can use a lot of sand, as long as the sand are glued together and not blown away by wind or brushed away easily. The lime paste has to be thick enough to stay on the putty knife.

I am supposed to use washed sand so as not to affect the chemical reaction. But imperfection with cracks is always desired. I wanted very coarse sand up to half of 5mm (the gap size) for good drainage. I ended up using the base sand for paving, as I got it in the yard.

The paste seemed to be a lot thicker with sand thrown in. It feels like a mortar and looks like a mortar with a little grey color.

There are still cracks, but a lot smaller, which is a good thing. I think the cracks can be controlled by the thickness of the lime putty. The more lime content the less it will shrink and the smaller the cracks. The full result isn't available yet.

The bad thing is that it's difficult to clean up the paving stone. Walking on it will certainly clean up the excess dry mortar, but it takes a long time. I thought of applying the mix like a caulk gun. Then I just point the mix and there will be no mess. Interestingly there is such a thing as a fillable caulk tube. It's only about $3 each but it's only available over the internet.

Then I think of using my wife's cake making bag. Surprisingly, there is such a thing as a grout bag. It's available on some hardware stores too.

Monday, June 7, 2010

Cleaning plumbing snake

I used everything to open the blocked drain in my kitchen. The clog is far from the U shaped trap under the sink. You have to understand that why restaurants need to use a grease trap. The blockage happens repeatedly at about 20 ft from the sink.

Everything works, but have their limits. Sulfuric acid openers are most powerful. But some say that they push the block further and further away from the sink. This seems to be true for my case. But the main problem is that if you pour a bottle of acid down 20 ft of 2in pipes, there's nothing much of it left to do the job. I already pour the acid down bypassing the U-trap. The trap itself holds about half the bottle. Also I left the acid overnight instead of 15 minutes. They are supposed to be safe if used as directed. I'm not sure for overnight.

The safe and effective alternative is gel. It's not supposed to be diluted by water. So the same amount that your pour down will get there, eventually. It works and I am happy to leave it overnight. But I have to pour 128 oz of strong gel down there.

Exploding bladder using water pressure is a good one. But it's messy and the blockage will come back soon if you do not do something else. But it's chemical free and it's free.

I used the plumbing snake once. It worked but I don't understand what's the problem. Because the tip of the snake captured some grease solid. I hate to clean it up and left it in a corner of the yard to rot. It did rot.

Now I understand that the whole 2" tube is deposited by grease solid, leaving a tiny passage for water. Therefore it clogs frequently and slow drain most of the other times. There's no way you can clear that up using chemicals down 20 ft of pipe.

Snake seems to be the only option now. And if recurring slow drain is your problem, you should not waste time on other methods.

A hand held snake using electric drill cost less than 3 bottle of sulfuric acid or gel. That's a bargain in my case.

Now I understand that the snake is corrosion resistant, but you need to oil it to prevent corrosion.

The problem is to clean it before oiling it.

Mine is a common cheap one. The important point is that it can be easily pry open so you can take out the snake to clean and put it back easily. There's almost no metal part except for the drill connector. It's isolated from the inside of the casing so you can keep it absolutely dry if you want. So you can wash the plastic casing in degreaser.

The snake itself is a terrible thing to clean. It's not just the foul smell. It's the grease accumulated on the pipe that got trapped into the snake instead. Of course you do not need to clean it. But then where do you store it? I have a garage but you don't it to smell of foul grease for days. You can store it outdoors but it would easily rot if you do not treat it well.

Degreaser doesn't do a thing on the snake. Not unless you polish the snake with a cloth repeatedly.

I had the idea to use brake cleaner. It's like a dust blower for computers but with solvent. It's a aerosol spray with tube, dries very quickly leaving no residue. It works pretty good depending how much you spray on the snake. A whole bottle only cost a few dollars. The best part is that I do not need to touch anything, except wiping the dirt off with a disposal rag towel.

The bad part - it's a cancer causing aerosol. Nowadays they contain no CFC and none of the more harmful chemicals. But it's still cancer causing (what isn't?). But if you do not inhale the vapour, there's shouldn't be any harm done to you. I do it in the yard stretching the snake on a foot path. When I have to breath I run away to the other side of the house.

There are other aerosols that may be safer. But the brake cleaner dries very fast without residues.

When it's dry I'll add WD40 to oil it. WD40 isn't a proper lubricant. It got some cleaning properties as well. But it's pretty safe - at least non cancer causing. It sort of "dries" fast but the smell lingers. I hang the snake over the swings until the smell is gone. Then I put it back into the casing ready for next time.

Friday, June 4, 2010

Using economic trash bags on trash carts

The trash carts for machine collection is usually a lot bigger than you normally need. Trash bags of that size are usually for thick enough for heavy duty jobs. Therefore those bags are way more expensive than what you get for your kitchen at Target.

I made an wooden frame adapter so my trash cart can use a smaller bag. The problem is that it's too good in securing the bags. You have to rip off the corner of the bag to remove the frame before you push the cart out for collection.

That was before I discovered those miniature metals clips, 50 for a few dollars. The plastic bags I use are deep enough for the cart, but the opening is not wide enough. So I just need to use 4 clips to hold the four corners of the bag to cover part of the cart opening. It's simpler than it sounds. It's pretty fast to do so. For the same bag, the trash capacity is larger than when I'm using the wooden frame adapter.

Addition:
Now I put in another trash bag to fill the void, in case someone throw things into the bin bypassing the main trash bag.

Tuesday, May 25, 2010

The revolutionary pet water system

This is for the pet rabbit. About $3. It's a 1-1/4" PVC slip joint p-trap - the J shaped tube. The other part is a hose clamp. I just clamp the J to a PVC pipe glued to the "cage". And of course the "free" standard wine bottle.

It works as any office gravity feed drinking water system or any pet gravity feed system. Rabbits like to topple things. Mounting the J instead of a heavy bowl saves space, and the rabbit cannot step into the bowl. I used bottles with a stem and ball valve. It drips eventually. The mounting on the outside of the wire door is stupid for an outdoor cage, which can be rather cold without covering it up in winter. Mounting inside is still very inconvenient. I tried to make something to mount it but the awkward stem made anything fail eventually.

It happened that a standard wine bottle neck can get into the 1-1/4" slip joint, but cannot pass through the joint. So the water level is perfectly aligned as shown. The bottle can wobble a bit but it's not going to fall off. The only minor detail is that the bottle opening fits the joint too well, sometimes making a perfect seal. To avoid that, I put a plastic soft mesh, such as those used in gardening to protect from birds, on top of the J, before slipping the bottle in. The soft mesh guarantee to disrupt any perfect seals.

Kids know how to add water. But in order not to spill a drop, you need a hand pump for babies, pump out the remaining from the drinking hole, before taking out the bottle.

Sure mr rabbit knows where the water is. He drinks it too. But I'm not sure. For the water bottle with a drinking stem, he learned to drink it in no time. Since the water is flowing slowing, you can watch drinking from it. Maybe he drinks a lot faster from the J, so I don't notice that he drinks from it. I marked the water level in the bottle just to make sure. And he still pees a lot. I'm not sure because rabbits' mouth are a bit clumsy, opening like under the chin. So he has to dip his whole chin into the water to drink from it, unlike dogs and cats.

For dogs it's easier. I brought a float valve from Ace's hardware for cattle. It's like a brick but made of foam for the float. I just mount it on a bucket, large enough that he cannot topple the weight full of water. Water in the bucket is constant when connected to a garden hose. I can go for a few days of holiday and not worry about the water. Food is different.

The only problem is that you need a backyard. It's totally not for indoors. And you need some shelter to reduce the dust, soil, leaves and branches from falling into the bucket.

The requirements. You need a bowl big enough so that your pet cannot topple it deliberately or accidentally. The alternative is to mount it somewhere fixed.

You want to reduce the drinking hole to reduce dirt, not for your pet to step in it or dip their heads into it. But you want it to be big enough so they can find it and drink from it without training.

Water level should be high to reduce dirt, like rabbit litter. But you don't want to keep a large volume of water. It's easier to go stale. It's not as convenient to cleanup the whole setup. You want the water level to be low at a comfortable level for your pets.

You don't want to refill water every day, but you want to save space for your pets.

Kids should be able to refill without mess.

The 1 1/2 P-trap should be large enough for big dogs, if only for vacation. Either you get those huge wine bottles, or you can adapt the 1-1/2 slip holding a standard bottle, to the 1-1/2 standard non slip joint tubes. I can see that you can put a bottle and a J at different places for redundancy when you are at vacation.

ps The wine bottle necks seem to be fairly standard. I use a much smaller bottle now with the same size neck so the kids can do it easily. Water need to be changed every 2 days instead of about a week. The lighter load means that there's less tilting of the bottle - basically it's mounted on a PVC pipe glued onto a acrylic platform. The weight of a full wine bottle will bend the whole thing slightly to one side.

Monday, May 24, 2010

In praise of Wayne Dalton garage door and opener

It was at least a couple of years ago, I picked a Wayne Dalton sectional garage door at the local hardware store. The installers told me I had to get a new opener and sold me a Wayne Dalton jack shaft type, or torsion type, wireless. I didn't know why I had to get a new opener, and I wasn't happy with the price of the opener, which wasn't much cheaper than the door itself. But I let them because they were that at my garage already. I didn't do any research and let my wife coerced me into the hardware store to get a new door. I knew WD is trouble when I tried to replace the remote control that I lost. That was a few years ago. But I'm glad that I ran into two geeks who picked the WD opener. Perhaps you couldn't get anything more expensive and less time to install than this. But I'm happy for the 1st time after so many years.

My old garage door was the one piece, very thick and very heavy wood door type. Indeed it was welcomed to donate those doors to Mexico to build houses. The spring counter balance was trouble when I moved in, and had been trouble since. Despite the thickness, it was not flat. I learned to lubricate and adjust the counter balance, and to replace them altogether. But it was worse as time went on, relying on the brute force of the opener to pull the door open, and gravity to shut it.

I didn't remember but the reason I agreed to get a new door was because my wife crashed her car on the door twice, from inside! Every time there was significant damage to her car, but not the door though. The door was too imperfect and too heavy for me to fix.

For the new door, I always felt that the two geeks didn't do a good job. The tracks didn't look precisely installed, and the wooden planks that they added didn't look professional. I felt that they were in a rush. I felt that they sold me the most expensive drive on their truck and the easiest one to install.

To add insult to injury, I crashed into the garage door a couple of years ago. I think it's aluminum or steel. But unlike my wife, the door got damaged instead of my car. Actually that's a good outcome. Fixing the door should be cheaper than fixing the car. But I have to replace two sections, which is about half of the door. Since the door still works and you can't see much different from the outside, I never replaced anything. So everyday I looked at the bent sections from inside the garage.

I sensed that WD is trouble when I tried to replace the remote control that I lost. Although I do not have much problems, the customer service seemed scared about the model I had. I took the chance to ask some questions about home link compatibility, but they can't answer anything. I just brought a WD direct replacement from elsewhere.

I think what happened is that WD is very innovative. The ideas are pretty good, going towards an intelligent home, with the garage door integrated with other controls. The problem is, how can they compete with other companies for good electronic engineers? They may out source the design but who's going to support them?

The worse problem is that who is going to install the openers? Openers used to be very simple, just a motor, with belt, screw or chain drive. Installers would hate to install something very different. They would not know anything at all if the electronics have problems. And actually the drives can be installed by the owners. There's not much to do as a professional installer. Actually the whole garage is quite easy to install, relatively speaking.

Why I praise WD after so many years? Because my garage is completely screwed up one day. The installer didn't left any documents, only warning labels and a terse, tiny, programming sheet on the wall. I had absolutely no idea how the door works. And WD seemed to have exited the drive business, and perhaps the Torque Master type of doors.

I was looking for the emergency release like my old door. It disconnected the door from the opener alright, but how am I going to lift the door? The old door will just swing open. I tried to lift the door with great difficulty, and soon it was completely jammed close.

I opened the drive cover with difficulty. I had no manual. To my surprise I saw two batteries. I remembered they call it backup in case of power outage, but actually the motor need to be battery operated. I checked the internet that the batteries had a couple of years of life. They cost too much. I was trying to jump start it with my car battery, when I realized that the batteries were still good.

I thought the electronics were screwed up, so I connect the motor directly to the battery. The motor just gave out sparkles but didn't move. I thought I had to replace the drive, the damaged sections, and maybe the whole door.

Then I found the installation manual of my door, but not at the WD website! There was over 20 steps with diagrams. It looked good but there are 1 in 10 words that I don't understand. It should be easy if you have some idea of how the door is designed and operates.

There's no trouble shooting procedures. The thought of going through 20 odd steps through the installation daunted me. I parked the cars outside and left them there for a week, doing nothing. Before that, the cars were trapped inside the garage. I had to unscrew all sectional bolts so the sections could be lifted up one at a time. With the help of my wife we managed to lifted the sections up to the ceiling rail, let the cars out. My wife decided to drop the sections down that night. But the bottom section wouldn't go completely down, leaving a pet height opening on the ground. Worse still, the bottom was one side higher than the other. I also decided that we should not put the top section down because it might be difficult to get them all up again. So we have only three sections as the garage door, with a bottom slanted opening and the same at the top, for all the neighborhood to see.

Finally I went through the installation process. Very soon I discovered that there's nothing wrong with the hardware installation. The tracks were solid, though they are not perfectly horizontal and vertical, and there are gaps at the joints. The rollers guiding the sections easily comes off, but that's a feature, and the design is quite tolerant to imperfect installation.

Then I discovered what is jamming the door mechanism. It was the counter balance. On one piece swing doors, there is a large spring on each side. Although the door is damn heavy, you can swing it open fairly easily in the spring counter balance is installed correctly. For the torque master doors, the counter balance is in the form or wounded spring inside a small disc box at each end of the shaft.

The door is suspended by two cables. When the shaft turns, the cables are wounded onto the drum at each end. The counter balance is part of the drum. So if the cables are jammed, with all the tension on them, you cannot move the cables to the right place.

There is a bolt on each side to unwind the torsion springs. If you have no idea you just think that the bolt is just a bolt like any others at the door. They are mostly of the same size. The bolt is designed to be turned by an electric drill. I used hex screw driver bits to drive square sockets before. I thought it should be illegal. Now I know, for the first time, that there are square bits for sockets, silly me.

So I unwind the torsion springs until the dial is at zero, straighten out the cable, put the bottom section back on the ground, slide the other sections on top one by one, and screw them back together one by one. So if you install the tracks correctly, there's nothing to it for the sections. It doesn't need to be precise.

So I understand why the door can't be opened in an emergency. If the counter balance malfunctioned or the cables are jammed, the door is just too heavy to open. And even if you opened it, the loose cable will be jumbled up.

Then I tried to calibrate the two sides so that the tension is the same. I don't think it can be done easily, not on my old door anyway. You have to roll the cables a little and tighten the cables a little by the drill. You can't do the same on both sides equally. When I tighten the cables to the same number of turns on the dial, I felt that the tension in the cable are very different.

I tried it all over again by unwinding completely. It's the same. I think the torsion springs aged differently, or they suffer differently. What the hack. I just tighten until I feel that the cable is about the same tightness, and that the door can almost be opened by hand. There's nothing much to it.

Now the door is perfect. I don't know if I damaged the opener's electronic by connecting the battery directly to the motor. Indeed the opener seemed dead. Just when I think that I have to replace the opener, and have to install the conventional overhead opener, I remembered that there's one and only one thing to do.

On the wireless wall unit, there's a little toothpick for you to insert into a hole to start the installation. It doesn't start anything but I know what button to push when I opened the unit. When I pushed the button, the door went up and down twice and wallah, my garage door is all normal again.

All you need to install the opener is to put it right in the middle of the shaft and screw it onto the wall. The opener sense the torque, or more likely the speed, of the cables and vary the speed of the motor when the door is at different positions. There's nothing to measure. The door will close perfectly and open perfectly. The opener knows when to stop exactly.

The whole setup is a big advancement over the dumb openers. Sadly WD is exiting the opener business, even though the openers are still on sale. Or they are just scaling back the number of drives on the market in order to have sufficient support for them.

It's easy to install, tolerant to imperfections. Less moving parts. Quieter and smoother. And since there's intelligence, it's easy to provide more function such as opening a little bit for pets, delay close, and disabling the remote controls.

The mechanics and the motor can be very reliable. The electronics should be more reliable. But if there's trouble, who's going to shoot it? The jump from dumb openers is just too big. But you can't make the jump easier because you want all the features. For example, some jack shaft openers still require to run cables from the drive to the wall unit, which is on opposite ends of the garage!

If the electronics goes wrong, there's nothing much to do except to swap it out. If you are not supported by WD technicians they do not have the boards to replace yours. Sending it back to WD to "repair" seems too much trouble. If WD doesn't cover it, it may be too expensive to replace the electronics. Why can't they do it as if it's a TV? It's quite reliable and you don't expect it to fail, not initially anyway. It's guaranteed for a number of years and there's extended guarantee. And nobody is afraid to "repair" TV's although it really can't be repaired, just swapping out the bad boards and bad parts, or take it back to "factory" to repair, in reality you get back the old shell with everything new in it.

WD is the way to go, but they seemed to fail. I'll still recommend the wireless jack shaft drives, whether you install it yourself or not. But make sure that you are covered if the thing doesn't work initially. As with other electronics, if it works during the burn in period for a couple of months, it will not likely to fail for years. Have a look at the installation manual, and if you are clueless technically, you may want to cover yourself for at least 10 years. The WD service department seems to be afraid of any technical questions regarding electronics.