It's unlimited text and data, first 5Gb at 4G! It includes only 100 min. But you will later find out that each extra min is 10 cents, which is the lowest you can get for prepaid. So far so good.
You may get the plan from Walmart, but as long as you buy a sim activation kit online at t-mobile, you have the choice when you activate. I don't how what happened but I got the sim for free, but today it's $10. I was just going to get a free sim for every kid because I spotted that their $10 pay as you go last for 90 days. Not so fast now in case they drop that again.
The 1st hurdle is actually with AT&T to unlock my phone. I setup profile for my wife but the bill is under my name. It may be the probable cause that I couldn't unlock. I waited until the contract ended and then some, because I can't risk any mishaps in the busiest time of the year. Finally I chat with them online and it was quite helpful. May be it's my phone, they have a procedure that I have to do it. I don't have another carrier's sim at the time so I didn't try. I copied the steps from chat but the 1st line is missing before I realized it.
A couple of days later, I received an email with the instructions. This time they have an unlock code that I don't think I have it before. When the T-Mob sim came, I inserted it, power on, entered the unlock code and it seemed to work. I was on the t-mob network but can't make any calls because my sim wasn't activated. But I am sure they can't fuck me up on the carrier unlock.
I considered carefully when to activate. I tried the activate website and it seemed to work and help to transfer my number too. But when I actually do it I want not to be at a very busy time when there are no real agents to trouble shoot. And I have 2 days off so there is one spare day for fuck ups when they claim to do it in 24 hours. And I don't want to wait too long when it's close to the deadline of the activation of my free sim. And I don't want to start losing things from the package.
So I took the plunge on Xmas eve day before I realized it. It went totally smoothly online until the last payment page. I use Linux and they screw up. Who wouldn't do a website nowadays without sticking to some common standards? I was afraid that I got the number transferred but I can't call because my service wasn't paid.
They don't have online chat. It's terrible when there are so many numbers involved. I tried to pay elsewhere online but they don't have my number registered yet.
I called as the last resort and very soon an agent answered. He was helpful. He got those data that I entered online. Instead of payment, he first deals with the transfer first. AT&T wants to screw me. They want my AT&T account number instead of my phone number. But I have a browser tab on that ready. Now that was OK and before he continued, the phone got cut off. I was using my mobile phone. So I switched to my landline.
Another agent answers the phone very soon. I think the 1st guy is American dealing with carrier transfer and tech stuff. This woman is in India dealing with other non-tech stuff. Now, I got too many apologizes in one day. It sounds as if he is sorry that t-mob website don't support Linux well enough, but that would be a first. She is sorry for the cut off. After a minute or two she confirmed that the transfer is successful and transfers me to payment. This 3rd call center could have been in Mexico. Again I don't have to wait and some agent pickup the phone soon. May be I picked the right day in the year? She is not sure what my problem is and I understand that the usual automatic prepaid payment via the phone is available. So I said goodbye and dial 223 or something. It was wrong. You dial 611 but * or # then 223. Seriously!
I dial 611 again and realized the correct number should be prefixed with a * or # (that I don't remember). It doesn't matter because I couldn't pay anyway. Because the transfer is actually not completed. I called 611 again to find out that I have to wait 2 hours until I got the completion text.
Before that I registered on t-mobile website but then the registration wasn't real because I don't have an active number to go with it.
A couple of hours later I can receive call too. And I got the completion text. Now I can pay online, after registration again. And I sign up for automatic payment. But as soon as I paid, learned to check the balance, my 100 min was up as indicated on the website!! What's going on? I called 611 again with no waiting. The guy assured me that my account status was OK and I can use the phone. 1st they have a funny way to tell the balance. I paid $30 and they say my balance is $0 and I will be paying $30 next month. But really the minutes count is wrong and after some wait the used minutes drops from 100 to 10. But I don't think I made 10 connected calls.
Before the transfer completion I can dial out but incoming calls go straight to my old AT&T voicemail. I looked it up and enter the t-mob voicemail number into my phone and it didn't seem to work.
Somehow it all worked. Then I wanted to setup visual voicemail (for my wife). There is a subscribe button on the website but it does nothing except redirect to your homepage. Then I did what I prefer to do, switch over to her google number voicemail. Android reported that it can't do it and I have to talk to t-mob.
After a while of online search, I confirmed that t-mob don't allow visual voicemail nor forward voicemail for prepaid accounts. This is pretty strange as I would think $50 and up prepaid plans are more popular and the money isn't too bad. I thought I got an old internet post of how to switch to google voice email. In GV I setup a contact with my mobile phone number, then I setup a group for it. If group members call, GV will not try to ring any numbers so the call will go straight to google voicemail. Now I just need to setup call forward in my phone, to forward when no answer to my google number. But the problem is, forwarding isn't allowed by the t-mob network, and that's why you just can't simply change over to GV voicemail. A waste of time.
Those are the catches. I spend half a day doing it, on xmas eve. May be I'm lucky. I could have waited for 24 hour and nothing would happen because AT&T wants my account number.
Tuesday, December 24, 2013
Friday, December 13, 2013
Mulching fallen leaves on lawn
This is another "why I didn't thought of that" moment. I was brain washed into racking up the leaves, and put them in the green collection bin. That is a lot of work and last many weeks for all leaves to fall.
I didn't know what triggered me to search how to deal with fallen leaves. Indeed I didn't remember what I was searching. I agree that mulching fallen leaves save a lot of resources.
Just happened that my 1st season small battery mower had a mulching attachment. I only know that it is for grass, and I use it a lot out of laziness. I also use the grass chip collection bag because it is convenient too. At the front yard, mulching the grass cuttings may spread the chippings into the sidewalk. There's more work to clean up.
My mulching attachment is to keep the grass chips in a loop around the blades, instead of allowing them to go out into the bag. The grass are cut finer and drop back onto the ground.
Leaves look very different from grass so I doubted. When I mow the fallen leaves, I was impressed. The leaves are palm sized, dried and brittle. One pass over the yellow leaves, the pile is gone leaving a green path. I can still small dots under the short grass. But instead of a very yellow pile, the ground turns green with barely visible yellow dots at an angle.
It's easier than mowing. You can easily see where the leaves are done. My mower isn't that big so the lesser the overlapping passes, the more effort are saved. But my small mower is very good at manoeuvring to get to the leaves. Even for a big pile (by nature) you can still see the lawn after all leaves are mulched.
Now I can just mulch the leaves when I mow the lawn as soon as the leaves fall. I don't need to wait for sufficient leaves to pile up before raking.
Wednesday, December 4, 2013
Clean and seal your grout perfectly with green chemicals
Grout is like teeth. The two very effective cleaning agent is baking soda and hydrogen peroxide. Dry or paste baking soda helps to polish away trapped dirt and especially grease. Hydrogen peroxide bleaches. I always know that. If your grout is white for example, you can get back the original color as white as you want. The problem is the amount of work and the amount of hydrogen peroxide to use. Now I made it perfect.
First option. You add first-aid 3% hydrogen peroxide slowly into baking soda powder. You just add enough to "wet" all the powder and obtain a paste. For horizontal surface you can make the paste thinner. Now you just need to apply the paste on the grout. The hydrogen peroxide will stick and bleach much longer than if you spray the liquid onto a vertical wall. If helps if you brush the paste into the grooves to get rid some of the grease and dirt first.
You rinse or just wipe when dry. Residue baking soda is eatable and safe. Hydrogen peroxide turn into water and oxygen. If your grout is white, the residue baking soda actually makes your grout look snow white.
Water tends to separate from the baking soda paste. You can add something like a little guar gum or xathan gum to the mixture at room temperature to thicken and stabilize the mixture. If you use corn starch, you probably have to warm or heat the hydrogen peroxide first to get a gel.
Option two. Hydrogen peroxide plus acid is a bleach. The hydrogen peroxide is more table is acid. Citric acid crystal from food supplies is a good acid. A one pound bag doesn't cost that much and last a very long time. One teaspoon per cup of hydrogen peroxide (or water) is a stronger acid than vinegar. You can make a much higher concentration acid until the crystals no longer dissolves. Now you need to thicken the bleach to save peroxide. It's a few dollars a quart but you have walls and walls of tile in the bathroom, kitchen or the floor.
I get the idea from computer preservation enthusiast. They thicken peroxide to work on plastic shells of old computers. I already told you. The warm or heat the peroxide in the microwave. Then add corn starch or other starch to make a gel of peroxide. You can add guar gum or other gum in room temperature. You save gums if you warm the peroxide too, and it works better. You will use a lot less gum than starch. Just don't add baking soda to the acid as it will react.
It's perfectly safe to heat the peroxide. The peroxide will decompose faster but still in a slow rate compared to the bleaching.
In this option the ingredients are all natural and biodegradable.
Now the difficult part is sealing of the grouts once it is clean. There are plenty of grout sealants to choose from if you don't mind the toxicity. Pick one that whitens as well as sealing. Then you don't need to worry whether the grouts are clean enough for sealing. And you don't need to match the color of the grout in various shades of white.
I was wondering if there's anything naturally non-toxic for my kitchen counter? Easy to apply but do not need to be permanent?
Simple - wax! I actually tried before to use a candle to seal the grouts. I gave up. You cannot rub the candle wax into the grooves. And you cannot melt the wax by burning the candle - too much soot.
Just happen I have emulsifying wax NF at hand so I tried. You have to melt it and pour onto the grouts. Then recover the excess wax that solidifies. You cannot spread the wax easily because the tile will cool and solidify the wax. It will have a lot of waste and inconvenient.
I have the almost perfect solution. The wax comes in small peas. You just put a pea on the grout and melt it with a gas lighter type barbeque lighter. The wax will melt and follows the tip of the flame down the groove. The wax stays white when solidifies. You can use organic white bees wax if you want. It's at even higher melting point. This lighter method seems to be much better than direct pouring, when the wax solidifies as soon as it touch the cool surface.
Since grout is very porous, I doubt if you can easily get rid of all the wax. Initially the whole groove is covered by wax. It's unlikely you can melt the wax by any hot objects unless you pour boiling water on the wax. How often does that happen? If that happens you can "repair" the wax in no time.
So far the wax stays in the grooves, translucent white in deeper grooves. When there is wax, no way can dirt get in there or stain the grout.
It's not a quick to seal with wax. But it's pleasant and you can spread the work in as many stages as you want. The area of the kitchen counter that you prepare food isn't that big.
Saturday, November 30, 2013
Minimal kick/push scooter stand/rack

This is what the 4T scooter stand looks like. It is made of only 4 tee PVC couplers. So if you count, the material cost is slightly over $1.
The 1st principle of stands is that you have to make use of your own weight. There is always a groove between the flat feet rest and the front wheel of every scooter. This is where the scooter is slightly lifted off the ground by a horizontal bar. Whether the front wheel is turned sideways does not matter. It depends on what position of the scooter design feels more stable.
The stand is based on the 45 deg slope design common for bikes.
In the original design the two sides of the stand are parallel. The handle rest on one of the side bars with a little bit off vertical. It is still very stable. The intention is to add some guides at the top end of the pipes to make the handle perfectly vertical with respect to the front-rear axis. However, it was discovered that a little twist of the side bars will do just that. And because the base is now wider, the stand is more stable.
You can make it prettier, stronger, but you can't beat using only 4 tee's. So this is it. Obviously when you are doing a rack you can modify it to be more space efficient. But you can put the stands as is very closely side-by-side with the twisted legs crossing each other.
If you just lift the handle the stand goes with you.
Wednesday, November 27, 2013
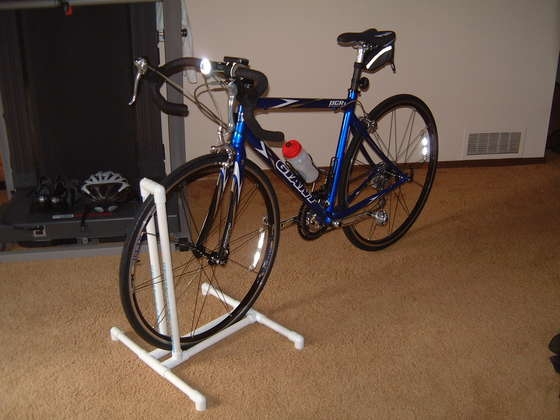
Self-balancing bike stand / rack
I was moving the bikes from the garage to store outside with weather "proof" covers. So the kids can take a ride whenever they like without having adults to bring the bikes out of storage.
I was trying to work out the physics but got stuck on some points. So I built one base on other practical criteria but not on the absolute stability. It is based on the common 45 deg inclied design.
 |
| Inclined bike rack |
I shortened the top rail so the wheel rest tightly on the 45 deg slope, shorter than the diameter of the wheel. Like this, but the angle is 45 deg.
 |
| Wheel locked bike stand |
In doing so the centre of the wheel is moved away and down from the rack. But it turns out that the main instability comes from the centre of the wheel, trying to topple over to the sides. I was doing the opposite that is desirable, that the centre of the wheel (probably top of the wheel too) should be restricted by the stand as much as possible.
I was worry wrongly about that the front wheel will turn itself horizontally and so the whole bike become unstable. The front wheel does not have the tendency to turn, and friction make it difficult even if it wants to turn.
 |
| Vertical lock bike rack |
The other is the vertical design that use the top rail and one of the bottom rail to lock the wheel so the weight of the bike is on top of the stand. However, the vertical bar is too far from the centre and top of the wheel. You can see there are "wings" on the side for balancing.
 |
| Horizontal support bike rack |
There are horizontal designs that seem to use the weight of the bike. And the centre of the wheel is close to the stand, but not the top of the wheel. In any case it requires the kids to lift the wheel off the ground and onto the stand. May be just a little bit of lifting but rolling over a pipe is much easier.
 |
| Self-balancing bike stand |
My design turns out to be looking like a wheel clamp. The wheel must be standing on two lower points of the stand (A and B), not touching or barely touching the ground. Then a vertical bar raising up at an angle close to the centre and top of the wheel.
The stand, only about 5" wide (slightly wider than the length of two 3/4" tee couplings), is able to hold the bike vertical against strong wind without anything else. So I gave up the idea of a rack, allowing the kids to park anywhere they want, even carrying the stand along with a bike ride.
Point C doesn't do anything, not touching the wheel. It provide closure and support, otherwise the vertical bars on the two side of the wheel will be floating.
There is no need for exact dimensions, as long as the front wheel don't touch the ground. You can make the length A-B short enough to make sure of that. Short A-B doesn't lead to instability. The bike is very stable in that direction. You can also raise point B off the ground a bit to ensure that the wheel do not touch the ground. Or use thicker pipes than 3/4". You can also raise point A off the ground but the front wheel need to be lifted a bit to get into the stand, rather than roll over point A.
The gap between the bars is slightly thicker than the tires so the bike can get into and out of the stand freely. As of now, because the spokes near the centre are thicker than the tires, this is where the stand holds the bike in position. If that is not the case, the stand will hold the bike at the top of the wheel.
The perfect angle of the near vertical bars are just incidental. You just need to make it close to the centre of the wheel and the top of the wheel.
8 tee's and short pipes may be about $2 total.
You can put the bike on a thin wall.
Wednesday, November 20, 2013
Validation of the Green Pee litter system for rabbits (and cats)
 |
| The modified Breeze litter system |
The Breeze is one of those products that give away good, tested ideas when people can make it for next to nothing. And if you promote it too much, it will affect the profitability of your other products.
First, the Green Pee is two stacked trays. The top one has holes in it to drain liquid waste, and pea sized gravel for cats to cover their solid waste. The bottom tray collects liquid waste and allow you to put in anything you fancy to deal with the odour and ultimate disposal. You scoop away cats' solid waste on top, and sacrifice some gravel to go with it. You have to maintain the level of gravel with new additions and the old ones are supposed to be rinsed and dried from time to time.
The Breeze that inspired Green Pea is the same thing. The top tray has a plastic grid on most of the bottom for drainage. The grid maintain the strength of a fairly large tray, some 20" by 12" (check spec). The bottom tray is securely snapped onto the top, but has a drawer like tray in the middle that can be pulled out. The tray just fit a custom sized pad with probably very absorbent gel. The drawer is very shallow but will allow the gel in pad to expand a lot and hold a lot of liquid waste. Instead of gravel, Breeze has it's own pellets that is perhaps made from soft rock with a waxy coating.
I got the Breeze just because I wanted to use disposable pellets that I liked - feline pine. The slots will work better than drilling holes. And that the feline pine's own double tray system, very similar to both, is only available online with expensive shipping. The Green Pee is better, and cheaper.
The other reason I got the Breeze is because I was obsessed with adapting to rabbit use, getting rid of the pills / pellets / pebbles in a convenient way. Unlike cat waste, the pills are the same diameter as typical pellets, so you can't scoop or filter them out to reuse the pellets.
It turns out that for rabbit use, the best adaption is nothing. When you rinse the gravels, the pills will float while rocks sink. You just pour away the pills and flush it, or pour the pills into a sieve / colander to get rid of the water, then dump the pills in trash.
Some people put a semi-rigid screen on top of the gravels to prevent the pills from mixing with the gravels. You scoop away the pills from time to time. That doesn't save much work because you need to wash the screen at least daily for the semi-solid waste. And you need to wash the gravels anyway.
My particular problem is that the screen on top of gravels is too comfortable. My rabbit occupied it as his bed and pee on his normal sleeping area. Without the screen, he still likes to sleep on the gravels and pee on the corners of the tray.
I see no advantage of the Breeze pellets to gravels. The regular cylindrical shape of the Breeze pellets may drain better, and the coating may reject water and therefore odour. But I don't see any problem of using pure rock instead. You can use finer gravels for you rabbit if you worry about their feet without pads. There are very smooth and exotic aquarium gravels, but for a few dollars I get a huge bag from gardening store and filter out the larger than 1/4" stones with a discarded potting tray with a grid bottom.
As for what to put in the bottom tray, newspaper and baking soda is excellent I'm sure. If you can get the huge baking soda box in the laundry department (non-food grade from the same manufacturer), it's much cheaper than from the baking department.
My problem is, I don't have any newspaper. But even though the Breeze has a tiny tray, you can still put a lot of other stuff in it that will last you about a day or two. If you only want to empty every week, you just need to put the Breeze on another tray and get rid of the drawer. You can put crumbing cat litter and scoop away the crumbed solids. But they are not that environmental friendly. You can put anything absorbent down there and let nature equalize the liquid distribution. You can put biodegradable gel for camping but that would be expansive. I put in feline pine because I have some left. There are similar much cheaper pellets but not in my town. The pet store do have some pellets from recycled paper that are cheaper. In general compacted pellets are more absorbent than other loose materials.
To convert a Breeze into a Green Pee, I put a screen on the grid, under gravels. Some of the gravels are too fine and fall through the grid. So far I keep the drawer system because it's a piece of cake to empty every day. People use plastic canvas from sowing / craft stores for the screen that you can cut to size. I use bug screens or those for windows and doors. I use the thicker ones that seems to be weaved from nylon threads and coated with plastic.
The reason I gave up on pine pellets is that you have to keep paying for the consumable. You can't separate the good pellets from the pills. You need to keep adding fresh pellets so the degenerated dust will not stick to his feet and being carried around. (This is minor.) The Breeze drawer is too shallow for the pine pellets. And you have to use a scoop to "encourage" the wet dust to go through the grid and down to the drawer. The dust should fall through by itself but fresh pellets and wet dust can accumulate to a thick layer and it gets harder for the dust to fall through. Feline Pine's own system may be better but I don't see how the problems are totally eliminated.
The only problem is drying the gravels. You need two or three sets to rotate. And you need a yard but can be done without one. Pouring away the pills, soaking the gravels overnight will allow any dirt to rinse away the next day. If you have space, spread the gravel into a single layer and sun dry. If they are completely dry, you are not creating an environment to accumulate germs. Germs cannot survive without water. If you feel the need to disinfect anyway, household beach is effective when you soak the gravels. But it is not environment friendly and can be harmful. Germs that survive on animals adapt to neutral pH or 7. You can kill germs with extreme acid or alkaline. Vinegar can kill many germs. If you buy citric acid crystals you can get more acidic solutions. Washing soda should do too but vinegar is safe because you can eat it. Baking soda is a weak alkaline so it cannot be effective. You cannot mix acid and alkaline because you will neutralize them and become useless. Alcohol and hydrogen peroxide are effective but because of the cost, they are only limited to small surface areas. For Vinegar or Washing soda, you need to consider the concentration level. If you can, check with cheap pH papers to get less than 4 or more than 9 for sufficient concentration. But since washing soda is so cheap, I would think it is easy to be alkaline enough.
Thursday, November 7, 2013
Total solution: Under sink pop-up ball rod too short

The old short horizontal pop-up ball rod is still there. I extend the length by putting a 1/2" cpvc tube on the outside of it. For my case there is not enough space to put the cpvc tube without cutting it in two half first. So I use a cpvc coupler to join it again after they are in position. I have to do that because if I don't have access to the ball rod when I screw the ball in, I can't get the rod through the stopper hole.
To reduce play (side way movement) between the old ball rod and the cpvc tube, I put in between them a 5/8" tubing, the thicker version for fridge ice maker. The OD, outer diameter of the rod is usually 1/4", same as majority of tubes for fridge ice maker. The next size tubing has ID, internal diameter, of 1/4", with OD 5/8" (I think). Therefore the thinner tubes can be inserted into the thicker ones. The tubing also prevents the outer rod from sliding horizontally. If you need to you can add glue to fix the outer cpvc tube.
The horizontal pop-up ball rod is connected to the vertical pull rod by a 3/4" pvc tee piece as shown. That's the next size pipe that allows the horizontal rod (tube) to go through while allowing some play.
The tee piece is fixed to the vertical pull rod via a short vertical pvc pipe section. The vertical pull rod is universally connected to a flat bar with holes in it. A simple screw will fix the pvc pipe onto the bar securely. First I drill through the pipe with a plastic bit. I use a long precise dry wall screw to nail the pipe and bar together. It's better to use nut and bolt.
For the horizontal rod you can also use 1/2" emt pipes for conduits. It's cheaper and can be easily cut using the cheapest copper pipe cutters. CPVC was phased out already. I just had some in the garage.
Friday, November 1, 2013
How to scare kids away screaming at Halloween and keep all the candies to yourself
I know I am unpopular but I have to share this. I have video to prove it.
My wife like to play trick and treat in the neighbourhood with the kids at Halloween, so to be fair she won't allow me to rest in peace, but have to hand out candies. In the beginning I don't even dress up. There is some sort of anti-climax when I opened the door and saw kids in fancy costumes. But then I'm still popular as long as I have candy.
Once I had to take the kids to trick and treat. It's good to wear costumes and mask so nobody knew who I was and nobody cared. That suited my personality. So I began the custom even when I am just handing out candy at my house. I don't need to smile even if I want to eat the troublesome kids. I don't need to praise kids for their fancy costume. Then I discovered that even the cheapest scary mask will scare kids, in the right circumstances.
I always wanted to make some automatic candy dispenser so I don't even need to open the door. But I know it have to be very tough because kids will try everything to get more out of it. Then I thought of making them to put their hands inside the door to get candy. Then I am the candy dispenser without them knowing. Then I thought of a fake door. With that you can do almost anything inside without opening the "door", and without revealing yourself.
I couldn't have done that in previous years. This year it dawned on me that I can make a temporary door frame in no time, and it take a minute or two to put it up and put it down. The proof of concept model takes a few minutes to make. It worked but not the way I anticipated. Then the whole frame is made, just cutting a few pipes. Then it took a couple of hours to figure out how to cover the frame like a "door" so insects and the cold can't come in. Now, the whole thing can be disassembled after test, and resembled in minutes at Halloween. It's tough enough so kids cannot break their way in to the candy jar, and won't degenerate when they knock on the wrong place.
Once I made a hole in the fake door for the candy jar, everything came into place. Instead of wearing scary costume and mask myself, I just pop up the mask suddenly through some secret opening in the door. The surprise always work. Some scream while running away. Some beg me to show their friends who missed it.
Note to myself: it have to be in their face, or over their head, while they are not expecting, or while they are busy figuring out something out.
Then the candy jar is too easy. I hinted that it's also a rat hole, snake den or spider home. There's the danger that they will be hurt. Also, the candy jar will be exposed only when they rang the bell, so I will be there to dispense the candy fairly.
Note to myself: an ordinary looking harmless fake door will add to the surprise element. The security of the candy jar have to be increased. If kids see something scary or heard about the house, they will not ring the door bell but to figure out how to get into the candy jar.
The results? My ear hurts because of the screaming! Caught on cam too. May be I should add some sound proof element at the fake door. I had bigger girls running away screaming, but asking for reinforcement and came back. When they gathered all their courage to put their hands into the candy jar (or rat hole), they threaten me not to scare them anymore or else ... It's really begging. The threat seems to be that they will freak out. I didn't prepare something scary inside the jar because I thought kids will laugh off my cheapo design.
As for the candy count, no matter how much I put in the jar, kids tend to spend minimum time in it. They are happy if they just grab one or two, just to show their friends that they pass the test. Some kids ask their parents to grab some candy, who are not as greedy. "Professional" bigger kids from other neighbourhoods tend to avoid my house. They have news networks and don't want to waste time on some difficult house. And kids came in big groups. If the first few ran away screaming, my candies were safe until the next group. Once you got the reputation, or people heard screams coming from the street, only the "brave" would come for the test - those who want to watch scary movies but scream all the time.
I may release some video clips. I wasn't expecting it but this is the best Halloween I had.
Wednesday, October 30, 2013
Install utility sink at outdoor kitchen cleanout
In many places the plumbing code requires an outdoor clean-out near the kitchen sink. It took me many years to find out what it is. Also in these places, most likely it is frowned upon to discharge waste water outside, or even wash your car.
Our kitchen sink clog often, or drain very slowly, like once a month. I used fine metal mesh filters at the twin sinks. I even installed a mesh filter down at the trap. It didn't matter. I suspected my wife bypass the filters. But it must be grease and other stuff like rice, but mostly grease. We don't fry and so we don't have grease that we pour into the sink. But we stir fry a lot and the residue oil cannot be poured elsewhere.
I thought of installing a grease trap as in the restaurants but it is too expensive. The undersink is already reserved for a 4 gal reverse osmosis system. And you have to maintain it like washing the filters.
I have everything to clear clogs and I'm well trained at all those. Once I snaked until the entire length of the snake is in. An online plumber told me in that case my snake would have traversed the whole house and reached the sidewalk in front of the house. That wasn't a real solution. I hate snaking. You can't leave the dirty snake inside the garage. If you clean it you have to add oil. I don't have an outdoor drain to clean anything. When it's not too late I can pour a gal of drain cleaner into the kitchen sink. That would work overnight, but not less than a gal. The other thing is at least 8 oz of sulphuric acid that work every time, but I am afraid I would damage the pipes if I apply once a month. And I have to pour at the clean-out. Anyway, chemicals are too expensive and environmental unfriendly. It's like pouring a $10 note down the drain every time.
For years I pour the dirty bucket of mob water into the toilet after my wife did the cleaning. When we have to wash anything bigger and dirty we have to do it in the bathtub. And after some oil change or repair, I hate to bring myself, tools, and anything toxic into the house for cleaning. I don't want anything to accumulate at the yard too.
The more I look at it, the more I am convinced that I cannot install a sink outdoors. I have to find the right section of pipe near the wall, beak the wall, install a tee and seal the wall.
But I have added pipes at the cleanout to make it easier to add chemicals, friendlier chemicals that you have to add more often. I even thought of adding a small sink for RV's to enlarge the end of pipe.
But now I found the solution. Big laundry / utility sinks that have stands on it's own, to be installed at the cleanout.
I didn't want it to be big. But they all come in that size suitable for the laundry. Big has it's advantages. When the pipes down the kitchen sink clogs, you have a big reservoir to allow water backup, before dirt water backup into the kitchen sink. Or, depending on the height of the sink, dirt water will overflow outside and never backup into the kitchen sink. Both have it's merits and disadvantages.
You need a p-trap under the utility sink, just as you need one under the kitchen sink. That would prevent sewage gas (bad smell) from escaping. Why I didn't think of that?
The joints are screw at the cleanout, and slip-joints with compression screws elsewhere, the most common types. Typically, the slip-joints can be unscrewed and taken out rapidly by hand. But you should design the cleanout joint section so that it's simple to unscrew. You can add a permanent section while still be able to put in a snake. But it would be difficult to put in a pressure bladder without direct access to the cleanout. The bladder is the most convenient equipment and effective that I love.
It helps a lot if the sink is light weight. The weight of the sinks surprised me. At the hardware store, the sinks weight like huge stone. For the cheapest one I got online, I can lift it with one hand, with the steel legs included! So if you prepare to access the cleanout often, you should get a light weight one so you can lift the whole thing away.
And since the sink is moving, I should have got a p-trap with a flexible pipe section. I can joint the parts together perfectly with addition slip jointed pieces and ABS glue. But when the sink moves, perfect alignment cannot be maintained all the time. The legs rest on a flower bed.
You might be able to get all the parts without the need for glue. But for my case I already have a PVC (white) piece and ABS (pipe). So I adapt them to the PVC p-trap. If you really have to glue different materials together, do not use any super dupper glues for boats. Different materials will expand and contract in different rates. There are transition glues designed for gluing PVC to ABS. But I saved money. Someone reported experiments with all the combinations of glues and mismatch. He reported anything goes without problem. Another found out too late and have to dig out the yard to correct the mistake just in case. He reported that PVC glue did nothing much to the ABS. So I used the ABS glue I have to save money. The pipes are never under pressure and are outside over the flower bed.
Now I can clean stuff contaminated with pet waste outside. I can clean my car with the two bucket method without pouring the dirty water into the flower bed or into the toilet after bringing it all the way into the house. I may use mob again that do not need to be cleaned using the washing machine. Life is good, until the kitchen clogs.
ps The most good that came out of it. You know water will backup before water backup into the sink. When the tap is on, water will flow normally for a few minutes before slowing down or backup into the sink. The outdoor sink, usually on a lower level, will give you early warning. And if the next day you see some food residue in the sink, you know water was there when the dishwasher drains overnight.
Monday, September 30, 2013
Mystery solved: sneaky leaks and persistence pipe noises in the wall
It started when there were strange noises after a bath or shower in the upstair bathtub. It sounds like droplets of water falling from great height. The frequency will diminish quickly into once per minute and much less, but will last hours after a bath. I suspect that there is a leak in the drain pipes. Water drips very slowly but falls from 2nd floor straight down into the ground, hitting some hollow pipes or other amplifications. Or that something in the 20 year old pipe system held up water, and drips slowly inside the pipes, falling straight down over great height.
I never had a oscillating tool before and opening a dry wall is the last thing I would do in my house. I never cut open a hole in a dry wall. I don't know how to cut. Drilling holes, cut by utility knife seems to be so primitive. In addition, how to cover that irregular hole as if nothing happened?
Also we had a pinhole leak in the copper pipe once a couple of years back. It was near the same tub, under the HAC blower. So I cut open the bare floor board instead to have a look. I replaced the leaking pipe section with a short flexible connector. It was a hard to reach area from there so I opted for shark bite connectors and a flexible reinforced tube with screwed ends, with a seal inside. I always think it's a bad job breaking all plumbing codes, and may have small leaks. But we never saw water sipping into the ceiling downstairs again.
So I suspect there may be water collected somewhere between the walls or the ceilings. And may be toxic mold or rots. It could be scary and hopeless so I postpone looking into it unless I am fully ready no matter what. I was never ready.
Then, instead of water sipping through the ceiling, a pool water was collected in the ceiling, enough to open a hole in the dry wall. Luckily, there wasn't much water and it was only after a shower or bath.
This is where the mystery begins. It's not like water will leak during the shower. It's unpredictable. I can even waited for weeks without water coming down all the time.
Then I summoned all the protective gears and all the courage to confront the toxic mold. I knocked off the dry wall around the ceiling hole for the 1st time in 20 years, after the house was built.
That would be called the crawling space I think, between the upstairs floor board and the downstairs ceiling. There's nothing. The dry wall around the hole is still pretty much dry. The floor board looks dry and so is the studs. The ABS drain pipes are pretty dry though with some water stains near the bottom of the under side of the tub. And yes, the tub is directly above me. The replaced copper pipe section looks brand new and the rest of the copper pipes seem to be in good condition and dry.
There are visible spider webs and old rat bites on some pipe insulation materials. The rat infestation would have been dealt with when we moved in. That's it. No horrible stuff.
Obviously the drain pipes wasn't leaking and couldn't identify the source of the leak and noise from where I could see.
When cold water is turned on fully, nothing will happen. All sorts of things happen only when the hot water is turned on. So I suspect the faucet leaks at the hot water inlet. As there is no height for water drops to make great noises, I also suspect something fishy at the copper pipe at top of the shower.
I could have knocked down the whole dry wall behind the tub immediately to get to the hot water supply. But fortunately, behind the tub, there is a space for the HAC. I can't get to the tub from behind because the one storey HAC blocks everything. I can know down the dry walls, but can't put it back without moving out the huge HAC system.
I can knock down the tiles at the tub side to get to the faucet and pipes. But then I have to use an oscillator tool to cut out the tiles, and then cut the backing board. The pipes also go through holes in some studs. Putting back everything is much worse.
So I did more diagnosis to make sure. The copper pipe at top of the shower is dry. You can hear the pipe noises as soon as the hot water is turned on, but it's hard to see water leaking. I actually observed under the tub when everybody took showers and baths in the morning before work and school. People come and go. I can only conclude that there is no leaks. Until my wife was in the tub for a while. Then about a cup of water ran down the drain pipes, then stops.
So I did a final test. Nothing happens unless I turn on the hot shower for over 5 minutes. Nothing even if the hot faucet is fully on. Water will start dripping down the drain pipes after 5 minutes of hot shower, and only hot shower.
The next phrase is to turn to the internet for solutions. The first thing I hit is that ABS drain pipes were found to be defective in the 80's. There was class actions. My pipes should be slightly newer but the builder may use stocks several years old. That seems a good explanation. I should be replacing the drain pipes under the tub. That's a horrible thought. I have to make a big hole to crawl in and under the spiderwebs, not knowing if I can reach the back of the tub down there.
They say to look for repeated repair around the pipes. Yes, the joints look shiny new but the pipe itself look beaten with water stains. (But of course the joins look shiny and new with the protection of the ABS glue.) There are a lot of couplings and turns under the tub so I guess that's right.
Someone argues to apply and apply ABS glue around the joints to fix the leaks. Some suggest to use marine glues and repairs. I concluded that ABS glue is the way to go because I know it welds the joints together into one piece, and that the whole piece contracts and expands as one, without extra stress.
I could have done that but then the water seems to come from the joints but really not. It came from further up, just following the pipes down.
But then it dawned on me that the pipe noises are not caused by water leaks but by thermal expansion. I found the information that they expand a lot and you have to allow for that in proper installation. They must have hired a cowboy to do that in my house. Not only they violation all codes for expansion (if they have that then), they did the minimum effort to allow the pipes to turn corners and down the wall.
So I realized that whenever I turn on the hot water, the thumping noises start, vigorously at first and then taper off when all the pipes are warm. When the hot water is off, the noise will come back. It thump once or less per minute and last for hours.
It's funny that we had been looking to move up and opened our house for showing with appointments. It's very embarrassing when someone came in and hear a loud thump inside the wall in the middle of the living room. I told my wife please don't take a shower less than a couple of hours before an appointment.
If I had known that, I could just run a lot of cold water down the drain after a hot shower, until the noise stops. It's as quick as the noise starts.
I cut larger the holes in the studs where the drain pipes went through. But I can't do anything when the pipes go into the vertical wall. I suspect the pipe is pressed against a lot of studs along the height of the wall. I thought of opening the wall to cure that, or to cut out the pipes to add a flexible section. At the end, compared with doing nothing, with cutting out everything with no guarantee, I opted for the former. But I don't understand why in the first 10 years we don't have any expansion noise. Or did we not?
With one mystery solved, I went on to philosophies where the water came from. I concluded that it's the overflow drain hole. The seal or the pipes degenerates and water leak from there. My reason? When water drips down, it will look like coming from leaking pipe joints. And it takes over 5 minutes during a hot shower for hot water to condense in the drain cover and enough to run down the pipes outside.
Now I can see the water coming but then how is it so unpredictable? I'm much better than the plumber in this. My wife is a compulsive person. After summer vacation, she took a good bath, washed the bathtub, and used the shower head to spray and clean everything, including the overflow plate. That explained there were enough water to make a hole in the ceiling.
And that a compulsive person particularly like to flush a lot of clean water into some perceived dark and dirty places, like the overflow drain. That explains why nothing happened when I was observing under the tub, until my wife came along and until the end of her shower. She cleaned the bathtub!
So I read on the internet that the overflow seal is a common part to be replaced. I opened the cover plate and saw that it is. My tub wall look straight and flat so I tried to get a flat gasket instead of a tapered/bevelled one. Only the depot have the ones large enough for my grand old tub. I got one but it turned out to be tapered. I found only one on the internet that is flat. I ordered but never came. I asked online if the one at depot is flat. I ordered one before the manufacturer answered. All are tapered.
That wasted me a whole week when there is a big hole in my ceiling under ugly pipes. But then it dawned on me that a flat straight wall doesn't necessarily use a flat gasket. I tried to put in the tapered one and it seemed that it didn't fit. I looked at the old one fallen down through the ceiling. It was totally degenerated but it could be tapered. I opened the overflow drain cover again. I rotated the gasket upside down and there was a better fit. I was silly to put in the other way around and claim unfit. Then I rotate the gasket slightly to get the best fit. Then I closed the cover tight. I tested the seal with the shower head and then an overflowing tub. It worked. Just the overflow opening is not big enough to prevent overflow at maximum flow. But that's immaterial. We have children and will never fill a tub that way.
OK, everything explained, no serious damaged and everything fixed, except for the noise and hole in the ceiling. It also explains why there is some water stain at the ceiling in the garage under the 2nd bathtub. But I have no rush to fix that. I just told my wife don't do that to the other overflow drain until I change the gasket.
Wednesday, August 7, 2013
Reinforced PVC tube and perfect PVC cutting tools
I found out that to reinforce long PVC tubes I can just inert a 1/2" EMT conduit into a 3/4" PVC tube. The combined price is still less than a 2" by 4" piece of wood with the same length.
But why?
A PVC pipe is quite flexible if you look at a 3/4" piece with a length of over 6'. You can break it up into sections, adding supports in the middle. But those fittings are also the weak points. Sometimes you just need a straight long piece of pipe. Fittings are more expensive (stronger) than the pipes. You can go thicker but the price of pipe and fittings increase exponentially.
EMT conduit is much stronger and cheaper. However, there's no easy and neat and cheap way to fit them together. So I get best of both world by inserting a EMT into a PVC. For example, a reinforced 3/4" pipe can support an adult bicycle, while you can just put together such a shelf with only PVC fittings. Also you can add fancy couplings along the pipe without weakening the reinforced pipe.
The advantage of EMT pipe is that it can be cut easily. Saws are a pain, especially if you have a hand-held jigsaw. It dawn on me that there may be EMT pipe cutters that is specialized for the job. There are. They are the roller blade types for copper pipes. I use my copper pipe cutter on EMT pipes and it's good.
It dawned on me that why don't I use the copper pipe cutter on PVC pipes. Excellent. The shear types is convenient but it's increasing hard for thicker types. The edge will never be perfect - always at some angles to the pipe length rather than perpendicular.
Someone uses table saws for PVC, which is a mistake. Saws will generate heat, which will melt the plastic that is a environment concern. Pipe cutters have no saw dust to breathe in, and they are the most precise among saws and shears.
Friday, June 7, 2013
The last shower bath tub caddy you will ever need


I have to drill for body wash and shampoo holders. I have to drill for wash towel hangers, sponge holders. I have to drill for shaving accessories. And I have to drill for a shower head set for kids.
Finally I designed the ultimate shower / bathroom caddy. The basic frame is a T-shaped thing made of PVC pipes and fittings. You can add anything to it at the end points, or branch out at the tee fittings already built-in. All you need are 3 drill points for fixing the end points of the big T.
The main thing is the horizontal bar for hanging towels, lots of them. Each hook is made from a short section of PVC pipe, with part of it cut out leaving a finger like extrusion. The uncut section of the pipe sits into a tee coupling. I cut PVC using a cheap oscillator tool, which cuts like butter.
On the right is a platform for soap made from tee couplings. The inside of the tubes can also hold things, like a grout cleaning brush here. The gap between the pipes and the tile can also hold things like a razor.
The kid's shower head holder is an after thought. I cut a gap along the length of a tee coupling for the shower head tubing. It's not adjustable but a 45 deg bend is sufficient. Adults can also shower without wetting their hair.
At the drill points, screws hold flat PVC plugs in place. Tee couplings near the big frame are then pushed into the plugs with the help of a rubber mullet.
As the mounting was surprisingly perfect, I accidentally discovered the law of triangle mount. Thou shall not mount with 2 holes, not 4 holes or more, but 3 and only 3 holes. You first assemble the whole frame and trace the tee openings on the tiles where the plugs should go. Drill at the centre of the openings and also at the centre of the plugs.
Now, if you ever drilled on tiles before even with a tile bit, it's not possible to be precise. I would have thought 3 points will be a disaster. But it turns out to be perfect. Absolutely no wobbling. My theory is that the holes in the tiles, holes in the plug, and the plastic frame itself, all can give at least a little. Or you can say a little play. But ... once you can gently hammer the frame in place, there will be no wobbling, as if the drilled holes were in the perfect position. Say if one side of the triangle is too long for the holes, the other two side will help to fix that side in place. Only if you are too far off, you just need to replace some of the plugs with holes in better positions, until you can push the frame in.
I don't even need to seal the screw holes. The screw is covered by the PVC frame. The plugs act as seals. Water can get into the pipes and reach the screws. But the water level cannot rise high enough.
Also, if you cannot add enough things to this gadget, you can always pull the whole thing out from the plugs and do a complete redesign using the same 3 screws. There's absolutely no glues and other screws used. The whole thing is totally reusable and recyclable.
Saturday, May 18, 2013
Food grade instant insect killers for flying and crawling bugs
It is well known that diluted soapy solution kills ants instantly. It works well for other crawling insects. Spiders can't run away when it is slippery all around them. When bugs can't escape, it's up to you how to kill them. There are organic liquid soaps too so you can use food grade insecticides around food, pets and people.
I would think soapy solution works well for flying insects. But no. The first hit will slow down a fly a bit. You need a few more hits to ground them. They can recover once dried. So you have to kill them using other chemicals. 70% Rubbing alcohol is very effective. Just a drop or two you can see their body twisted into a mess in seconds. So a food grade killer will be Vodka. It doesn't smell like vinegar. It's easier to find than citric acid powders. No residue. It is actually a cleaner. It is also not new, just that I haven't come across it because I wasn't looking. I haven't yet find out how much dilution is still effective.
So for flying insects, I now use rubbing alcohol while not in the kitchen and Vodka otherwise. Also for spiders. Just one hit and you can kill them.
I used to spray lawn insect killers. Brain washed. There are no insects that eat grass that much. And if there are, they are most welcomed since I do not need to mow the grass that often. Ants don't live on lawns as long as it is regularly watered. They also don't get across lawns if there are no reasons to. Every year ants from the hills and neighbours all come to feast on the palm fruits/seeds. I don't bother anymore as I don't need them. If I remember I will cut and discard the fruits/seeds first.
They also come for the fruit trees. But my fruits are so big and the tree so tall I don't eat all of them. Some rots and some birds got them. Ants really don't consume that much in comparison. I don't even notice.
Fill cracks and voids with whatever you got, sand, lime, soil, glue, proper repair compounds. It is much more sensible than spraying. Anything that can be sprayed outdoors and claimed to be remaining effective outdoors for months are biochemical warfare that I won't touch. Even worse if the claims are indoors where I live.
Trash bag adapter Mark IV

Because the field modified dimensions last time wasn't updated on the spreadsheet, I was wrong by two inches. I find it useful to clip the trash bag onto the frame at two more locations, forming a hexagon. The new shape is better, if only there's less length for the trash bag to slack. So, there will be mark V with the clips replaced by tee's.
Defeating the Flushmaster patent: automatic toilet bowl cleaner

My previous improved version of the Flushmaster split the water from the fill tube into 2 paths, but still using the Flushmaster. It was a temporary fix for prove of concept. Once the concept is proven, using the Flushmaster is totally unnecessary, overly complicated, inconvenient, and unreliable.
Since my new design is patentable, I look up the patents reluctantly. Reluctantly because there's not much money to be made because everybody can build it for less than $1. But still, many people will still want to just buy and drop one in the tank and forget about it. Fortunately, Flushmaster has already patented the concepts in 2007, so I can disclose my findings immediately and not spend my time in the toilet business.
The current Flushmaster gadget is patented about 2001. Why they don't give you products with the new 2007 patent? Money! Now the refill cartridge sells for $7 (?) and last for about a month for a large family with older high flow toilets. That's totally not bad if you don't have a cleaner/house keeper. That's a steady revenue stream that the new produce will decimate. And if you see the new thing, probably you want to copy it for less than $1.
Overflow tubes are 1" pipes slightly narrower than standard PVC 1" pipes. So the whole thing is based on 1" pipes and fittings. In this final assembly, the Tee on the right just slides onto the overflow tube. Nothing is needed to modify permanently any existing fittings.
For this design, the chamber on the left stands on the tank bottom. This is not necessary. To secure the assembly in place all you need to do is to glue a 1" coupler to the Tee on right. That will hold anything securely in place using the overflow tube itself.
The whole assembly need to be water tight so the chemicals don't leak a lot into the tank. Since the assembly is not under any pressure, you can just use PVC glue to put them together without worries.
Water from the fill tube is split into two branches. The main branch goes into the top of the Tee on right, via a 1/4" hole, drilled with a plastic drill tip so it doesn't slip during drilling.
The 2nd branch fills the chemical chamber, via a dripper or flow restricter or narrower tube or you don't even need a 1st branch. When the chamber overflows, the cleaning solution goes into the flow tube.
Since the overflow tube and the 1" Tee is only loose fit, I put some plumber's pudding on the edge of the flow tube to seal, so chemicals can't leak into the tank. I don't think you need it because instead of NOT allowing drop-in-tank cleaner manufacturers to destroy flippers and gaskets, the new standard seems to require everything in the tank to withstand cleaner chemicals. I spend time for this new design because chlorine destroys drippers for gardening drip irrigation. It only lasted for a couple of months though it is dirt cheap.
If your fill valve ever malfunctions, water goes into the overflow tube horizontally via the Tee on right. The "critical fill level" changed a little but you can adjust it. I think this is or can be plumbing code compliance. A simpler gadget will be based on 3/4" pipes and fittings. A 3/4" tube goes nicely and tightly into the overflow tube. There is no possibility of leaks. But the effective overflow tube size is reduced to 3/4".
1" chlorine tablets simply drops into the chamber. But I am experimenting with something better. Let's see this in the tank. (The old Flushmaster is there totally unused.)

Recap: standard 1/4" pipes, for fridge icemaker or gardening drip irrigation goes straight into the white fill tube. Pick the slighter tougher ones and you can insert it far into the fill tube, forming a water tight joint. You also need a 1/4" tee and a dripper. I'm experimenting with the flow rate but currently I have a 2 GPH dripper.
I have an older version that uses 1" chlorine tablets.

Chlorine tablets can go through standard 1" pipes, tees and caps, but NOT plugs. So you have to allow enough space if you use plugs instead of caps.
I do not recommend expensive 1/4 tee's. It's easy to take the tubes out but only when not inside the tank for months. Drip irrigation tee's are much cheaper. If you ever need to disconnect the tubes, cut the tubes, discard the tee and the tubes.
To really reduce the chlorine smell, like any drain you can add a u-trap at the open tee. It's clumsy for 1" fittings but there's should be enough space for that. The u-trap should be refilled with fresh water every flush. The top level of the u-trap should be slight higher than the overflow tube so water will go into it rather than the tank.
Again, there's nothing wrong with the Flushmaster, but you can be environmentally friendlier. First, they use a lot more chemical than required. Their new patent sort of admitting that, or, you do not need to buy expensive slow dissolving tablets to avoid refilling too often. They design the rubber seal so flimsy that you cannot refill it yourself with chlorine tablets. You can at most reuse the o-ring a few times. I have yet to find o-ring in hardware store to fit without using pliers to twist the cartridge out. My design works at low pressure and you don't need any seals.
As for the new chemical, I can hint that it is very cheap and easy to find. If your tank is larger you can fit in a few chambers and you might not need to refill in a year's time. I have calculated the solubility of chemicals and nothing seem to last a week unless you make some large crystals so they dissolve much slower. But this is barking the wrong tree totally. You'll see.
Monday, April 22, 2013
Miracle liner for pet cage and anything else
The miracle liner is polyester film such as Duralar. It's like a sheet of paper but made of clear plastic instead.
The miracle? It's easier to work with than paper. It is tear and scratch resistance. It stays flat, better than non-slip. It's heat resistance and chemical resistance. It's low cost.
Even if you brought a huge roll, it stay flat when you unroll it. I know because I used it to cover the whole dinning table. It's clear and you can write on it. You can put it on a table or on the floor with a grid pattern on it. It's extremely easy to align and measure the exact size. Or you can trace the outline of the cage, or you can just cut freehand until the sheet fits the cage.
The sheet is slightly too thick for a paper cutter. But it's extremely easy to cut with scissors. It's easy to cut while following a straight line. It's easy to make a smooth cut whether you cut is straight or slightly curved in multiple parts. And since it's clear plaster, it's hard to notice that the cut is not perfect.
If the cage floor is reasonably fitted with a sheet from wall to wall, it's very difficult to take the sheet off because it stays flat from edge to edge, corner to corner. My bunny toss everything and attack steel wires but he couldn't do anything to the sheets. If the cage has some sort of "wall", it's better than non-slip liners. It just couldn't slip pass the walls.
The sheets are extremely easy to clean. I used rigid sheets before such as acrylic. I have to soak them in acid to get the rabbit poop off. It's a lot harder to cling onto flexible plastic sheets. When the poop are dry, they will almost fall off by themselves. Chemical free. I suspect that there is something to do with it's diet and the strong sun. In any case, this material is the most easy to clean stuff I ever used. It will return to it's flawless clear state after cleaning.
Because it is cheap, I stack several of them. It's non-slip even when stacked together. When the top one gets dirty, I just lift it off and expose the 2nd sheet. Then I dry the dirty sheet in the sun. If you want to wash it clean immediately, you need some acid such as vinegar and citric acid. Or, you can wipe the poop off with tissue paper whenever you see them. It's almost perfectly clear again once you wipe it.
The sheets are slippery so the naughtiness of the bunny is reduced a little.
My cage floor is made with perfectly pre-cut to size wood pieces. Polyester sheets are the perfect liner for that.
Monday, April 8, 2013
PVC pipe gadget techniques — no glue no screw
In building PVC pipe furniture and gadgets, glue or screws are often used. I doubt it is necessary, and arguably weaken the structures.
If you insert a standard PVC pipe into a standard PVC tee, all the way in with a rubber hammer, it's almost impossible to pull it out, even for the thinnest 1/2" CPVC pipes. To pull the pipe out, you have to have a clamp securely holding on to the pipe, and then twist the tee with hand or tools. You have to twist clockwise and anticlockwise until the joint come loose, and then the pipe can be taken out.
So, in your end structure, if you can't twist the pipe against the coupling by hand, and there's no direct force to pull the pipe straight from the coupling, you don't need any glue. This is easy to design and usually very natural thing to do. For example, if you have one pipe jointing with two tees at each end, and they are of different orientation, you can't twist the pipe against anything else since the tees are fixed in space in the end structure.
The only way you can twist the pipe is to use a clamp directly on the pipe. Even so, the force needed is great and don't do much damage since the pipe is still in the same position.
The disadvantage of glue is that it is usually toxic or at least contains some undesirable volatile compounds. It takes time to apply and dry. And the coupling cannot be reused. If you don't use any glue, when you change your mind about the design, you just need to cut the pipe and twist it out with pliers. All parts are reusable.
Some people drill through the coupling part and use bolt and nuts to prevent the joint from coming apart. Any drilling will weaken the coupling and the pipe. The nut and bolt will only be effective when the joint already come loose. They don't come loose if designed properly. In my roof top rack, a Christmas tree carrier, I don't even use glue or bolts.
Tips for plans. To be glueless, the plan has to be precise. I always use spread sheets to calculate the dimensions. You need the dimension of your structure modified by the dimensions of the couplings. For example, the top bar of the T character is about 2.5", the height of the vertical bar is about 11/16". The extra pipe length to insert into the tee socket is 3/4".
I always use standard tee's and occasionally 90 deg turns. They are much cheaper than the couplings designed for PVC furniture with more variety. Arguably the standard ones are better too. You can use two standard tee's to replace a 4 way coupling on the same plane, or a 3 way coupling in the x,y and z axis. Even though a standard tee joints everything on one plane only, if your dimensions are reasonably accurate, you can put together a cube quite nicely and squarely. You just hammer the pieces together with a rubber hammer and the pieces will fall in shape.
Tips for the ugly markings on the pipes. I don't know why but the cpvc markings can be easily removed with sand paper or steel wool. But it's almost impossible to remove the markings on white PVC pipes. Solvents will remove the markings but stain the white pipe with whatever colour the ink is. Most of my gadgets are by the wall and stationary. So I just need to turn the markings furthermost from the usual line of sight. It's almost totally hidden unless you go squarely at the back, which is impossible if the gadget is by the wall.
Tips for reusability and flexible joints. If the joint depth is 0.75", and you want to joint two tee's back to back together, the best pipe length is twice that at 1.5". If that part does not need to be structural and you want it to be taken apart with reasonable force, make the pipe length 1 1/4". If the joint is for the purpose of a "lock", that you may take it apart occasionally, make the pipe length 1", and insert the pipe all the way into the stationary coupling first. In this case, you can also make a hinge.
Thursday, April 4, 2013
Trash bag adapter Mark III

Mark I uses a wooden rectangular frame. It was too clumsy to detach the trash bag from it after full.
Mark II uses inexpensive clips to attach the bag to the edge of the cart. The clips aren't that secure. The bag slags. And tall bags are needed.
Now the new Mark III uses PVC pipes of course. Crius clips are used to attach the bag to the frame. Any known issues are improved.
Is it better than using a separate standard bin? Time will tell.
Sunday, March 31, 2013
Perfect low cost custom pet houses

I was going to custom made an acrylic house with all the easy to maintain gadgets. It would be perfect for indoors and outdoors and while we are on vacation. It was never done because the more I think, the more it's impractical.
Acrylic is expansive and you have to be precise to glue pieces together.
I have been building small PVC gadgets for a while and it suddenly dawn on me why I don't try to build a pet house from scratch.
I have been building very precise PVC pipe structures using only standard tee's at less than 30 cents a piece. PVC pipes are virtually free - less than $2 for 10 ft. With the help of a spread sheet, I can build very complex structures.
For pet house, the first problem is the floor. You can use pipe grids as the floor but still you need something to cover the gaps. You can use pipe grids for the walls but the total cost of tee couplings can be high, even at 30 cent a piece.
Wood is still the best choice for the floor. This bunny house is for indoors so I paid for a premium board, so I can nail ready made side guards on it to prevent spills. The board has to look smooth for indoors and can be painted if needed. For outdoors a flat particle board will do. The wood pieces are of standard dimension so I don't need to do any precise wood work (I can't as I only have a jigsaw).
For the walls I use 24 gauge galvanized steel wire forming a 2" grid. It turns out to be a great idea and looks neat too. It's easy to drill small holes into PVC pipes with a plastic bit. I sand the holes briefly with an oscillator tool.
It turns out that it's easy to tie the wire onto the pipes and tighten them. If you go around the same holes twice or more around the pipe, it will be securely attached. Add a Cirus clip on the endpoint and you can secure it further. After you tighten a length of wire, you can keep the tension by Crius clips as in the last post. Then you continue to wire and tighten the next part. You can wire the entire structure without one single wire without breaks. But for modularity I wire only one side at a time, and use separate wires for vertical and horizontal.
This bunny has been known to attack chicken wires and succeeded. He had a go on the steel wires but can't do anything to it, yet. Because the wires are hand tight, he managed to put his head through the grid, but fortunately not his feet at the same time. So, the cage is secure.
This cage is open top with walls two feet high. But I decided to put in a door so the kids can do the daily chores too. What you see in the middle is a toddler-proof door. I still have to add some legs so the vacuum cleaner hose can get under it. Also, it will be ideal if I don't need to bend down to feed him or clean the cage.
This is 20" by 3'. I'll build a 2'x4' for outdoors. It will be higher than the sprinklers can reach so we can put it in his yard without turning off some of the sprinklers.
You can clip anything on the pipes like sunscreen, rainproof sheets, blankets. The outdoor one will have a roof structure. You can see the Crius clips in the picture, near the lower left and right corners.
Crius clips - attaching anything thin or flexible to any pipes securely and economically

You can secure a thin or thick gauge steel wire to any pipe securely without slipping. There's no slipping.
You can attach a towel or a plastic sheet on to a length of pipe for shelter or projects. Not even high winds can detach it.
Say if your pipe is 1/2" PVC, pick the next size PVC pipe, which is 3/4". Use a pipe cutter to cut out about 1/4" length of pipe. From this O-ring, cut out about 90 deg, or a corner. The remaining PVC pipe is a Crius clip.
Place the C opening on the pipe you want to clip on. Push the clip on with your finger and it will go in easily. It takes two hands to take it back out.
The clip itself is always PVC pipe. The pipe to be clipped on to is not limited to any material. For example, for galvanized steel 1/2" EMT pipes, the best clip is to be made from 1/2" PVC pipes (the OD is slightly larger than the EMT pipes).
If you want to clip thick power supply cable or a thick carpet, use two size larger PVC pipes.
I'm into PVC and EMT gadgets and found numerous uses for this Crius clip.
Environment issues: The manufacturing and recycling of PVC involve toxic materials. PVC itself is stable and harmless as used in drinking water.
PVC and CPVC are supposed to replace expansive copper pipes. There's no going back to copper as I myself witness micro pores that can form on copper pipes. This is a nightmare as a leak can develop in any length of pipe. The leaking can continue for a long period undiscovered. The reason is still unknown.
The newer PEX are superior in many ways. But I heard that rats like them too?
PVC will be around for a while. They are also used to replace metal and wood window frames for energy efficiency. They are not that environmentally friendly but they last a long long time. They can be recycled too.
I can't find anything to replace PVC furniture. Metal couplings cost 10 times more, and they are bulky.
PVC produces toxic fumes when burned. Ironically PVC window frames and very popular.
There are ways to reduce PVC in furniture though. For pipes that don't need to be tight fit, you can use steel EMT pipes that is about the same price. You can still use PVC couplings but they won't exactly fit. You can use loose pipes, for example, for the horizontal support of beds. Or for vertical grids to keep things in.
Tuesday, January 29, 2013
The chemistry of baking soda and how to use it for hair
You can experiment on it. Baking soda reacts with oil similar to the process of soap making. Therefore thick layers of grease in the kitchen can be cleaned up in no time. You just rinse it off.
On the other hand, baking soda dissolved in water does nothing to oil. This is a common fact that most things that dissolve in water or oil, do not dissolve in both at the same time.
Baking soda is completely opposite to soap and detergents that works on surface, and have a hard time to work on bulk grease.
So BK is ideal especially for oily hair. If you apply BK to your scalp even after a week of nature camping with no shampoo, any oil and grease and odour disappear immediately. Because the whole mass of hair has so many surface area, it's impossible to strip too much oil from the hair shaft, which can eliminate the need for conditioner.
Dry BK is messy and mildly abrasive. So I use wash/rinse bottles with enough BK and water in it. I keep shaking while applying to guarantee enough solid BK delivered to the scalp.
BK is pretty safe. On a pH scale of 1 to 14, BK is at 8, one from neutral 7. BK is used a lot medically and often to neutralize acids and maintain a near neutral pH.
BK is of course you can say "natural" and therefore biodegradable. It doesn't degrade much as some form of sodium salt will always be there, which is natural occurring. BK with hydrogen and carbon dioxide atoms could be safer than common salt with chloride atoms.
There should not be long term effects if you always rinse thoroughly. And avoid excess stripping off body oil. It may be a good idea to neutralize BK with organic acid. Harmless sodium salts will be left and excess organic acid will degrade into something simple.
As for any shampoo and body wash, you may need conditioner and moisturizer for your scalp and skin.
Friday, January 25, 2013
The engineering approach to shampoo
After trying a lot of things, I recommend Nexxus or some other expensive shampoo with visible immediate results. I also recommend Dr Bronner's "pure liquid soap" as it seems to be gentle. Tresemme works for cheap. For the no-poo camp there is the baking soda. But use it carefully. Shampoo also depends on conditioner with different degrees. See, I'm totally unbiased.
Your hair type is critical, which explains that there are so many shampoos on the market. The scalp will produce body oil at the root carrying down to the shaft. After shampoo and drying, try fingering your scalp for a while and see how grease your finger tips feel. And try it the next day or longer if you don't wash your hair that often.
Do you need to disrupt the natural process that much? If your scalp don't produce enough oil for the long shaft, I would think it's easy to remedy, if you don't want to cut short your hair.
The problem with oily hair is that bacteria will feed on it, accelerate skin flaking and results in dandruff. I think that's from medical sources but that's not the universal cause for dandruff of course. That's not really a big deal as I have dandruff but I have great hair and they don't turn grey and they don't fall down. The other problem is that if you try fragrance free shampoo and not strong enough your head will smell weird. It could be all normal - that everybody's head will smell different and weird like without deodorant. But it's just not socially acceptable.
So be warned. If you go no-poo carelessly, you could get dandruff and your head can smell weird. It's hard to know if you have pre-existing conditions. If you wash your hair everyday with a normal fragrance shampoo, any flakes will be minute and you can't smell anything other than the shampoo.
People always say this is good if you have dandruff. But I really need somebody to say that I had dandruff, I used this, and dandruff never come back. A pharmacist say that you have to rotate with different dandruff shampoo to keep dandruff at bay. I have to wash my hair everyday so it makes little different whether I have dandruff or not. Nobody is going to split my hair repeatedly and watch and count the minute white spots floating down my hair.
Baking soda is many things to many people. If you use powder or paste, it can remove years of accumulated grease in your kitchen. If you use a teaspoonful or two per cup to rinse your hair, it may be too mild. Too mild that my head smells. My hair is great though. I will experiment some more. The stuff is just too convenient and cost next to nothing and so many people swear by it.
Never drop baking soda on your hair after oil treatment or vice versa. That's how to make solid soap. Your hair will be full of soap scum.
Dr Bronner's seems to be mild, even though it has lots of sud. But it's not very pure soap. I remembered it had some glycerin in it for moisturizer. But everything should be organic. As with pure soap for skin, if you don't have suitable conditioning, your hair can be messy. Whereas for Nexxus, if you hair type is one of those, your hair hardly need conditioning after the shampoo.
Whatever you use, you have to use it for a while to see the effect. For example, some conditioner coat your hair a bit. So if you change to some other systems, it takes time for the coating to disappear.
My great discovery is that, if you hair need detangling, and if you don't use conventional conditioner, it's a great time for detangling in the shampoo phase. Just use a detangling wet brush to comb your hair while there are lots of sud. In the following procedures, just don't mess up your hair again.
Subscribe to:
Posts (Atom)